Encountering the “Windows Resource Protection could not perform the requested operation” error can be frustrating. This message indicates a problem with Windows Resource Protection (WRP), a crucial system tool designed to protect core Windows files from corruption.
In this guide, we’ll explore the causes of this error and provide five effective solutions to fix it. Whether you’re a beginner or an advanced user, follow these step-by-step methods to restore your system’s stability and performance. 🚀
Understanding Windows Resource Protection (WRP)
Before exploring the solutions, it’s essential to understand the role of Windows Resource Protection (WRP). WRP is a built-in security feature in Windows designed to protect critical system files from unauthorized modifications or deletions.
How WRP Works:
- File Protection: WRP restricts access to essential system files using file permissions.
- Continuous Monitoring: It monitors changes and detects unauthorized alterations.
- Automatic Restoration: If a protected file is modified or corrupted, WRP restores it from a secure backup.
By ensuring that Windows always has a functional copy of essential files, WRP helps maintain system stability and protects against malware, ransomware, and other security threats.
Common Causes of the “Windows Resource Protection could not perform the requested operation” Error
This error typically occurs due to corruption within Windows system files. Several factors can contribute to this issue, including:
- Virus or malware infections 🦠
- Hardware failures (e.g., failing hard drives or RAM issues)
- Improper shutdown procedures (forcing shutdowns or sudden power loss)
- Corrupt or damaged system files ⚠️
- Incorrect file permission settings 🔒
- Windows Registry issues 🗂️
- Malware presence on your device
- A corrupted user profile 👤
Each of these underlying causes requires a specific solution. Let’s explore five effective methods to fix this error and restore system stability.
Method 1: Run the System File Checker (SFC Scan)
The System File Checker (SFC) is a built-in Windows utility designed to scan and repair corrupted system files. Follow these steps to fix the issue:
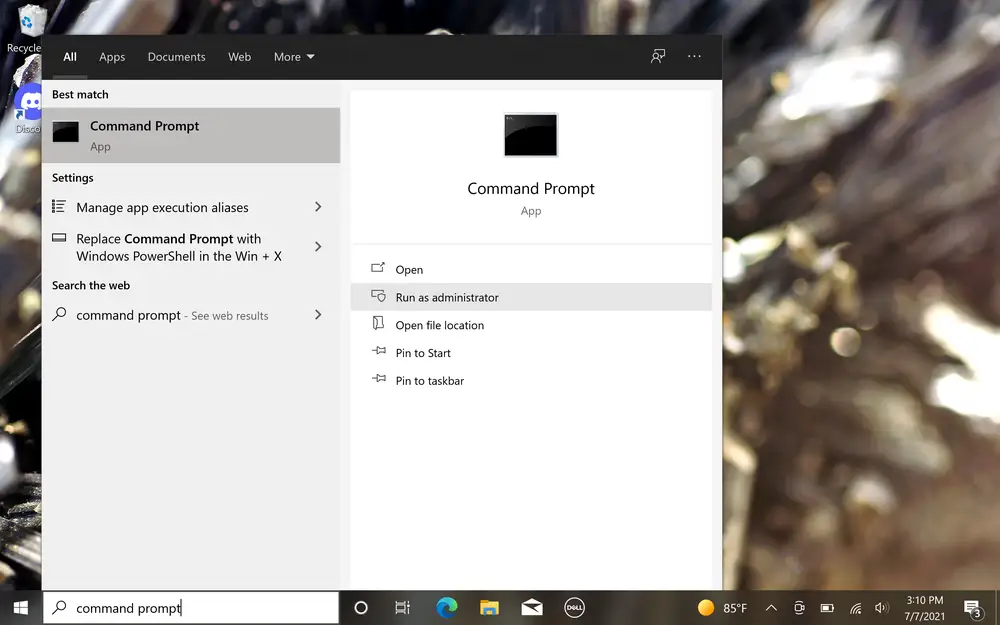
Step 1: Open Command Prompt as Administrator
- Click the magnifying glass icon in the taskbar or press Windows + S.
- Type “Command Prompt”, then right-click it and select “Run as Administrator”.
- If prompted by User Account Control (UAC), click “Yes”.
Step 2: Run the SFC Command
In the Command Prompt window, type the following command and press Enter:
sfc /scannow
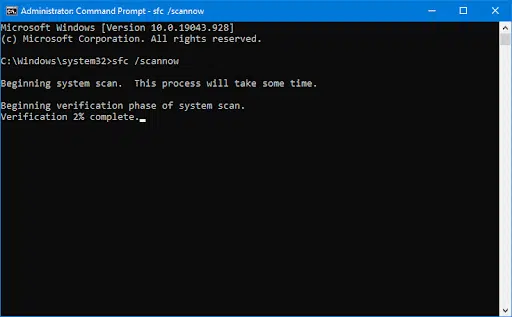
Step 3: Wait for the Scan to Complete
The System File Checker will scan for corrupted system files and automatically replace them if needed.
Step 4: Restart Your Computer
Once the scan is complete, restart your computer and check if the error is resolved.
Method 2: Utilize the “chkdsk” Command
The “chkdsk” command is a Windows utility that examines your computer’s hard drive for errors, including corrupt files and bad sectors. To utilize this command:
- Open the search bar by clicking the magnifying glass icon in your taskbar or pressing Windows + S.
- Type “Command Prompt” in the search box, right-click on it in the search results, and select “Run as Administrator” to grant administrative access.
- When prompted by UAC, click “Yes.”
- Enter the following command and press “Enter”: chkdsk C: /r
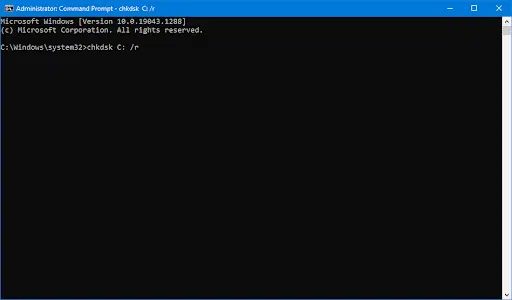
- Wait for the scan to complete.
Method 3: Start the Windows Modules Installer Service
If you’ve disabled the Windows Modules Installer service, the SFC Scan may not function correctly. To enable this service:
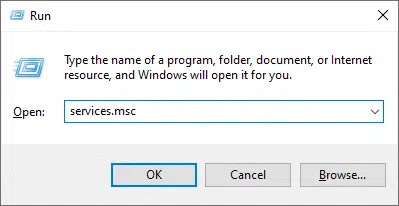
- Press Windows + R to open the Run utility.
- Type “services.msc” and click “OK” to open the Services window.
- Locate and right-click on the “Windows Modules Installer” service, then select “Properties.”
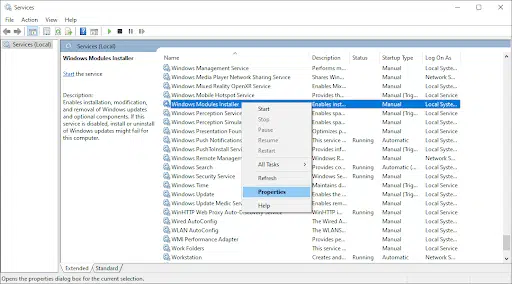
- Set the “Startup type” to “Manual.”
- If the service isn’t running, click “Start.”
- Click “Apply” and “OK.”
Check if the error persists. If so, proceed to the next solution.
Method 4: Run Automatic Repair From Advanced Startup
If previous methods fail, consider running an automatic repair. This built-in tool can resolve various issues with your Windows installation. To initiate the repair:
- Reboot your computer and hold the F8 key (or the Fn key, depending on your device) to access the Windows Recovery Environment (WinRE).
- Select “Troubleshoot” and then “Advanced options.”
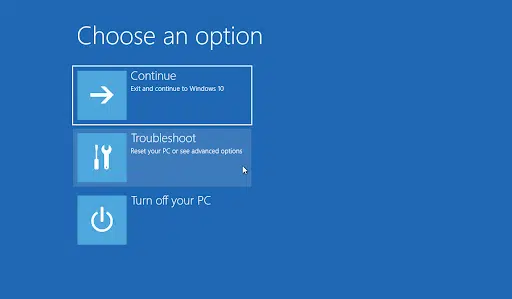
- Click “Startup Repair.” The tool will diagnose and attempt to fix problems affecting Windows’ functionality.
- Follow the on-screen instructions, and provide your local user account details if prompted.
Method 5: Reset or Refresh Windows
If the error persists, resetting Windows may be necessary. This process restores your computer to its default factory settings, resolving software-related issues.
⚠ Important: Back up your personal files, as they will be deleted during the reset.
To reset Windows:
- Click the Start menu, select “Settings”, and type “Reset” into the search bar.
- Click “Reset this PC” from the search results.
- Choose either “Keep my files” or “Remove everything” based on your preference.
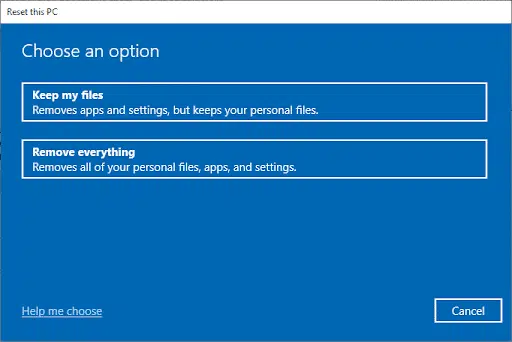
- Follow the on-screen instructions to complete the reset.
Conclusion
Encountering the “Windows Resource Protection could not perform the requested operation” error can be perplexing, but rest assured that various methods can resolve it. Start with the System File Checker (SFC) or the “chkdsk” command. If needed, enable the Windows Modules Installer service or run an automatic repair from Advanced Startup. As a last resort, consider resetting Windows.
We hope this article has provided valuable insights and guidance for resolving this error effectively. For more tech-related insights and solutions, explore our other blog articles. Thank you for reading, and we trust that this information has been helpful!
One more thing
If you’re in search of a software company that embodies integrity and upholds honest business practices, your quest ends here at Ecomkeys.com. As a Microsoft Certified Partner, we prioritize the trust and satisfaction of our customers. Our commitment to delivering reliable software products is unwavering, and our dedication to your experience extends far beyond the point of sale. At Ecomkeys.com, we provide a comprehensive 360-degree support system that accompanies you throughout your software journey. Your trust is our foundation, and we’re here to ensure that every interaction with us is a positive and trustworthy one.