If your hard drive isn’t showing up in Windows 10, don’t panic. This common issue can arise due to various causes, including connection problems, file system errors, drive letter conflicts, outdated drivers, or detection issues with internal or external drives. Your hard drive is essential for storing files, software, and the Windows 10 operating system, so resolving this issue is crucial.
In this guide, we’ve compiled several solutions to help you fix the problem and get your hard drive recognized by This PC or Disk Management. Follow the steps below to troubleshoot and restore your drive functionality.
How to Fix Windows 10 Not Recognizing My Hard Drive
If Windows 10 doesn’t recognize your hard drive, don’t worry – it’s a common issue. Whether you’re setting up a new system or dealing with an existing setup, this guide will help you troubleshoot the problem in easy-to-follow steps.
Why Does Windows 10 Not Recognize My Hard Drive?
If your internal hard drive isn’t showing up, it could be due to a variety of reasons such as not initialized, requiring formatting, or connection issues. Ensure your disk is properly connected to the motherboard using the correct SATA cable. Sometimes, BIOS settings might also cause your HDD to remain invisible in Windows 10.
Whether your drive is internal or external, new or old, it can suddenly fail to show up in File Explorer or Disk Management. Don’t panic – this is one of the most common problems faced by Windows 10 users.
Steps to Troubleshoot and Fix Windows 10 Not Recognizing Your Hard Drive
The issue may be a minor inconvenience or something more serious, such as a malware infection. If your device still boots, there’s likely no need to worry—your disk is still operational. However, if Windows 10 fails to boot from the drive, you risk losing access to important files.
The good news is that the problem can often be resolved, and we’ll guide you through the potential fixes to restore your drive and save your files. Let’s begin by identifying the source of the problem.
If you encounter the issue of Windows 10 hard drive not showing up, you might see it in Disk Management as uninitialized or unallocated space. Here’s how you can fix it:
- Right-click “This PC” in Windows 10 File Explorer and select “Manage.”
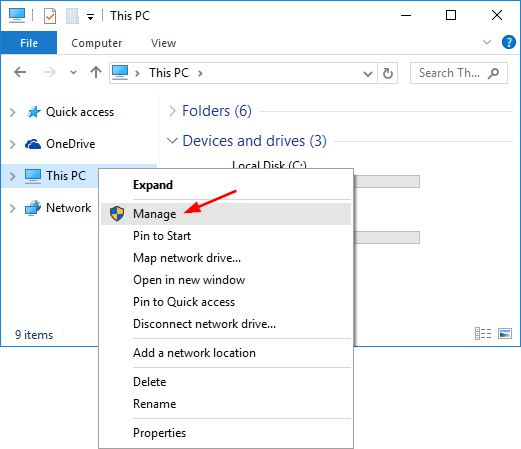
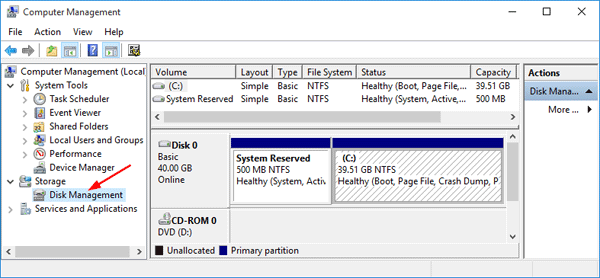
- In the “Computer Management” window, go to “Disk Management.”
- Locate the missing hard drive. If it appears as uninitialized or unallocated, right-click the drive and select “Initialize Disk.”
- In the dialog box, select the drive you want to initialize and choose either MBR (Master Boot Record) or GPT (GUID Partition Table) as the partition style, then click OK.
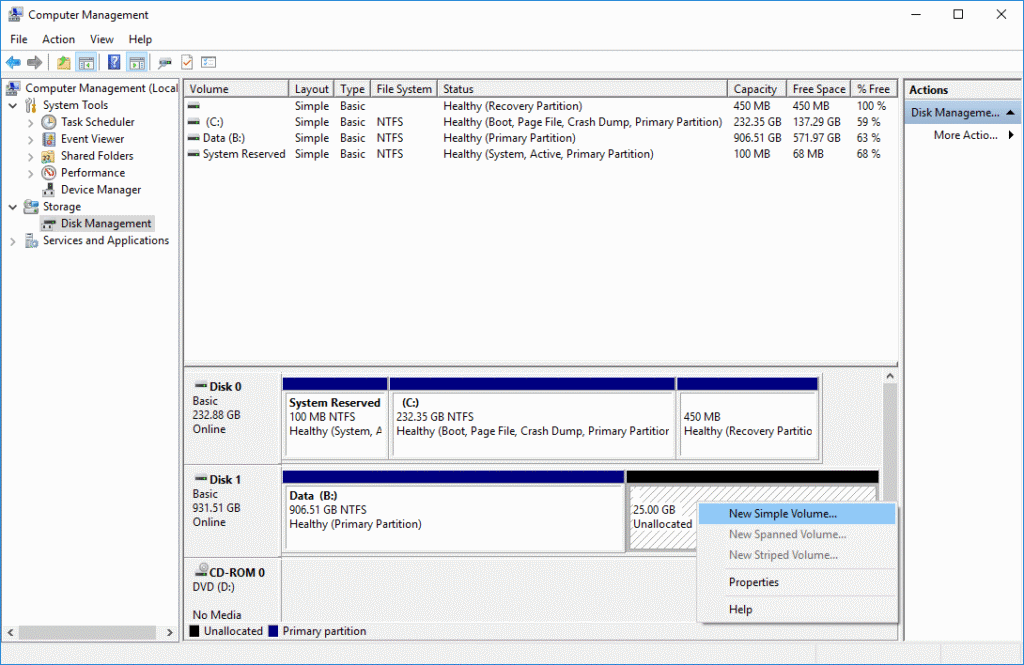
If your hard drive shows unallocated space, follow these steps to create a partition:
- Right-click the unallocated space in Disk Management and select “New Simple Volume.”
- Follow the New Simple Volume Wizard by clicking Next to proceed.
- Specify the volume size, assign a drive letter, and format the partition to make it usable.
These steps will help you initialize the disk, create partitions, and get your hard drive recognized and ready for use in Windows 10.
How to Fix New Hard Drive Not Detected on Windows 10
If your new hard drive is not detected by Disk Management or in Windows 10, there are several potential causes such as connection issues, driver problems, or incorrect BIOS settings. Fortunately, these issues are usually fixable. Let’s go through the solutions step by step to get your hard drive recognized again.
1. Check Your Connection
The first and easiest step is to ensure that the hard drive is properly connected. Often, the issue is as simple as a loose or faulty cable. Here’s what you can do:
- Use a SATA cable: If you’re connecting the drive via a USB cable, try switching to a SATA cable. SATA connections are generally more reliable for internal drives.
- Try different ports: Sometimes, the issue could be with the port itself. Try connecting your hard drive to a different SATA port on your motherboard.
- Test on another computer: If possible, connect the hard drive to another computer. This can help you determine whether the problem lies with the hard drive, your current PC, or the cables used. If the drive works on another computer, the issue is likely local to your device.
2. Update Your Drivers
If your new hard drive is still not recognized, you may need to update its drivers. Since the hard drive isn’t showing up in Device Manager, you cannot update it directly by right-clicking and selecting “Update driver.”
Here’s what to do:
- Visit the official support site of the hard drive manufacturer.
- Search for the latest drivers for your specific model.
- Download and install the correct driver for your device. This will ensure that Windows 10 can properly communicate with the drive.
3. Enable Hard Drive in BIOS
Sometimes, the issue could be related to BIOS settings, where the hard drive is disabled in the system firmware. To check and fix this:
- Restart your computer.
- During startup, press the BIOS key (usually F2, Delete, or Esc depending on your motherboard) to enter the BIOS settings.
- In the BIOS menu, use the arrow keys to navigate to the Integrated Peripherals section.
- Select USB Controller and check if it’s disabled. If so, change the setting to Enabled.
- Save the changes and exit the BIOS.
- Restart your computer and check if the hard drive is now detected.
4. Additional Troubleshooting Tips
- Check Disk Management: Right-click This PC and choose Manage. Go to Disk Management to see if your hard drive appears there. If it’s not initialized or shows as unallocated, you’ll need to initialize it or create a new partition to make it usable.
- Format the Disk: If the disk is showing up but isn’t usable, you might need to format it. Right-click on the unallocated space in Disk Management and select New Simple Volume to format the drive.
- Inspect for Faulty Hardware: If you’ve tried all the above steps and the hard drive still isn’t detected, it’s possible the hard drive is defective. Consider testing it with another system or trying a different hard drive in your current setup to verify if your system is working properly.
By following these steps, you should be able to resolve most issues with a new hard drive not being detected on Windows 10. If the problem persists, the drive may need to be replaced or repaired.
How to Fix Windows 10 Hard Drive Not Visible
If your hard drive is not showing up in Windows 10 without an error warning, don’t panic—this is a fairly common issue. This typically happens with used drives, but it can occur with new ones as well. The problem could be due to conflicts, unallocated space, or driver errors. Here’s a step-by-step guide to troubleshoot and resolve the issue.
Method 1: Check Disk Management
Start by verifying if the hard drive is recognized in Disk Management.
- Right-click This PC and choose Manage.
- Select Disk Management from the left-hand menu.
- Look for the missing hard drive in the Disk Management window.
If the disk is visible in Disk Management but not in File Explorer, it may not have a drive letter assigned, or it could be unallocated space.
Method 2: Assign a Drive Letter
If the hard drive appears in Disk Management but doesn’t show up in File Explorer, it could be due to the absence of a drive letter. To resolve this:
- Right-click on the disk in Disk Management.
- Select Change Drive Letter and Paths.
- In the window that appears, click Add and choose a letter for the drive.
- Click OK to confirm.
Once a drive letter is assigned, the hard drive should appear in File Explorer.
Method 3: Check for Unallocated Space
Sometimes, the hard drive may show up as unallocated space in Disk Management. This means that the drive doesn’t have a partition yet, and you’ll need to create one. Here’s how to do it:
- Right-click the unallocated space in Disk Management.
- Select New Simple Volume.
- Follow the New Simple Volume Wizard to create a new partition, assign a drive letter, and format the drive.
After completing these steps, your drive should be accessible in File Explorer.
Method 4: Update or Reinstall Drivers
An outdated or corrupted driver can also cause the hard drive not to show up in Windows 10. Here’s how to update or reinstall the drivers:
- Right-click the Start menu and select Device Manager.
- Expand the Disk Drives section.
- Right-click your hard drive and select Update Driver.
- Choose Search automatically for updated driver software.
If that doesn’t work, you can try uninstalling the driver and rebooting your system. Windows should automatically reinstall the correct driver upon restart.
Method 5: Check for Disk Conflicts
Sometimes, disk conflicts can prevent a hard drive from showing up in Windows 10. Check the Disk Management window for any errors or issues with the drive status, such as “Offline” or “Not Initialized.” If so, right-click the drive and select Online or Initialize Disk.
Method 6: Check Your Cables and Ports
Faulty SATA cables or USB ports could also be the cause of your drive not appearing in Windows 10. Check the physical connection between your drive and your computer. Try using different cables or ports to rule out hardware issues.
Method 7: Format the Drive
If your hard drive is still not visible or accessible, and you’ve ensured there’s no unallocated space or drive letter conflicts, it may be necessary to format the drive. This will erase all the data on the drive, so ensure you have a backup of any important files.
To format the drive in Disk Management:
- Right-click the drive and select Format.
- Follow the on-screen instructions to format the drive with your preferred settings.
Once the format is complete, the hard drive should be visible and accessible in File Explorer.
Final Thoughts
We hope this guide was informative and helpful in resolving your hard drive issues in Windows 10. If you’re still facing difficulties or have more questions, feel free to return to our website for additional tips and solutions to fix various Windows errors.
Additionally, be sure to explore our exclusive deals on Microsoft Office software and take advantage of our other helpful guides and articles to enhance your computing experience. Stay tuned for more expert advice to keep your system running smoothly!
One more thing
If you’re in search of a software company that embodies integrity and upholds honest business practices, your quest ends here at Ecomkeys.com. As a Microsoft Certified Partner, we prioritize the trust and satisfaction of our customers. Our commitment to delivering reliable software products is unwavering, and our dedication to your experience extends far beyond the point of sale. At Ecomkeys.com, we provide a comprehensive 360-degree support system that accompanies you throughout your software journey. Your trust is our foundation, and we’re here to ensure that every interaction with us is a positive and trustworthy one.