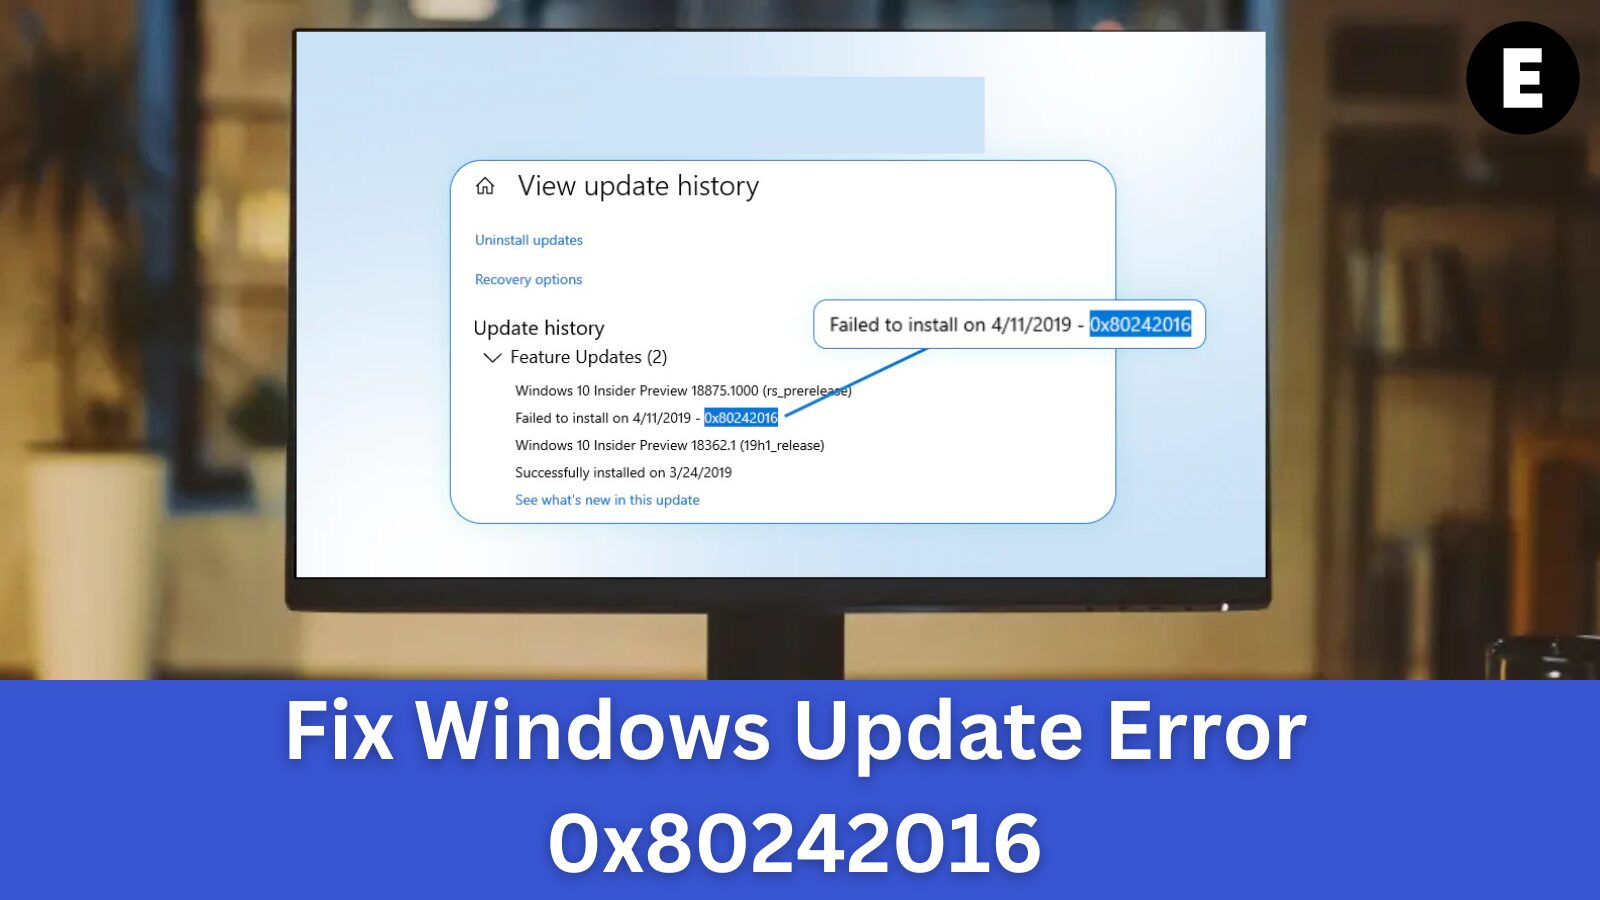
Windows is notorious for its various quirks and errors, with one of the most common being error 0x80242016. This error typically appears when you’re trying to install a new update, leading to frustration.
When you encounter error 0x80242016 while attempting to install updates on your Windows 10 or Windows 11 system, it indicates that the update installation has failed.
This error can be triggered by several factors, such as incorrect registry values, corrupted system files, or incompatible hardware. In this article, we will guide you through the steps to resolve the “0x80242016 – failed to install” error.
If you’re encountering the 0x80242016 error while trying to install a program on your Windows computer, don’t worry—this issue is easily fixable. Follow the instructions provided below, and you’ll be able to fix the problem quickly.
Understanding Error Code 0x80242016 in Windows
If you’re encountering error 0x80242016, it indicates an unexpected state after a post-reboot operation, as noted in the Windows Update error 0x80242016 logs. The error log may show the message WU_E_UH_POSTREBOOTUNEXPECTEDSTATE.
Users facing this error might miss important updates, including critical bug fixes and performance enhancements. Keeping your Windows system up to date is vital for avoiding security vulnerabilities and enjoying the latest features.
Therefore, resolving this error code is crucial to successfully installing Windows updates. If you’re experiencing this issue and need assistance, this guide is for you!
What Are the Causes of Error 0x80242016 – Failed to Install?
There are several potential causes for the 0x80242016 error, including:
- Incorrect Registry Values: The Windows Registry is a critical database storing system configuration data. If the registry values become corrupted, it can disrupt the update process and cause errors like 0x80242016.
- Corrupted System Files: Corrupt system files on your computer can interfere with the successful installation of updates, leading to errors during the update process.
- Incompatible Hardware: Sometimes, the hardware on your PC may not be compatible with the update you’re attempting to install, causing the update to fail.
- Proxy Server Issues: Using a proxy server to connect to the internet can sometimes lead to issues during the update process, including errors like 0x80242016.
- Third-party Antivirus Software: In some instances, third-party antivirus software may block or interfere with the Windows Update, preventing the installation from completing successfully.
- Corrupted Temporary Files: During the update process, temporary files are created. If these files become corrupted, it can cause issues that result in the 0x80242016 error.
These are just a few of the possible causes for the 0x80242016 error. To fix this issue, you’ll need to troubleshoot each of these potential causes to identify the root cause of the problem and resolve it effectively.
How to Resolve Error 0x80242016 – Installation Failed
If you’re encountering the 0x80242016 error, several potential solutions can help resolve the issue. Here’s a summary of how to fix the Windows Update Error 0x80242016:
- Install the update in clean boot mode
- Run the Windows Update Troubleshooter
- Perform DISM and SFC scans
- Reset Windows Update components
- Temporarily disable third-party antivirus software
- Disable your proxy connection
- Restart relevant Windows services
- Manually download and install updates
By following these steps, you can effectively address the 0x80242016 error and successfully install updates on your system.
Method 1: Install the Update in Clean Boot Mode
One of the most effective ways to fix the 0x80242016 Windows Update error is by installing the update in Clean Boot Mode. This process disables all non-essential programs and services, preventing potential conflicts that may be causing the update to fail.
Steps to Enter Clean Boot Mode:
- Press
Windows + Rkeys to open the Run utility. - Type
"msconfig"(without quotes) and pressEnter. This will launch the System Configuration window.

- Go to the “Services” tab and check the box for “Hide all Microsoft services” to filter out system services.
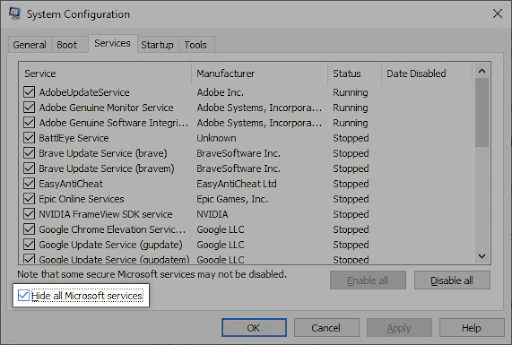
- Click the “Disable all” button to turn off all third-party services.
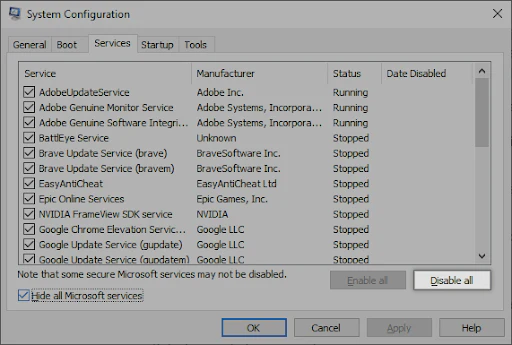
- Press “Apply” and restart your PC to enter Clean Boot Mode.
- Try updating Windows while in Clean Boot Mode and check if the error persists.
By performing a clean boot, you eliminate third-party interference, making it easier to successfully install Windows updates.
Method 2: Run the Windows Update Troubleshooter
If you’re still encountering the 0x80242016 Windows Update error, running the Windows Update Troubleshooter can help detect and resolve issues preventing updates from installing successfully.
Steps to Run the Windows Update Troubleshooter:
- Open the Search Bar by clicking the magnifying glass icon in the taskbar or pressing
Windows + S. - Type
"Control Panel"in the search box and click on it from the results.

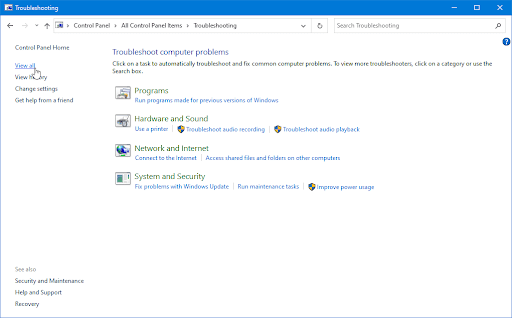
- Use the search bar in the top-right corner to look for “Troubleshoot”, then click on the “Troubleshooting” option.
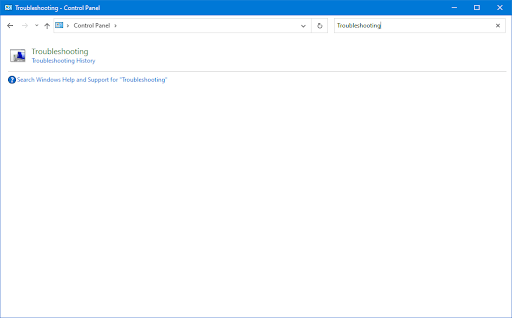
- Select “View all” from the left-hand panel to display all available troubleshooters.
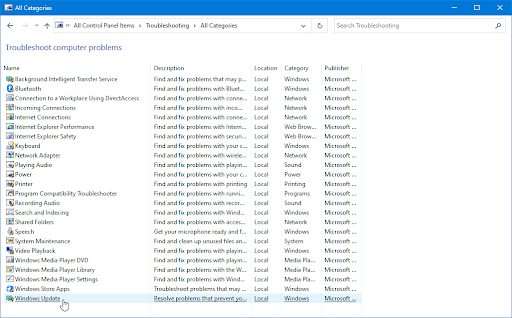
- Locate the “Windows Update Troubleshooter”, then click on it to launch the tool.
- Press “Next” to start the diagnostic process. The troubleshooter will detect issues and attempt to fix Windows Update errors automatically.
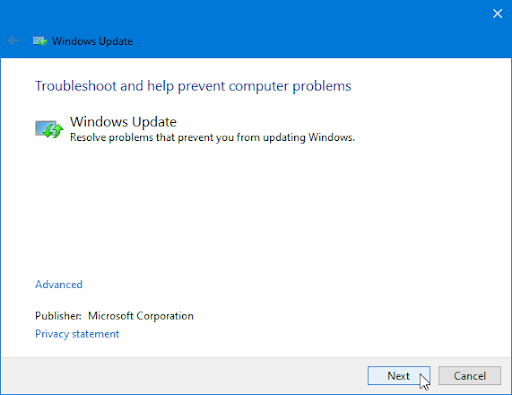
- Review the troubleshooting report and follow any suggested actions.
This method helps resolve common Windows Update installation errors, ensuring a smoother update process.
Method 3: Run the System File Checker (SFC Scan) to Fix Corrupt Files
If you’re still encountering the 0x80242016 Windows Update error, running the System File Checker (SFC scan) can help detect and repair corrupt or missing system files that might be causing the issue.
Steps to Run the SFC Scan:
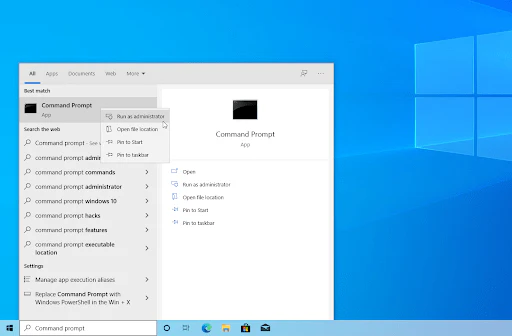
- Open the Search Bar by clicking the magnifying glass icon in the taskbar or pressing
Windows + S. - Type
"Command Prompt"in the search box. When you see it in the results, right-click on it and select “Run as Administrator.”
- If prompted by the User Account Control (UAC), click “Yes” to allow admin access.
- Type the following command and press
Enterto execute it:sfc /scannow
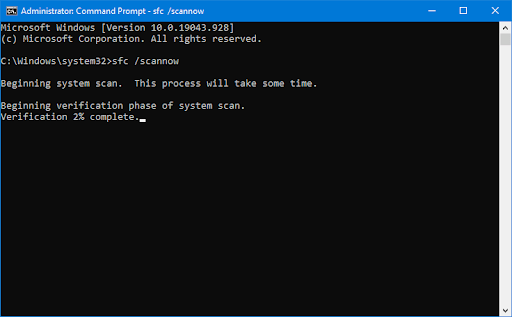
- Wait for the scan to complete. The tool will identify and repair any corrupt system files automatically.
- Restart your computer and check if the update error is resolved.
Method 4: Run the DISM Command to Repair Windows Update Components
If the SFC scan doesn’t fix the Windows Update error 0x80242016, you can use the Deployment Image Servicing and Management (DISM) tool to repair Windows Update component store corruption.
Steps to Run the DISM Command:
- Open the Search Bar (
Windows + S), then type"Command Prompt"and run it as Administrator. - If prompted by the UAC, click “Yes” to grant admin permissions.
- Type the following command and press
Enter:DISM.exe /Online /Cleanup-image /Restorehealth - Wait for the process to finish. The tool will scan and repair Windows Update-related issues.
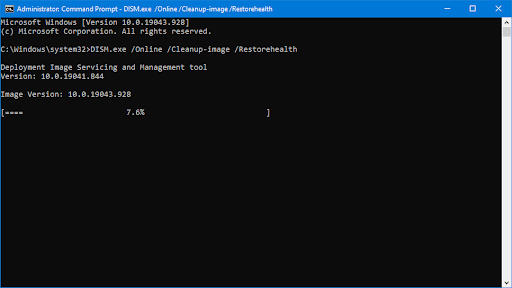
- Restart your device and check if the update can now be installed successfully.
Using SFC and DISM together ensures that your Windows system files and update components are properly fixed, helping to resolve the 0x80242016 Windows Update error efficiently.
Method 5: Reset Windows Update Components to Fix Installation Issues
If you’re still facing the 0x80242016 Windows Update error, resetting the Windows Update components can help by clearing the update cache and resolving any corrupt update files that may be causing the issue.
Steps to Reset Windows Update Components:
- Open the Search Bar (
Windows + S) and type"Command Prompt". - Right-click on Command Prompt and select “Run as Administrator.”
- Stop Windows Update Services by entering the following commands one by one, pressing
Enterafter each:net stop wuauserv net stop cryptSvc net stop bits net stop msiserver
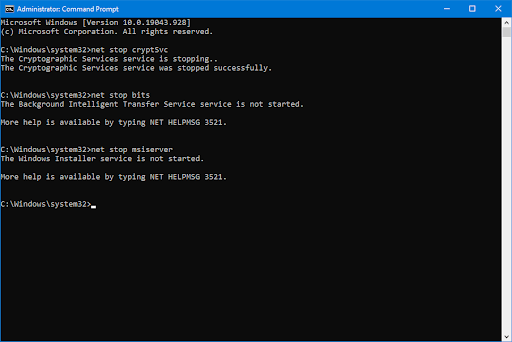
- Rename Windows Update Cache Folders to create a backup, which allows Windows to regenerate fresh copies:
ren C:\Windows\SoftwareDistribution SoftwareDistribution.old ren C:\Windows\System32\catroot2 catroot2.old

- Restart the Windows Update Services by entering these commands one at a time and pressing
Enterafter each:net start wuauserv net start cryptSvc net start bits net start msiserver - Close the Command Prompt and restart your computer.
- Run Windows Update again to check if the issue is resolved.
Resetting Windows Update components is a powerful fix for update failures, ensuring a smooth update process and resolving errors like 0x80242016 efficiently.
Method 6: Temporarily Disable Your Antivirus to Fix Windows Update Error 0x80242016
If you’re experiencing Windows Update error 0x80242016, your third-party antivirus software may be interfering with the update process. Temporarily disabling your antivirus can help determine if it’s the cause of the issue. Once the update is installed successfully, consider adding an exception for Windows Update in your antivirus settings.
How to Disable Your Antivirus Temporarily:
- Open Task Manager:
- Right-click on an empty space in your taskbar and select Task Manager from the menu.

- Go to the “Startup” tab:
- Click on the Startup tab in the header menu at the top of the window.
- Find Your Antivirus Program:
- Scroll through the list to locate your antivirus software.
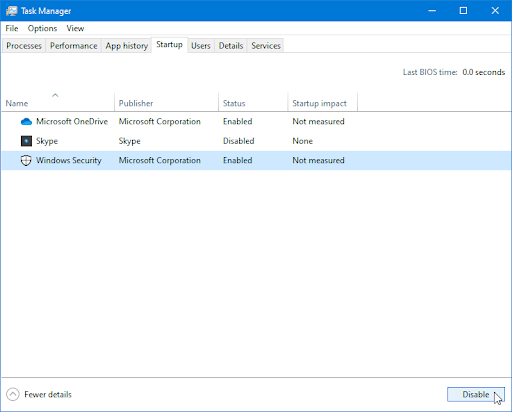
- Disable the Antivirus on Startup:
- Click on your antivirus program to select it.
- Click the “Disable” button in the bottom-right corner of the window.
- Restart Your Computer:
- Reboot your PC and then attempt to install the Windows Update again.
If the update installs successfully, you may need to adjust your antivirus settings to prevent future conflicts with Windows Updates.
Method 7: Disable Proxy Connection to Fix Windows Update Error 0x80242016
Using a proxy server can sometimes interfere with Windows Update, leading to the 0x80242016 error. Disabling your proxy connection may resolve the issue and allow updates to install successfully.
How to Disable Your Proxy Connection:
- Open the Search Bar:
- Click on the magnifying glass icon in your taskbar or press Windows + S on your keyboard.
- Access Internet Options:
- Type “Internet Options” in the search box and select the first result.
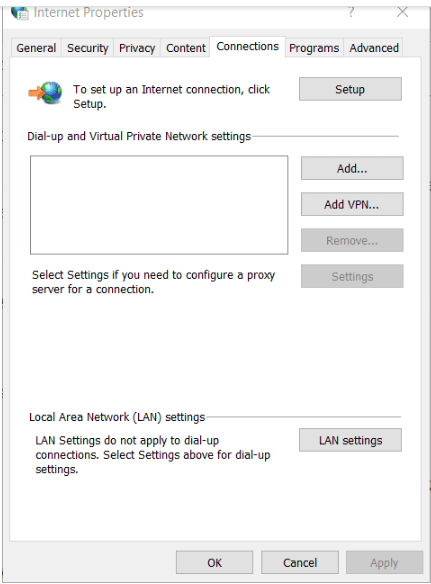
- Go to the Connections Tab:
- In the Internet Properties window, switch to the “Connections” tab.
- Click on the “LAN Settings” button.
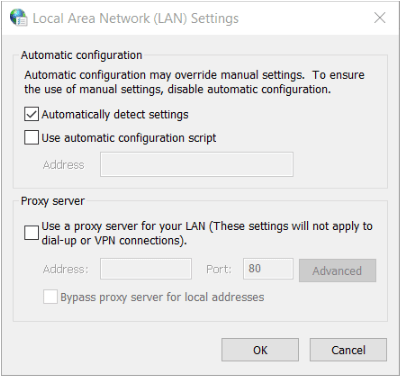
- Disable Proxy Server:
- In the Local Area Network (LAN) Settings window, find the option “Use a proxy server for your LAN”.
- Uncheck the box if it’s enabled.
- Apply Changes & Restart:
- Click OK to save changes.
- Restart your computer and try installing the Windows Update again.
By disabling your proxy connection, you eliminate potential conflicts that may prevent Windows Updates from downloading and installing properly.
Method 8: Start Essential Windows Services to Fix Update Error 0x80242016
If you’re encountering Windows Update error 0x80242016, it might be due to a Windows service that isn’t running. Ensuring that the necessary services are enabled can help resolve the issue.
How to Start Required Windows Services:
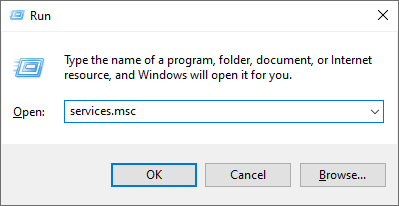
- Open the Run Dialog:
- Press Windows + R on your keyboard.
- Launch Services Manager:
- Type “services.msc” (without quotes) and hit Enter.
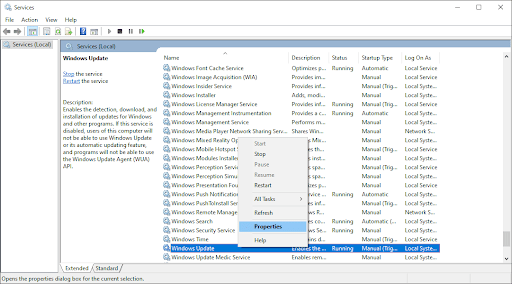
- Find the Windows Update Service:
- Scroll down the list until you see Windows Update.
- Right-click it and select Properties.
- Enable the Service:
- Locate Startup type and set it to Automatic.
- Click Apply and OK.
- Restart Your PC:
- Close the window and restart your computer to apply the changes.
Method 9: Manually Download & Install Windows Updates
If you’re still facing error code 0x80242016, you can try manually downloading and installing the required Windows updates from the Microsoft Update Catalog.
How to Manually Install Windows Updates:
- Visit the Microsoft Update Catalog:
- Go to Microsoft Update Catalog.
- Search for the Update:
- Enter the KB number of the missing update and press Search.
- Download the Update:
- Select the correct update for your Windows version and architecture (x64 or x86).
- Install the Update:
- Once downloaded, double-click the file and follow the on-screen instructions.
- Restart Your PC:
- After installation, restart your computer and check if the error is resolved.
TL;DR: How to Fix Windows Update Error 0x80242016
- Ensure your PC meets system requirements for installing the update.
- Reset Windows Update components to clear the update cache.
- Run SFC and DISM scans to fix system file corruption.
- Use the Windows Update Troubleshooter for automatic error detection.
- Disable third-party services and proxy settings that might interfere with updates.
- Manually download and install updates from the Microsoft Update Catalog if the error persists.
Conclusion
We hope these solutions helped you fix Windows Update error 0x80242016 and successfully install your updates. Keeping Windows up to date is essential for security, performance, and new features.
For more troubleshooting guides and tech tips, check out our other blog posts to keep your system running smoothly! 🚀
One more thing
If you’re in search of a software company that embodies integrity and upholds honest business practices, your quest ends here at Ecomkeys.com. As a Microsoft Certified Partner, we prioritize the trust and satisfaction of our customers. Our commitment to delivering reliable software products is unwavering, and our dedication to your experience extends far beyond the point of sale. At Ecomkeys.com, we provide a comprehensive 360-degree support system that accompanies you throughout your software journey. Your trust is our foundation, and we’re here to ensure that every interaction with us is a positive and trustworthy one.