
Are you encountering the frustrating “DNS Server Unavailable” error message? Don’t panic! This common issue can be easily resolved. In this guide, we’ll cover 9 proven methods to get your internet connection back up and running in no time!
Nobody wants to face the dreaded “DNS Server Unavailable” error. But what does it mean? Why does it happen? And, more importantly, how can you fix it? In this blog post, we’ll answer these questions and walk you through actionable steps to quickly resolve the issue and restore your internet access.
First, it’s essential to understand what DNS servers are and why they’re critical. A DNS server acts as the internet’s “phone book,” translating web addresses (like www.example.com) into IP addresses, enabling your computer to connect to websites.
If a DNS server is malfunctioning, your device won’t be able to access any website, resulting in the “DNS Server Unavailable” error message. But don’t worry! There are several methods you can try to fix the problem and get back to browsing the web.
9 Ways to Solve the “DNS Server Unavailable” Error
There are several potential causes for the “DNS Server Unavailable” error on your computer. It could be due to a DNS server outage, incorrect DNS settings, or other network issues. But don’t worry—there’s hope! In this article, we’ll walk you through 9 proven methods to resolve this issue and get your internet connection back on track quickly.
Method 1: Restart Your Computer and Router
A simple but effective fix for many computer and internet problems is restarting your system. You can also reboot your router to start with a clean slate and potentially fix the issue. Here are the steps to restart both your PC (Windows 10) and router:
Restart Your PC
- Click on the Windows icon in the bottom-left corner of your screen to open the Start menu.
- Click on the Power option, then select Restart. This will close all your open applications and fully restart your computer.

Restart Your Router
- Locate the power button on your router and turn it off.
- Wait for about 5 minutes to allow the router to shut down properly.
- Turn the router back on.
After your PC and router have restarted, check your network connection to see if the DNS error is resolved. If the problem persists, continue with the following steps for more solutions!
Method 2: Temporarily Disable Your Antivirus
Antivirus software can sometimes interfere with your internet connection or block essential services, leading to issues like the “DNS Server Unavailable” error. To check if your antivirus is causing the problem, you can temporarily disable it. However, use caution, as your computer will be unprotected during this time.
Note: Disabling your antivirus is not recommended for extended periods, as it leaves your system vulnerable. Only proceed if you’re aware of the potential risks and have a backup of your system to restore in case any issues arise.
Steps to Temporarily Disable Antivirus:
- Right-click on an empty space in your taskbar and select Task Manager.
- If Task Manager opens in compact mode, click on the “More details” button to expand it.
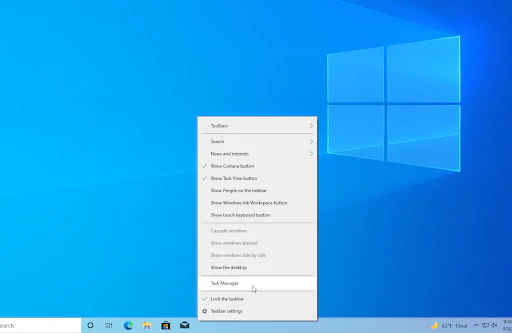
- Go to the Start-up tab from the top menu.
- Look for your antivirus application in the list. Click on it to highlight it.
- Click the Disable button in the bottom-right corner to prevent it from starting automatically when your computer boots.
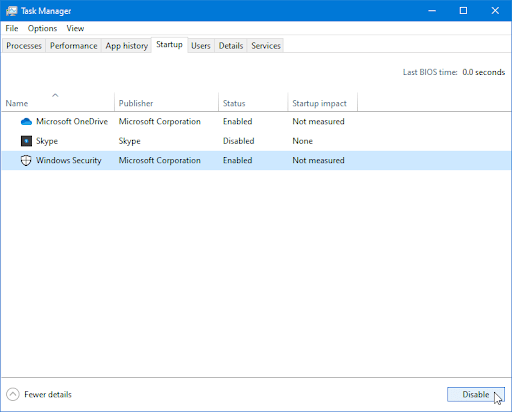
- Restart your computer.
Once your computer has restarted, check if the DNS error is resolved. If the issue persists, follow the next troubleshooting methods!
Method 3: Flush DNS with the Command Prompt
If your DNS cache is outdated, it can cause issues like the “DNS Server Unavailable” error. Flushing the DNS cache can often resolve these problems by clearing out any temporary files that might be interfering with your internet connection. This method is quick and can be done in just a few minutes using Command Prompt.
Steps to Flush DNS:
- Open the search bar in your taskbar by clicking on the magnifying glass icon (or press Windows + S).
- Type Command Prompt in the search box. When you see it in the results, right-click on it and choose Run as Administrator.
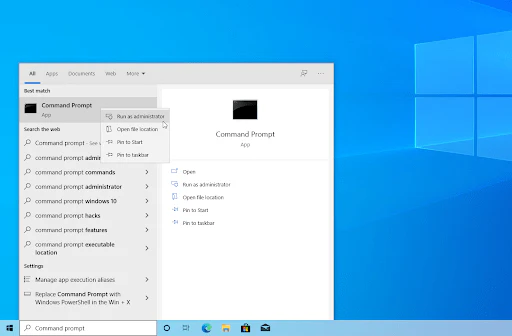
- If prompted by User Account Control (UAC), click Yes to allow the app to run with administrative permissions.
- Enter the following commands one by one, pressing Enter after each line:
ipconfig /flushdnsipconfig /registerdnsipconfig /renewipconfig /release
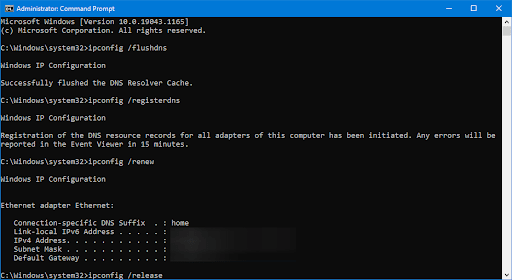
- Once the commands have been executed, close the Command Prompt.
- Open any web browser and try to access a website like Google.com or another popular site to see if the DNS error is resolved.
If you’re still facing issues, continue reading for more solutions!
Method 4: Reset TCP/IP Using the Command Prompt
If you’re frequently seeing the “Your DNS server might be unavailable” message, resetting your TCP/IP settings could be the solution. This method uses the netsh command to reset and fix any misconfigurations or issues within your TCP/IP stack, which might be causing the error. It’s a simple fix and can be done in just a few steps.
Steps to Reset TCP/IP:
- Open the search bar in your taskbar by clicking on the magnifying glass icon (or press Windows + S).
- Type Command Prompt in the search box. When it appears in the results, right-click on it and select Run as Administrator.
- If prompted by User Account Control (UAC), click Yes to allow the app to run with administrative permissions.
- Enter the following commands one by one, pressing Enter after each line:
netsh int ip set dnsnetsh winsock reset
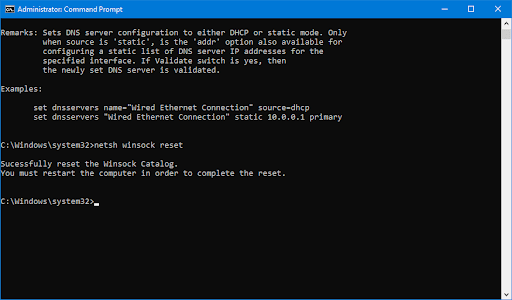
- After running these commands, close the Command Prompt.
- Open any web browser and check if you’re able to access a website, like Google.com or another search engine.
If this doesn’t resolve the issue, don’t worry! We’ve got more solutions to help you out.
Method 5: Automatically Obtain DNS Details
If your DNS settings are incorrectly configured, allowing your computer to automatically obtain DNS details can help resolve critical issues and restore your internet connection. This method ensures that your system will automatically find the correct DNS server needed for proper configuration.
Steps to Automatically Obtain DNS Details:
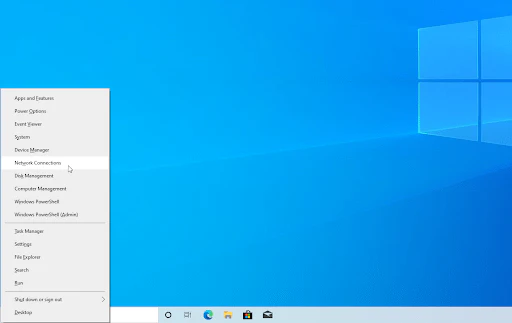
- Press Ctrl + X on your keyboard, then select Network Connections from the context menu.
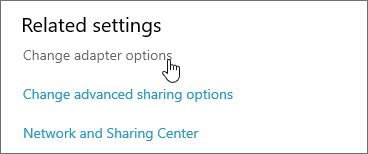
- In the Network Connections window, select your current connection type (e.g., Wi-Fi or Ethernet) from the left pane. Then, click on Change adapter options in the right pane.
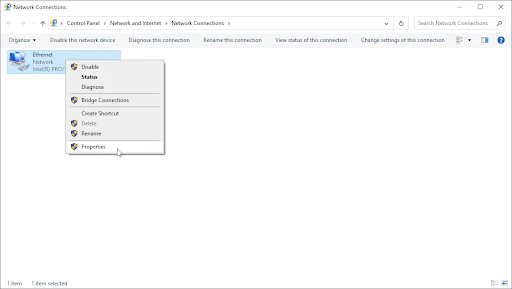
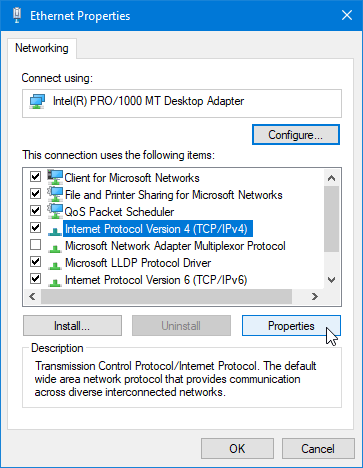
- Right-click on the connection you’re using and select Properties.
- Scroll down and find Internet Protocol Version 4 (TCP/IPv4). If there’s no checkmark next to it, click the box to enable it. Then, click the Properties button to open a new window.
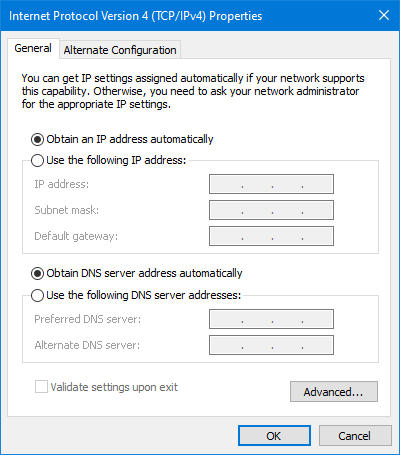
- In the IPV4 Properties window, ensure that both Obtain an IP address automatically and Obtain DNS server address automatically are selected. This will allow your computer to find the correct DNS server for your connection.
- Click OK to save the settings and then restart your computer.
- After your system has rebooted, check if your internet connection has been restored and if the DNS error has been resolved.
If you’re still having trouble, continue following the steps for additional solutions!
Method 6: Manually Input a DNS Server
If automatically obtaining DNS details didn’t work, you can try manually inputting a DNS server. There are many reliable public DNS servers available, and choosing one might help resolve the DNS Server Unavailable error. Here are a few popular options to consider:
- Cloudflare DNS: 1.1.1.1 (Preferred DNS) and 1.0.0.1 (Alternate DNS)
- Google DNS: 8.8.8.8 (Preferred DNS) and 8.8.4.4 (Alternate DNS)
- OpenDNS: 208.67.222.123 (Preferred DNS) and 208.67.220.123 (Alternate DNS)
Steps to Manually Input a DNS Server:
- Press Ctrl + X on your keyboard, then select Network Connections from the context menu.
- In the Network Connections window, select your current connection type (e.g., Wi-Fi or Ethernet) from the left pane. Then click on Change adapter options in the right pane.
- Right-click on your current connection and select Properties.
- Scroll down and find Internet Protocol Version 4 (TCP/IPv4). If it’s not already checked, click the box to enable it. Then, click the Properties button to open a new window.
- Select Use the following DNS server addresses and enter the following details:
- For Cloudflare DNS:
- Preferred DNS server: 1.1.1.1
- Alternate DNS server: 1.0.0.1
- Alternatively, for Google DNS:
- Preferred DNS server: 8.8.8.8
- Alternate DNS server: 8.8.4.4
- Or for OpenDNS:
- Preferred DNS server: 208.67.222.123
- Alternate DNS server: 208.67.220.123
- For Cloudflare DNS:
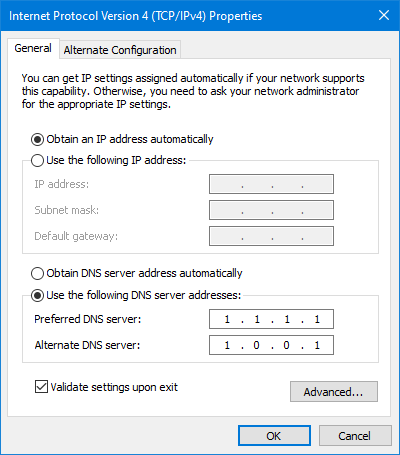
- Check the Validate settings upon exit box, then click OK to save the changes.
- Restart your computer and check if your internet connection has been restored.
If the issue continues, feel free to proceed with the other troubleshooting steps!
Method 7: Change Your DNS Through Your Router
If changing the DNS server on your Windows 10 device didn’t resolve the issue, you can try setting it directly through your router. This can often be more effective, as it applies the DNS settings to all devices connected to your network.
Steps to Change DNS Through Your Router:
- Open any web browser and enter your router’s Default Gateway address into the address bar. The Default Gateway IP address can be found by running Command Prompt and typing (
ipconfig). Look for the Default Gateway listed under your network adapter’s details.

- Log into your router using your login credentials. You can usually find this information on a sticker on your router or on the box it came with.
- Once logged in, look for your Internet Connection settings. This section is typically under tabs like Network, WAN, or Internet Settings.
- Keep in mind that router interfaces vary, so the exact steps might differ depending on your model. If you’re unsure, search your router’s name and version online for specific instructions, or call your ISP for assistance.
- Locate the DNS server section. Depending on your connection protocol, select either IPv4 or IPv6. Then, enter the DNS server address you want to use. Here are a few popular options:
- Cloudflare DNS:
- Preferred DNS: 1.1.1.1
- Alternate DNS: 1.0.0.1
- Google DNS:
- Preferred DNS: 8.8.8.8
- Alternate DNS: 8.8.4.4
- OpenDNS:
- Preferred DNS: 208.67.222.123
- Alternate DNS: 208.67.220.123
- Cloudflare DNS:
- Save the settings and exit the router’s interface.
- Check if you’re able to connect to the internet. The new DNS settings should now be applied to your entire network.
If the issue persists, proceed with the next troubleshooting methods to resolve the problem!
Method 8: Restart the DNS Service
If you’re still encountering the “DNS Server Unavailable” error, you can try restarting the DNS service directly within Windows 10. This can help resolve any service-related issues that may be preventing your system from connecting to the DNS server.
Steps to Restart the DNS Service:
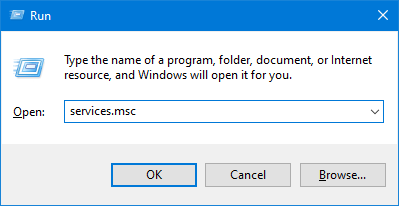
- Press Windows + R on your keyboard to open the Run utility.
- Type services.msc and click OK. This will open the Services window, which might take a few moments to fully load.
- In the Services window, scroll down and locate the DNS Client service.
- Right-click on the DNS Client service and choose Refresh from the context menu. This will automatically restart the service, turning it off and back on again.
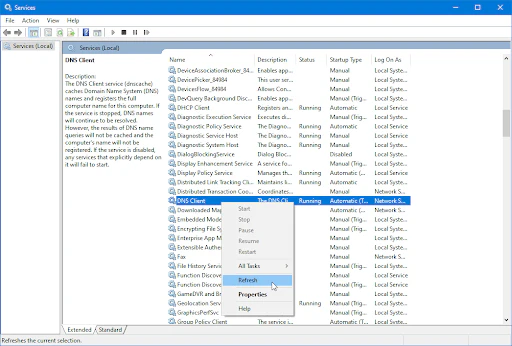
- After refreshing the DNS Client service, check if your internet connection is restored and if you can access websites properly.
If this method doesn’t solve the issue, continue with the next troubleshooting options for further assistance!
Method 9: Reset or Reinstall Windows 10
If none of the previous methods resolved the “DNS Server Unavailable” error, the final solution may be to reset or reinstall Windows 10. This will give your system a fresh start and could resolve any underlying software issues causing the problem. Keep in mind that this process might delete most of your applications and system configurations, but you can choose to keep your personal files.
Steps to Reset or Reinstall Windows 10:
- Reset Windows 10:
- Open Settings by pressing Windows + I.
- Go to Update & Security > Recovery.
- Under the Reset this PC section, click Get Started.
- Choose whether you want to keep your files or remove everything. If you want to keep your files, select Keep my files.
- Reinstall Windows 10:
- If you prefer a full reinstallation, you can follow the steps in our guide: How to Install Windows 10, 8.1, or 7 Using a Bootable USB for detailed, step-by-step instructions.
- Alternatively, visit the official Microsoft support page for instructions on how to reinstall or refresh your system.
After resetting or reinstalling, check if your DNS connection issue is resolved and if you can access websites again.
One more thing
If you’re in search of a software company that embodies integrity and upholds honest business practices, your quest ends here at Ecomkeys.com. As a Microsoft Certified Partner, we prioritize the trust and satisfaction of our customers. Our commitment to delivering reliable software products is unwavering, and our dedication to your experience extends far beyond the point of sale. At Ecomkeys.com, we provide a comprehensive 360-degree support system that accompanies you throughout your software journey. Your trust is our foundation, and we’re here to ensure that every interaction with us is a positive and trustworthy one.