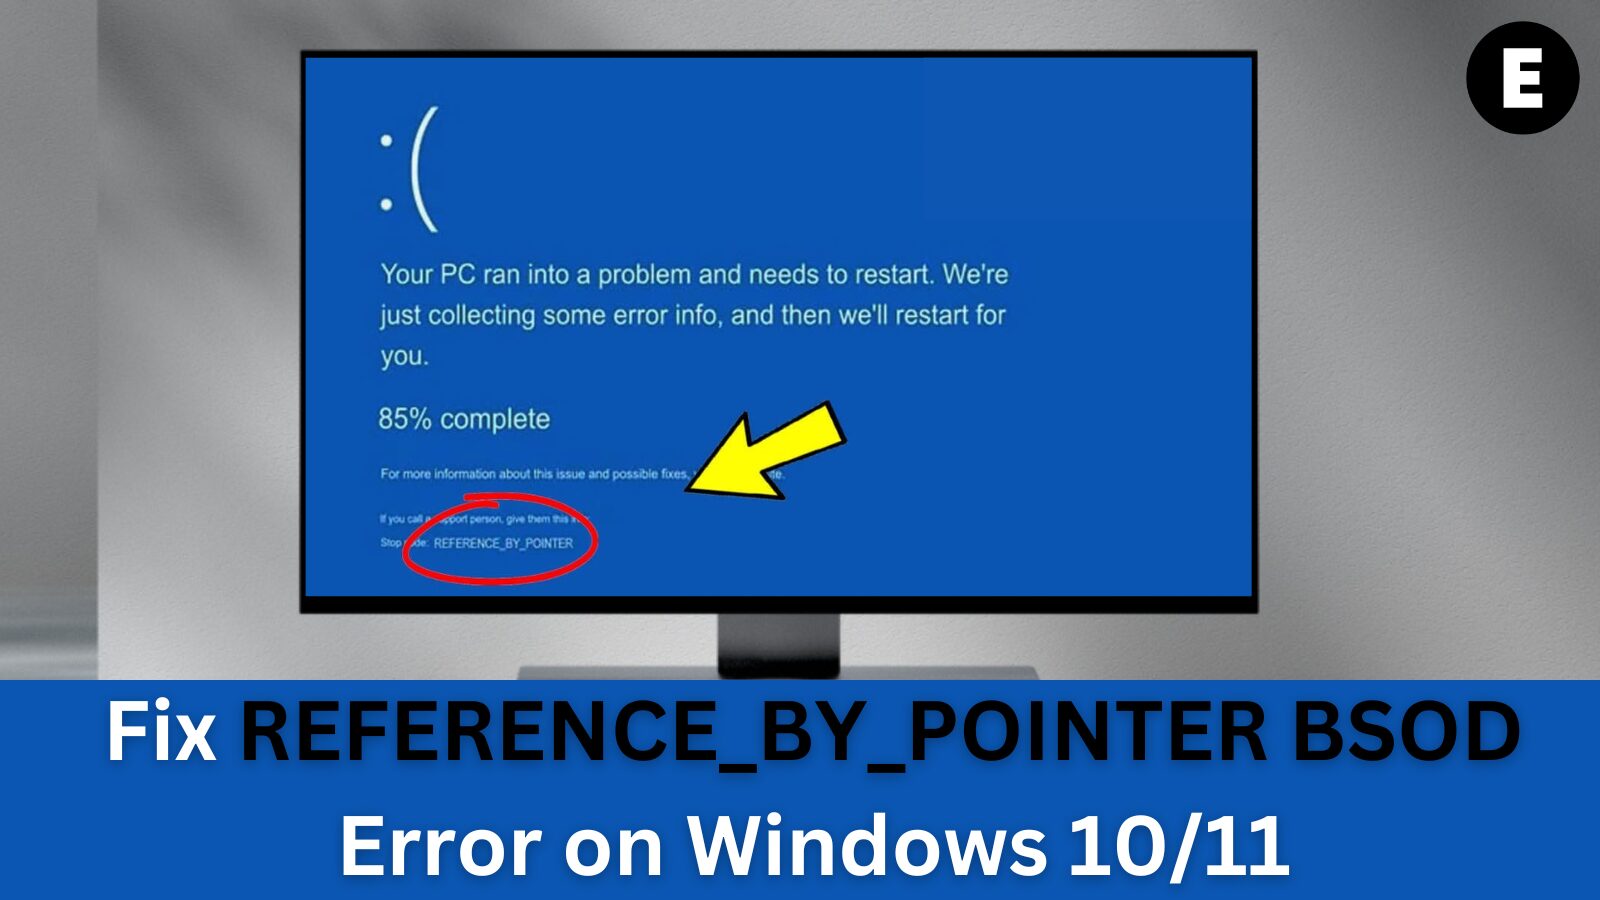
Are you encountering the REFERENCE_BY_POINTER BSOD (Blue Screen of Death) error on your Windows 10 or Windows 11 computer? In this guide, we’ll show you how to fix the error with simple, effective steps.
The REFERENCE_BY_POINTER BSOD error is a pesky issue that has been troubling Windows users for years. It usually occurs when certain files or settings become corrupted. While the BSOD itself isn’t necessarily dangerous, it can be a real headache to resolve.
Luckily, there are a few steps you can follow to try and fix the problem. Below, we’ll cover the most effective methods for troubleshooting and resolving the REFERENCE_BY_POINTER error.
So, if you’re seeing the REFERENCE_BY_POINTER BSOD error on Windows 10 or Windows 11, don’t panic. There are a few things you can try to fix it. In this article, we’ll walk you through some of the most reliable solutions. Keep reading for more tips and information on how to get your computer working smoothly again.
About the REFERENCE_BY_POINTER BSOD Error
A “blue screen” error, also known as BSOD (Blue Screen of Death), occurs when a fatal system error happens on your device. This typical problem occurs when your machine encounters a specific STOP code, forcing your system to reboot. The error code is always displayed to help you identify the cause of the blue screen issue.
Most blue screen faults are triggered by system-related difficulties that cause Windows to return a STOP code, leading to a system crash. These errors can happen unexpectedly, causing you to lose work and damage files. To prevent data loss, always ensure you save frequently and create system backups!
Each blue screen problem triggers a STOP code. These error codes are unique, which means they can be used to pinpoint the cause of the issue or find solutions online. This helps with troubleshooting, enabling IT professionals to effectively diagnose and fix the problem.
Luckily, you don’t have to spend hundreds of dollars on repairs. Follow our methods below to fix the REFERENCE_BY_POINTER error for free! We’ll guide you through each step to ensure your computer is restored successfully.
What Causes a REFERENCE_BY_POINTER BSOD Error in Windows?
The REFERENCE_BY_POINTER BSOD error is most commonly caused by a badly coded driver, but it can also occur for several other reasons. While diagnosing this problem can be tricky, there are a few common causes that you should check when troubleshooting this issue.
Corrupted storage sectors: A failing storage drive or other types of storage inconsistencies are among the most common causes of this problem. If the damage to your drive is minor, a CHKDSK scan from the Recovery menu may help temporarily fix the issue.
System corruption: This problem could also be linked to system file corruption. If the issue is not severe, running SFC and DISM scans from the Recovery menu might solve it. However, if the problem is tied to Kernel data, you’ll likely need to perform a clean install or repair install to address the system file corruption.
Third-party antivirus: In some cases, this BSOD is associated with Norton and a few other third-party antivirus suites. The system crash is typically caused by a kernel file being blocked due to a false positive by the active antivirus software. To rule out this cause, try temporarily disabling or uninstalling the third-party antivirus and see if the BSOD disappears.
Motherboard drivers: This type of system crash can occur on laptops when the motherboard is not supplying the correct voltage to internal components. Installing the latest motherboard drivers can help resolve this issue.
Other possible causes for the REFERENCE_BY_POINTER error include faulty hardware, overheating, bad memory modules, and software conflicts. Fortunately, these issues can be fixed by following our solutions below!
7 Ways to Fix Windows Stop Code Reference by Pointer BSOD
If you’re facing the REFERENCE_BY_POINTER error, here are 7 effective solutions you can try to fix the issue on your computer. Follow these methods in order until you find the one that works best for you.
Prerequisite: Boot Your Computer in Safe Mode
Before you begin troubleshooting, it may be essential to boot your computer in Safe Mode to complete some of the solutions below. You can also determine whether the problem occurs in Safe Mode rather than in standard boot mode.
- Reboot your computer and press the F8 key on your keyboard while the boot screen is visible to enter the Windows Recovery Environment (WinRE). On some devices, you may need to hold down the Fn (function) key. Tip: If you can’t boot into WinRE using the keyboard shortcut, keep turning your computer on and off until it automatically starts in the repair environment. Typically, turning it on and off about 3 times will trigger this process.
- Navigate through to See advanced repair options > Troubleshoot > Advanced options > Startup Settings > Restart.
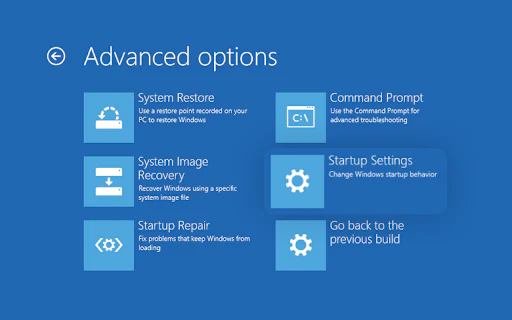
- After the restart, a list of restart choices will appear. By pressing F5, you will enable Safe Mode with Networking. Wait for your system to restart and check if it boots successfully.
If you’re able to boot into Safe Mode without encountering the blue screen error, proceed to troubleshoot further! A great starting point would be scanning your computer for malware using Windows Defender.
Method 1: Test Your Computer’s Hardware for Issues
If you’ve recently upgraded or changed your computer’s hardware, it’s important to double-check whether everything was properly installed. New RAM sticks can sometimes fail, and even older RAM may deteriorate over time.
Here are several steps to help you check your RAM and resolve potential issues. Remember to turn off your computer and unplug all cables before continuing:
- Swap RAM Slots: If you’re using two separate RAM sticks, try swapping them between the slots to ensure proper installation.
- Test Each RAM Stick: If you have multiple RAM sticks, test each one separately to identify the faulty one. Only use one RAM slot at a time to avoid confusion.
- Clean RAM Chips: If you’re using a single RAM chip, check for any dust or dirt and clean it off carefully to ensure optimal performance.
- Swap Out RAM: If you have spare RAM sticks, test swapping them in and rebooting your PC. If the issue doesn’t reoccur, the original RAM stick is likely faulty.
Faulty RAM can lead to the blue screen of death (BSOD) error, which, while rare, can occur as memory deteriorates over time. If you suspect a hardware problem, it’s advisable to either take your PC to a professional for further testing or replace the faulty RAM.
By following these steps, you can easily troubleshoot and resolve RAM-related errors, helping to restore your computer’s performance and stability.
Method 2: Perform a Clean Boot and Uninstall Problematic Apps
If you’re still encountering the REFERENCE BY POINTER blue screen of death (BSOD) error, it’s likely caused by a problematic third-party application.
To resolve this, you can boot your computer in a clean boot state. This will disable all non-essential programs and services, allowing you to start Windows with only the bare minimum running. Once in this state, you can identify and remove the third-party apps that may be causing the REFERENCE BY POINTER BSOD.
Here’s how to do it:
- Boot in Safe Mode: Start your computer in Safe Mode using the steps outlined in Method 1.
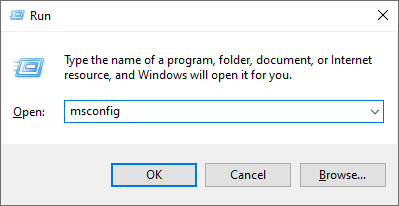
- Open System Configuration: After booting, press the Windows + R keys to open the Run utility. Type “msconfig” and press Enter to launch the System Configuration window.
- Hide Microsoft Services: Go to the Services tab and check the Hide all Microsoft services box. This ensures that you only see third-party services.
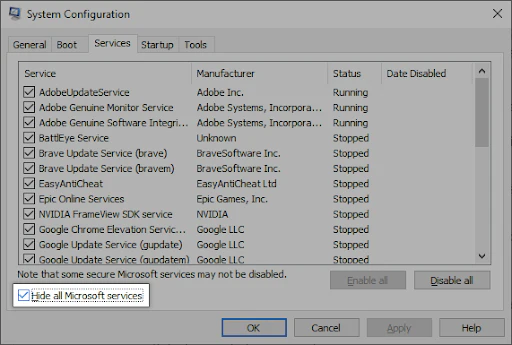
- Disable Third-Party Services: Click the Disable all button to disable all third-party services on your system.
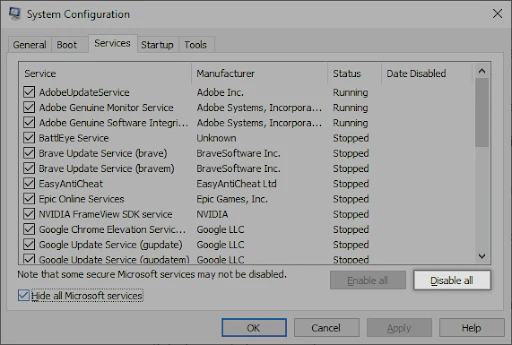
- Restart Your Computer: Click Apply and restart your PC. Upon reboot, your computer will only initiate Microsoft services.
Now, you’re in a clean boot state. Follow these steps to remove potentially problematic apps:
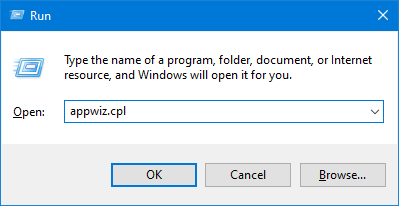
- Access Programs and Features: Press Windows + R, type in “appwiz.cpl” and press Enter to open the Control Panel and navigate to Programs and Features.
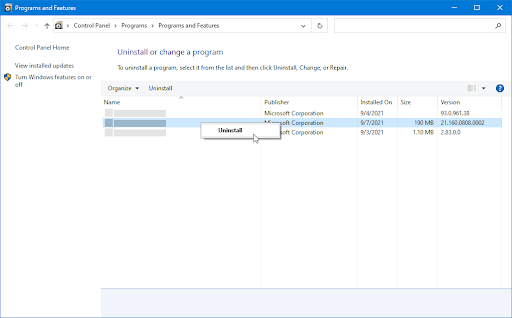
- Identify Problematic Applications: Scroll through the list of installed programs and look for any of the following:
- TrueCrypt
- VeraCrypt
- Daemon Tools
- Any video converter (HandBrake, ShanaEncoder, etc.)
- nProtect GameGuard
- Uninstall Problematic Apps: Right-click on a suspected app and select Uninstall. Follow the prompts to complete the uninstallation and restart your computer.
If the BSOD doesn’t occur after booting in a clean state, then a third-party service or app is the cause of the issue. You should identify the specific app or service, then either replace the associated driver or app, or disable the service to prevent further errors.
Method 3: Run the System File Checker Utility (SFC Scan)
If a clean boot and removing problematic apps didn’t resolve the issue, it’s time to run the System File Checker utility. This powerful tool will scan your computer for any corrupted or missing system files and replace them if necessary.
Here’s how to run an SFC scan:
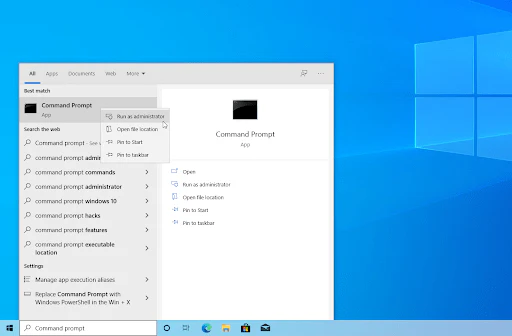
- Open the Search Bar: Click on the magnifying glass icon in your taskbar, or press Windows + S as a shortcut to open the search bar.
- Search for Command Prompt: Type “Command Prompt” in the search box. Once you see it in the results, right-click on it and select Run as Administrator. If you’re using a local account without administrator permissions, click here to learn how to grant admin access.
- Allow Admin Permissions: When prompted by the User Account Control (UAC), click Yes to allow the app to run with administrative permissions.
- Run the SFC Command: In the Command Prompt window, type the following command and press Enter: sfc /scannow
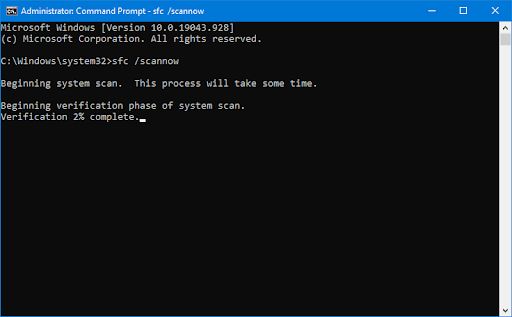
- Wait for the Scan to Complete: The System File Checker will begin scanning your computer for errors. If it detects any discrepancies, it will restore the system files and fix all errors related to them.
Running this utility can often fix underlying issues with your computer’s system files, helping to resolve the BSOD error and improve your system’s overall stability.
Method 4: Deploy the DISM and CHKDSK Commands
If running the SFC scan didn’t fix the REFERENCE BY POINTER blue screen of death (BSOD) error, you can try running the DISM and CHKDSK commands. These are powerful tools that can help repair your computer’s file system and fix deeper issues that might be causing the error.
How to Run the DISM Command on Windows 11/10
- Open the Search Bar: Click the magnifying glass icon in your taskbar, or press Windows + S to open the search bar.
- Search for Command Prompt: Type “Command Prompt” in the search box. When it appears in the results, right-click on it and choose Run as Administrator.
- Allow Admin Permissions: When prompted by User Account Control (UAC), click Yes to allow the app to run with administrative permissions.
- Execute the DISM Command: Type the following command and press Enter:
- DISM.exe /Online /Cleanup-image /Restorehealth
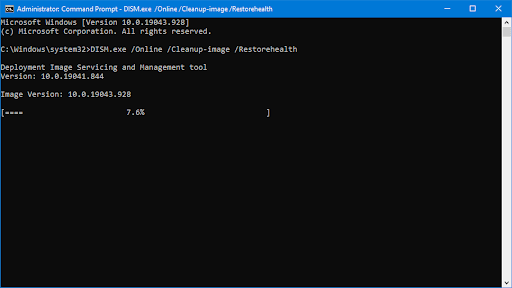
- Wait for the Process to Complete: After executing the command, wait for the process to finish. Once done, close the Command Prompt window and restart your computer to see if the REFERENCE_BY_POINTER error has been resolved.
How to Run the CHKDSK Command on Windows 11/10
- Open the Search Bar: Click the magnifying glass icon in your taskbar, or press Windows + S to open the search bar.
- Search for Command Prompt: Type “Command Prompt” in the search box. When it appears in the results, right-click and choose Run as Administrator.
- Allow Admin Permissions: When prompted by User Account Control (UAC), click Yes to launch the app with administrator permissions.
- Execute the CHKDSK Command: Type the following command and press Enter:
- chkdsk C: /r
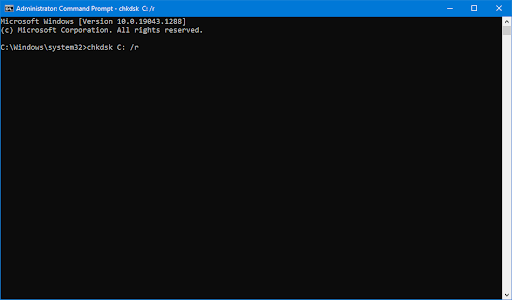
- Wait for the Scan to Complete: The CHKDSK tool will begin scanning and repairing issues with your hard drive. This process might take some time, depending on the size of the drive and the number of issues.
Both the DISM and CHKDSK commands are powerful utilities that can repair critical system files and hard drive errors, helping to resolve the BSOD and other performance issues.
Method 5: Update Your Hardware Drivers
Outdated or corrupt drivers can cause a variety of issues on Windows, including the REFERENCE BY POINTER blue screen of death (BSOD) error. If you’re still encountering this error, it’s likely that your device drivers need updating.
You can either update drivers manually or use a driver update tool like Driver Easy to do it automatically. The most common drivers to focus on are your graphics driver and motherboard driver, as these can often cause BSOD errors.
Here are some ways to update your drivers on Windows 10 and Windows 11:
Update Drivers Using Windows Update
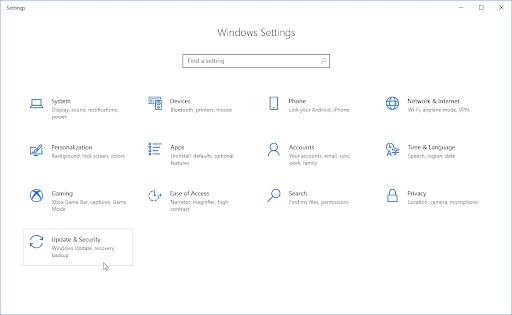
- Open Settings: Click on the Windows icon in the bottom-left corner to open the Start menu, then click on Settings. Alternatively, press Windows + I.
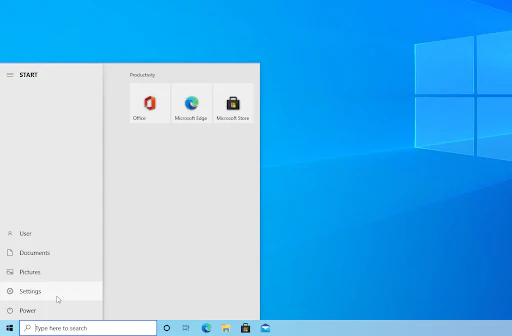
- Go to Update & Security: In the Settings window, click on the Update & Security tile.
- Access Optional Updates: Under Windows Update, click on the View optional updates link if available.

- Update Drivers: Expand the Driver updates section, then review the list of drivers that need updating. Check the boxes next to the drivers you want to update and click Download and install.
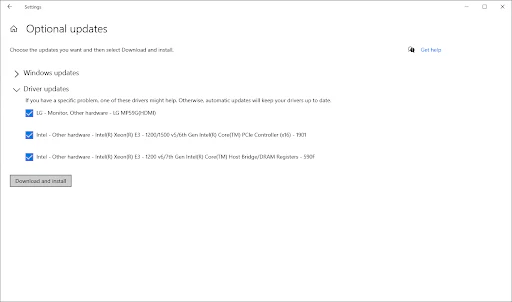
- Restart Your Computer: After Windows installs the updates, restart your PC to apply the changes. Monitor whether the REFERENCE_BY_POINTER BSOD error persists.
Update Drivers Using Device Manager
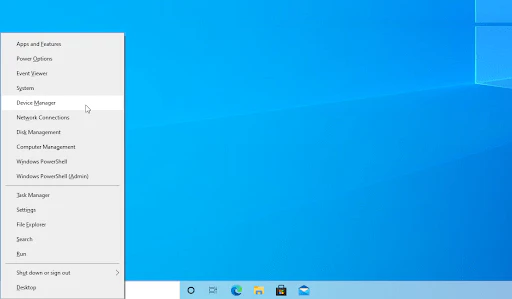
- Open Device Manager: Press Windows + X to open the WinX menu, then select Device Manager.
- Select the Driver: Right-click on the device driver you want to update (e.g., Graphics Card or Motherboard).
- Update Driver: Choose Update Driver from the context menu.
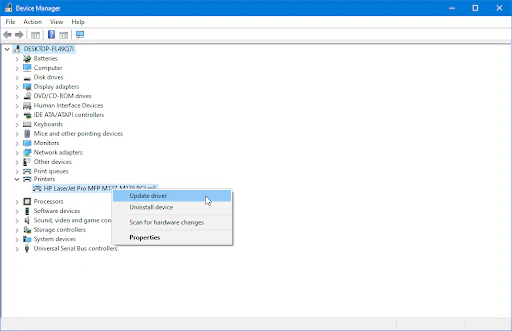
- Search for Drivers: Select Search automatically for drivers. Windows will connect to the internet and find the latest driver updates for your device.

- Install the Driver: If multiple drivers are found, select the appropriate one. Once the installation is complete, restart your computer to apply the changes.
By updating your drivers, you can often fix issues related to outdated or corrupt drivers, which can resolve the BSOD error and improve overall system performance.
Method 6: Clear the Temp and PreFetch Folders (if Applicable)
If you’re still encountering the REFERENCE BY POINTER blue screen of death (BSOD) error, it’s possible that your computer is trying to load files from a corrupt temp or Prefetch folder. These folders store temporary files and data for your apps, but they can sometimes become corrupt, leading to errors.
You can clear these folders either manually or by using a tool like CCleaner for automatic cleanup.
Clear Temp Folder
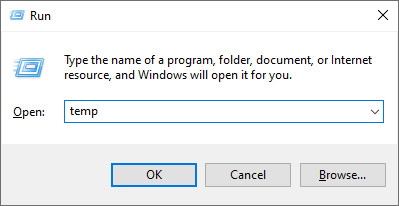
- Open the Run Prompt: Press Windows + R on your keyboard simultaneously to open the Run prompt.
- Access Temp Folder: Type temp in the box and click OK. This will open the Temp folder in File Explorer.
- Select All Files: Press Ctrl + A to select all the files in the folder. Alternatively, you can manually select specific files to delete if you want to keep some.
- Delete Files: Right-click on any selected file and click Delete from the context menu.

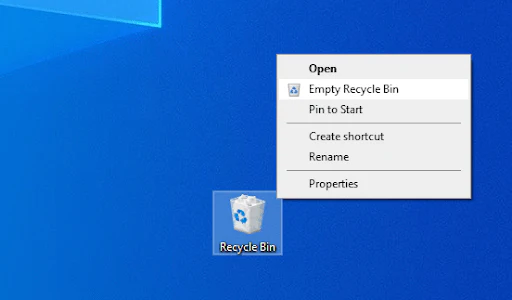
- Empty Recycle Bin: Navigate to your desktop, right-click on the Recycle Bin, and choose Empty Recycle Bin to permanently delete the files.
Clear PreFetch Folder (if applicable)
The PreFetch folder stores data to speed up app loading. It can also become corrupted. If you want to clear this folder, follow these steps:
- Open the Run Prompt: Press Windows + R again to open the Run prompt.
- Access PreFetch Folder: Type %SystemRoot%\Prefetch in the box and click OK.
- Delete Files: Select all files in the PreFetch folder (Ctrl + A) and delete them.
- Empty Recycle Bin: As with the Temp folder, be sure to empty the Recycle Bin to fully remove these files.
Restart Your Computer
Once you’ve cleared the Temp and PreFetch folders, restart your computer and check if this resolves the BSOD error. By removing potentially corrupt files, you may be able to eliminate the source of the problem and restore stability to your system.
Method 7: Temporarily Disable Your Antivirus Software
If you’re still encountering the REFERENCE BY POINTER blue screen of death (BSOD) error, it’s possible that your antivirus software is causing conflicts with Windows, triggering BSOD errors. Some third-party antivirus programs can interfere with system processes, leading to system crashes.
Here’s how to temporarily disable your antivirus software to see if it resolves the issue:
Disable Antivirus Using Task Manager
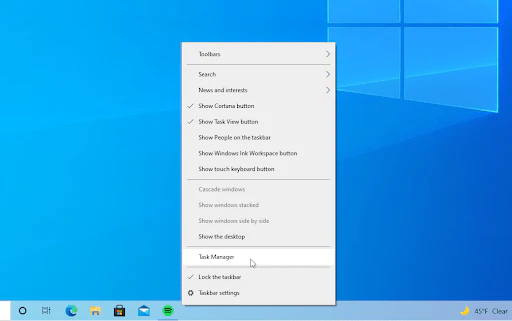
- Open Task Manager: Right-click on an empty space in your taskbar and choose Task Manager from the context menu.
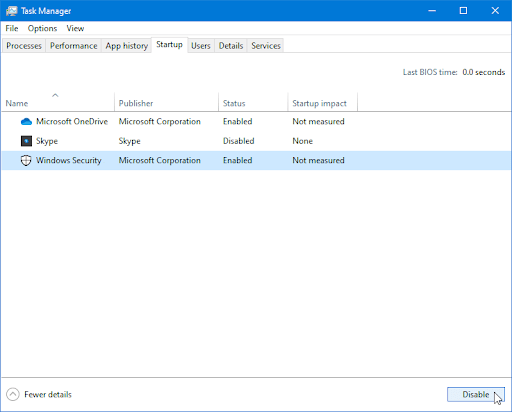
- Access Startup Tab: In Task Manager, switch to the Startup tab at the top of the window.
- Select Your Antivirus: Find your antivirus application in the list of startup programs. Click on it to select it.
- Disable Antivirus: Click on the Disable button in the bottom-right corner of the window. This will prevent the antivirus program from launching automatically when you restart your computer.
- Restart Your Computer: Once the antivirus is disabled, restart your computer and check if the REFERENCE BY POINTER error still occurs.
If disabling your antivirus resolves the issue, you’ll need to find a way to either whitelist the program or add exclusions to prevent it from causing further conflicts. You can usually find these settings in the antivirus software’s control panel.
TL;DR
The REFERENCE_BY_POINTER stop code is one of the most common BSOD errors on Windows 10 and 11.
If you’re encountering this blue screen of death (BSOD) error, it could be caused by a faulty RAM stick, third-party software, outdated drivers, or corrupt system files.
Here’s a quick summary of ways to resolve the issue:
- Run a clean boot, uninstall problematic apps, update drivers, and temporarily disable your antivirus software.
- Use system tools like the SFC scan, DISM, and CHKDSK commands, or clear your temp and Prefetch folders.
- If the issue persists, you may need to reinstall Windows or replace hardware components.
Conclusion
We hope these methods help resolve the REFERENCE_BY_POINTER error on your Windows 10 or 11 computer. If you have any other questions or suggestions, feel free to leave a comment below!
If the problem continues even after trying these fixes, there may be a hardware issue. In that case, consider taking your computer to a professional for diagnosis and repair.
One more thing
If you’re in search of a software company that embodies integrity and upholds honest business practices, your quest ends here at Ecomkeys.com. As a Microsoft Certified Partner, we prioritize the trust and satisfaction of our customers. Our commitment to delivering reliable software products is unwavering, and our dedication to your experience extends far beyond the point of sale. At Ecomkeys.com, we provide a comprehensive 360-degree support system that accompanies you throughout your software journey. Your trust is our foundation, and we’re here to ensure that every interaction with us is a positive and trustworthy one.