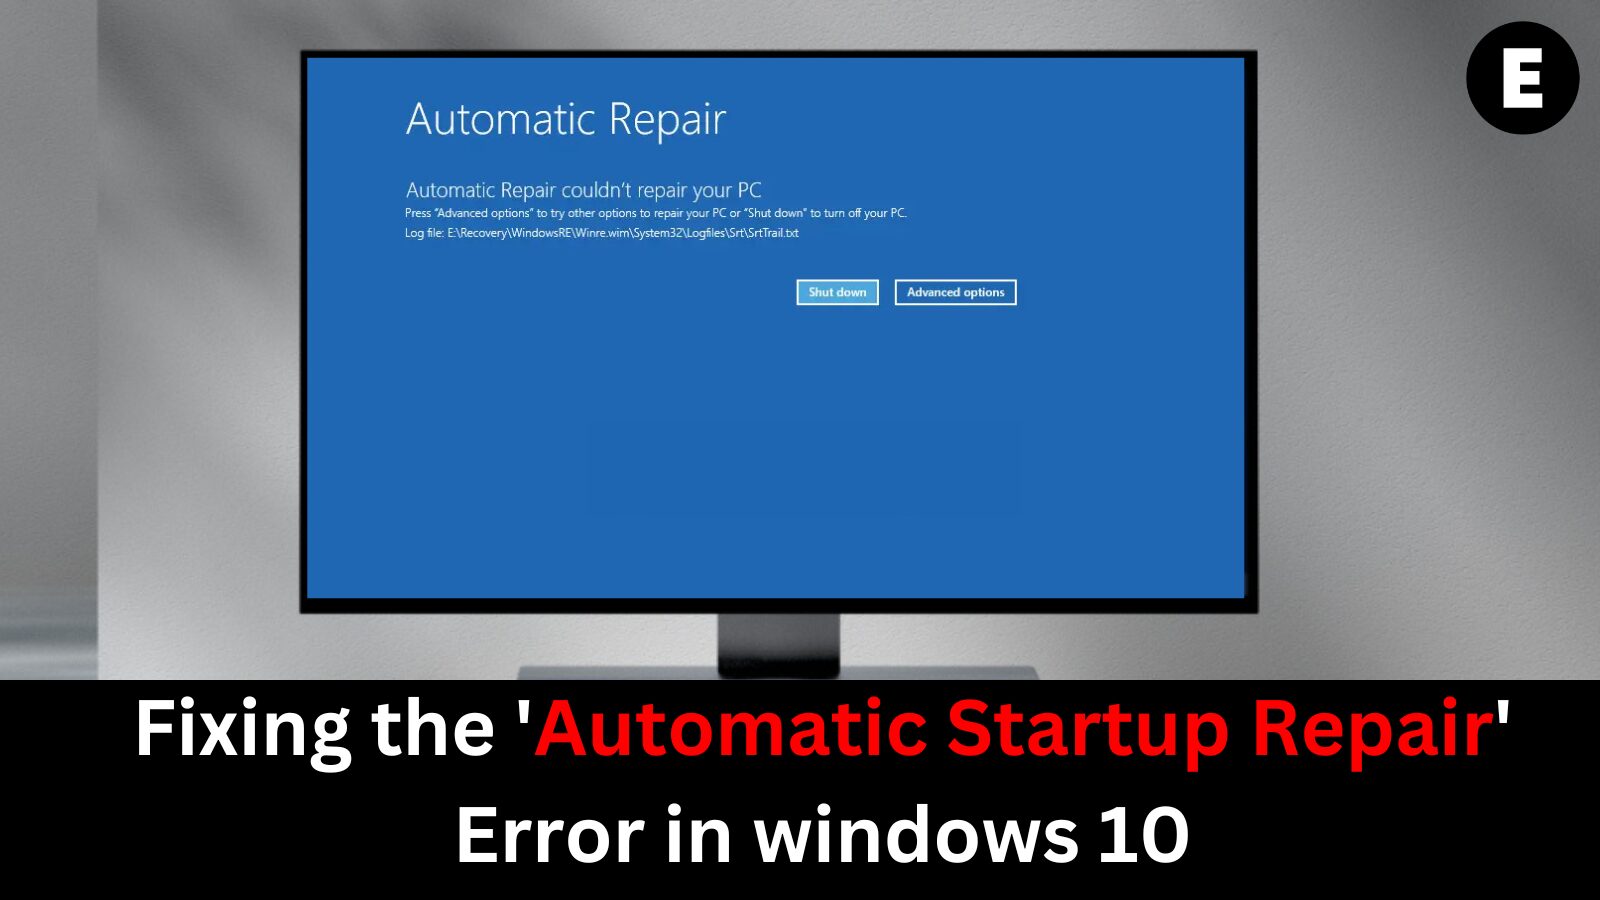
Automatic Startup Repair is a built-in Windows 10 troubleshooting tool that helps resolve problems preventing your computer from booting correctly. It is designed to automatically detect and fix issues such as missing or corrupt system files, damaged boot configurations, or other startup-related errors.
However, users may sometimes encounter the frustrating message: “Automatic Startup Repair couldn’t repair your PC.” This error can be concerning, especially if you’re trying to access important files or launch essential applications.
The good news is that there are effective ways to fix this error and restore your system’s normal startup process. In this guide, you’ll learn:
- What causes the Automatic Startup Repair error
- How to run Startup Repair properly
- Alternative methods to troubleshoot boot issues
- How to prevent this error from occurring in the future
Whether you’re a casual user or a tech enthusiast, this article provides clear, step-by-step instructions to help you resolve Windows 10 startup problems and get back to using your PC with confidence.
What Causes the “Automatic Startup Repair Couldn’t Repair Your PC” Error?
Encountering a message like “Startup Repair couldn’t repair your PC” or “Automatic Repair couldn’t repair your PC” can be frustrating and alarming. These errors typically indicate deeper issues with your system’s software or hardware, preventing Windows 10 from starting properly.
Below are the most common causes of the Automatic Startup Repair error:
1. Corrupted Operating System Files
If Windows system files are corrupted or missing, the Startup Repair tool may fail to fix the issue. This can happen due to malware infections, viruses, or improper shutdowns that damage the integrity of your operating system.
2. Hardware Failures
Faulty hardware components—such as a failing hard drive, damaged RAM, or overheating CPU—can interrupt the boot process and make it impossible for Automatic Repair to complete successfully.
3. Incorrect System Settings
Problems like outdated drivers, misconfigured BIOS settings, or incompatible software installations can interfere with the repair process. These settings can prevent Windows 10 from initializing critical components during startup.
4. Low Disk Space or Memory
If your system lacks sufficient storage space or available RAM, it may be unable to apply necessary updates or complete the repair. This often leads to repeated errors during the automatic recovery attempt.
What Is the Startup Repair Tool in Windows 10 and How to Use It?
The Startup Repair tool is a built-in Windows 10 recovery feature designed to automatically diagnose and fix startup issues that prevent your PC from booting properly. It’s one of the most effective solutions for resolving problems like disk errors, corrupt system files, and other common boot-related failures.
How to Access the Startup Repair Tool:
To launch the Startup Repair tool, follow these steps:
- Start your PC and interrupt the boot process three times to enter Windows Recovery Environment (WinRE).
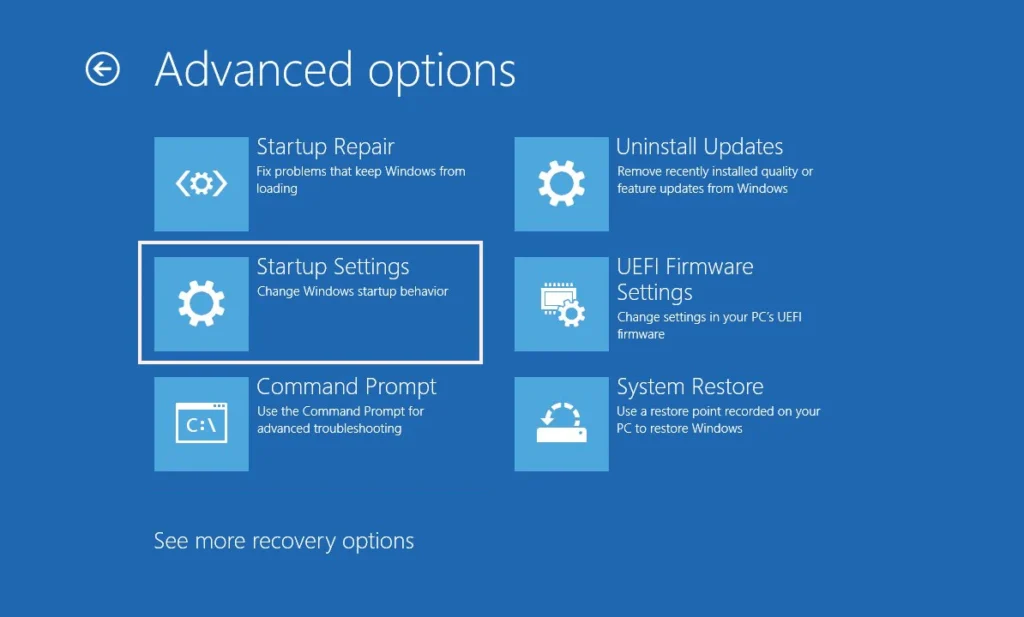
- Navigate to:
Advanced Options → Troubleshoot → Startup Repair - Select your user account and enter your password if prompted.
Once activated, the tool will scan your system for critical startup problems and attempt to repair them automatically—no advanced technical knowledge required.
✅ Fixed: “Automatic Startup Repair Couldn’t Repair Your PC” – Top Troubleshooting Methods
If you’re dealing with the “Automatic Startup Repair couldn’t repair your PC” error, don’t worry—you’re not alone. This issue can be frustrating, especially if you’re unsure what’s causing it. While the underlying problem may vary from system to system, the following step-by-step troubleshooting methods can help you fix the issue and get back to using your PC normally.
🔁 1. Restart Your Computer
One of the simplest and often most effective solutions is to restart your PC. A quick reboot can sometimes resolve temporary system glitches or incomplete boot sequences that trigger the Startup Repair error. If the issue reappears after restarting, move on to the next step.
🛠️ 2. Boot Into Safe Mode
Booting your system in Safe Mode is another powerful way to troubleshoot startup issues. Safe Mode loads only the essential drivers and services, helping you isolate what might be causing the problem.
Here’s how to boot into Safe Mode:
- Force shutdown your PC 2–3 times to access Windows Recovery Environment (WinRE).
- Go to:
Advanced Options → Startup Settings → Restart - Press F4 or F5 to boot into Safe Mode or Safe Mode with Networking.
Once in Safe Mode, you can run scans, uninstall problematic software, or roll back recent updates that might have caused the issue.
🔐 3. Disable Early Launch Anti-Malware Protection (ELAM)
Early Launch Anti-Malware Protection (ELAM) is a security feature in Windows 10 designed to load antivirus software before any third-party drivers. While this adds an extra layer of protection during startup, it can sometimes interfere with the boot process, leading to the “Automatic Startup Repair couldn’t repair your PC” error.
Disabling ELAM temporarily may help resolve the issue.
How to Disable Early Launch Anti-Malware Protection:
- Reboot your computer and press F11 or F8 repeatedly during the boot screen. (On some laptops, you may need to hold down the Fn key as well.)
- If the key combination doesn’t work:
- Turn your computer on and off three times in a row to trigger Windows Recovery Environment (WinRE) automatically.
- Once in WinRE, navigate to:
Troubleshoot → Advanced Options → Startup Settings
- Click Restart.
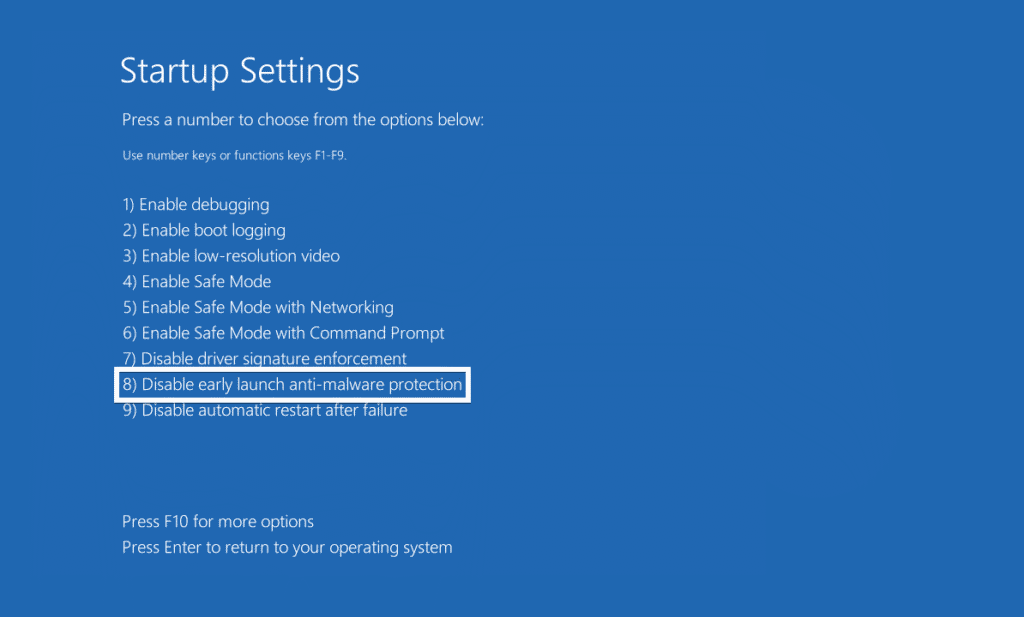
- When the Startup Settings screen appears, press the number key for
“Disable early launch anti-malware protection.” (This is usually [8], but it may vary slightly depending on your system.)
- Your system will restart automatically.
After rebooting, check to see if the Startup Repair error is resolved. If the issue persists, continue with additional troubleshooting methods.
🔄 4. Disable Automatic Restart After Failure
If Startup Repair fails and your system keeps restarting automatically, you may find yourself stuck in a frustrating boot loop. This makes it difficult to read or diagnose the actual error message. One effective way to break the loop and gain insight into what’s wrong is to disable automatic restart after failure.
How to Disable Automatic Restart After Failure:
- Boot into the Windows Recovery Environment (WinRE):
- Restart your PC and press F11 or F8 during the boot screen.
- If needed, force shutdown your PC three times to trigger WinRE automatically.
- Navigate to:
Troubleshoot → Advanced Options → Startup Settings - Click Restart.
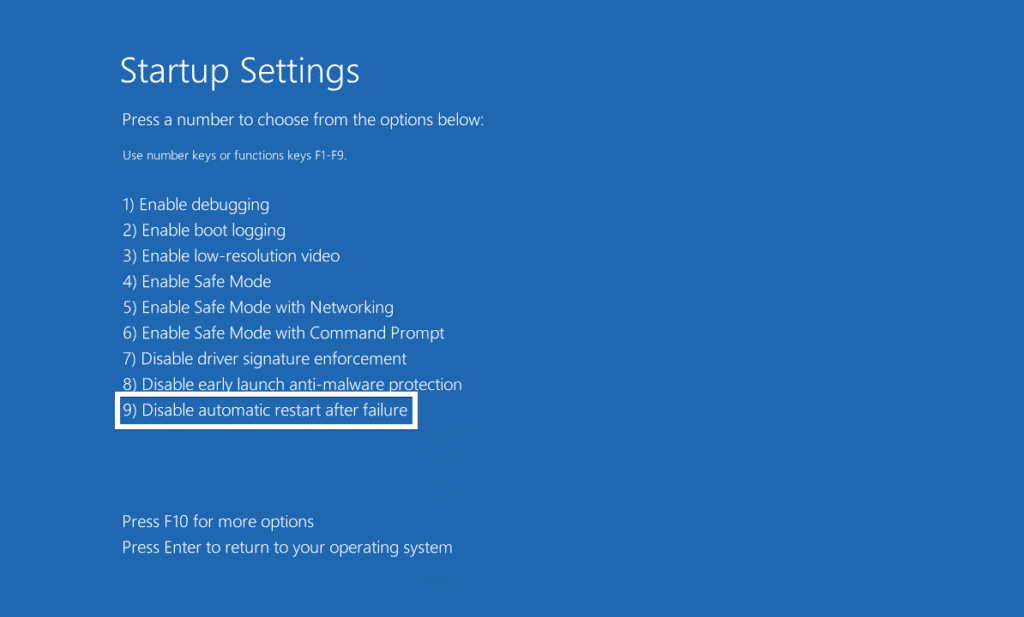
- When the Startup Settings screen appears, press the number key for
“Disable automatic restart after failure.” (Typically, this is [9], but it may vary based on your system.)
After completing this step, your PC will pause instead of restarting if another startup failure occurs. This allows you to see the full error message, which is essential for further troubleshooting and identifying the root cause.
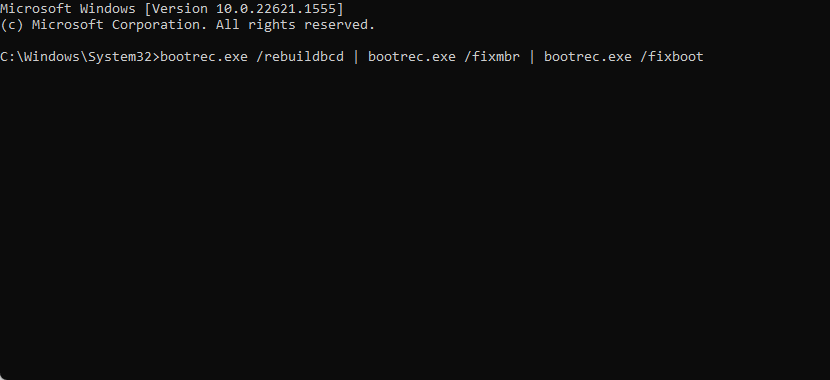
💻 5. Use the “fixboot” and “chkdsk” Commands to Repair Startup Issues
When dealing with persistent boot errors like “Automatic Startup Repair couldn’t repair your PC,” running advanced Command Prompt tools such as fixboot and chkdsk can help resolve corrupt files, damaged boot sectors, or disk errors that are preventing your system from launching correctly.
These commands are particularly effective when combined with other Windows 10 troubleshooting methods.
How to Run fixboot and chkdsk from Command Prompt:
- Boot into the Windows Recovery Environment (WinRE):
- Press F11 or F8 during startup, or force shutdown your PC three times to load WinRE automatically.
- Go to:
Troubleshoot → Advanced Options → Command Prompt
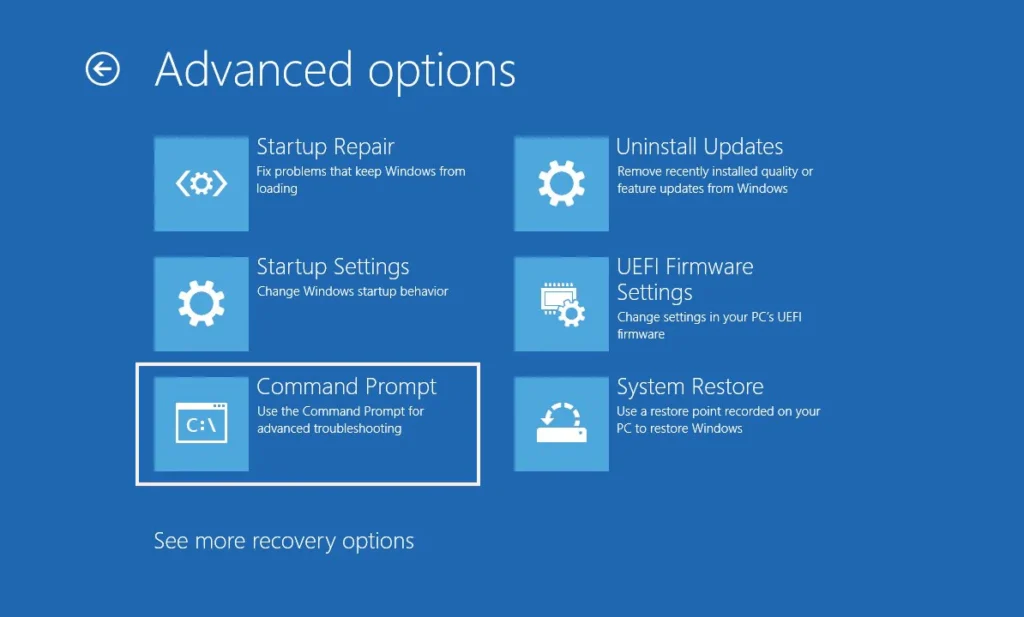
- Once the Command Prompt window opens, type the following commands one by one, pressing Enter after each:
-
bootrec.exe /rebuildbcd bootrec.exe /fixmbr bootrec.exe /fixboot
-
- After completing the above, run the disk check command to scan for and fix disk errors:
chkdsk /r C:(Replace C: with your Windows installation drive letter if it’s different)
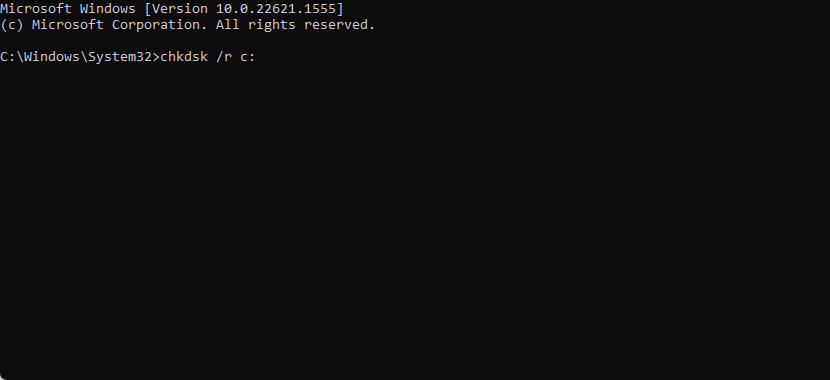
- Let the scan complete. Your system may restart automatically during this process.
🛡️ 6. Run the System File Checker (SFC Scan) to Repair Corrupted Files
Running the System File Checker (SFC Scan) is a powerful way to detect and fix corrupted or missing system files—a common cause of the “Automatic Startup Repair couldn’t repair your PC” error in Windows 10. This built-in utility helps restore your system’s integrity and performance by automatically replacing damaged files with cached copies.
How to Run the SFC Scan:
- Boot your system into the Windows Recovery Environment (WinRE):
- Use the F11 or F8 key at startup, or force shutdown your PC three times to access WinRE.
- Navigate to:
Troubleshoot → Advanced Options → Command Prompt - In the Command Prompt window, type the following command and press Enter:
sfc /scannow
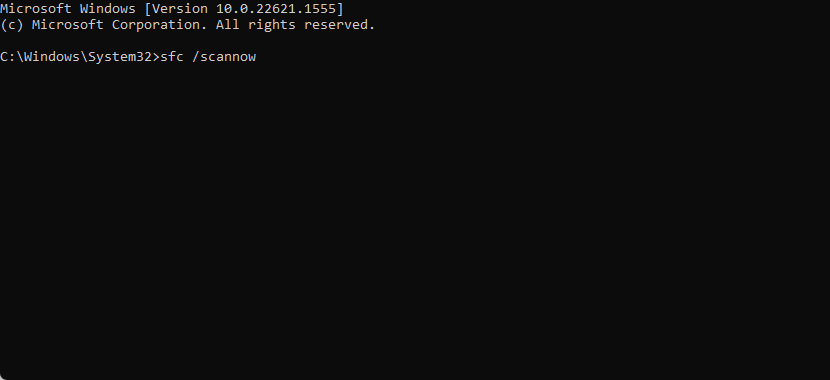
- Wait for the scan to complete. The System File Checker will identify and automatically fix any issues related to core Windows system files.
⚠️ Note: This process can take several minutes. Do not interrupt the scan. Your PC may restart during or after the repair process.
🧰 7. Run the DISM Tool to Repair Windows System Image
The Deployment Imaging Service and Management Tool (DISM) is a powerful built-in command-line utility in Windows 10 that helps repair and restore the Windows system image. If you’re encountering the “Automatic Startup Repair couldn’t repair your PC” error, DISM can replace corrupted system files using a clean source—either from a local cache or an online Microsoft server.
How to Use the DISM Tool in WinRE:
- Enter the Windows Recovery Environment (WinRE) by pressing F11 or F8 at startup, or force shutdown your computer three times.
- Go to:
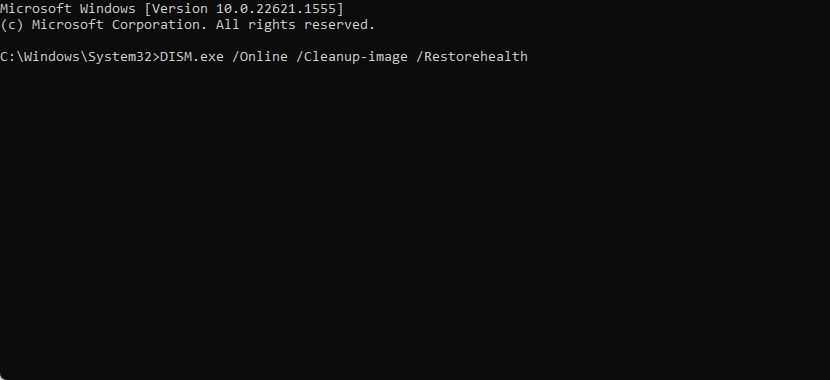
Troubleshoot → Advanced Options → Command Prompt - In the Command Prompt window, type the following command and press Enter:
DISM.exe /Online /Cleanup-image /Restorehealth
- Wait patiently as DISM scans and repairs your system image. This process may take several minutes.
⚠️ Note: A stable internet connection may be required if DISM pulls clean files from Microsoft’s online servers.
⚙️ 8. Repair the Boot Configuration Data (BCD)
If you’re seeing the “Automatic Startup Repair couldn’t repair your PC” error, there’s a strong chance the issue lies within the Boot Configuration Data (BCD). The BCD contains essential information needed to start Windows 10, and any corruption or misconfiguration can prevent your system from booting properly.
Fortunately, you can use built-in bootrec commands to rebuild or repair the BCD and get your PC working again.
How to Repair BCD in WinRE:
- Boot into the Windows Recovery Environment (WinRE) using F11, F8, or by turning your PC off and on three times to trigger automatic recovery mode.
- Go to:
Troubleshoot → Advanced Options → Command Prompt - In the Command Prompt window, type the following commands one at a time. Press Enter after each:
bootrec /rebuildbcdbootrec /fixmbrbootrec /fixboot
- Wait for each command to complete successfully.
- Once finished, restart your computer and check if the issue is resolved.
🛠️ 9. Restore the Windows Registry to Fix Startup Errors
The Windows Registry is a critical database that stores system settings and configuration details for both the operating system and installed programs. If the Registry becomes corrupted or damaged, it can lead to numerous errors, including the frustrating “Automatic Startup Repair couldn’t repair your PC” error.
Restoring the Registry from a backup can potentially resolve the issue and get your system back on track.
How to Restore the Windows Registry in WinRE:
- Boot into the Windows Recovery Environment (WinRE):
- Use F11 or F8 during startup, or force shutdown your PC three times to trigger WinRE.
- Go to:
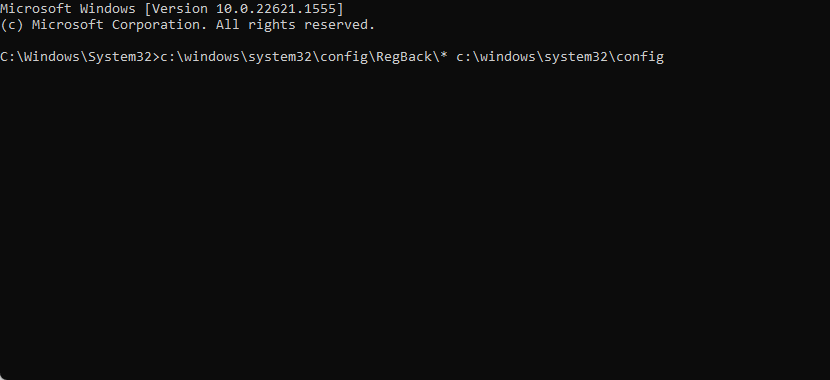
Troubleshoot → Advanced Options → Command Prompt - In the Command Prompt window, type the following command and press Enter:
c:\windows\system32\config\RegBack\* c:\windows\system32\config
- Wait for the process to complete, which will restore the Registry to its previous state using the backup files.
- Once finished, restart your PC and check if the error is resolved.
🔄 10. Reset Windows to Default Settings
If none of the previous troubleshooting methods resolve the “Automatic Startup Repair couldn’t repair your PC” error, performing a Windows reset may be your last option. Resetting Windows will restore your system to its default settings, but it may erase data on your hard drive, including apps and files.
Before proceeding, back up all important files and documents to ensure you don’t lose any data during the reset process.
How to Reset Windows:
Follow the on-screen instructions to complete the reset.
- Boot into the Windows Recovery Environment (WinRE):
- Use F11 or F8 during startup, or force shutdown your PC three times to trigger WinRE.
- Navigate to:
- Troubleshoot → Reset this PC
- Choose either the “Keep my files” or “Remove everything” option depending on your preference.
Conclusion
The Automatic Startup Repair tool in Windows 10 is a crucial feature designed to keep your system running smoothly by diagnosing and fixing startup issues. However, encountering the “Automatic Startup Repair couldn’t repair your PC” error can be frustrating.
As demonstrated in this guide, there are several steps you can take to resolve this error, ranging from simple restarts to advanced troubleshooting methods like DISM and SFC scans. By following our step-by-step guide, you’ll be able to thoroughly diagnose and address the root cause of the problem to prevent it from occurring again.
We hope that, with these methods, you’ll be able to fix the Automatic Startup Repair tool and get your PC running properly without any further issues. Always remember to back up your important files before attempting more advanced solutions, like a Windows reset.
One more thing
If you’re in search of a software company that embodies integrity and upholds honest business practices, your quest ends here at Ecomkeys.com. As a Microsoft Certified Partner, we prioritize the trust and satisfaction of our customers. Our commitment to delivering reliable software products is unwavering, and our dedication to your experience extends far beyond the point of sale. At Ecomkeys.com, we provide a comprehensive 360-degree support system that accompanies you throughout your software journey. Your trust is our foundation, and we’re here to ensure that every interaction with us is a positive and trustworthy one.