Windows Spotlight is a visually engaging feature in Windows 10 that automatically displays stunning background images and personalized suggestions on your lock screen. Many users love this feature for its dynamic, fresh look each time they log in. However, it’s only when Windows Spotlight stops working that you realize how much value it adds to your Windows experience. Whether the lock screen is stuck on the same image or isn’t displaying any content at all, this issue can be frustrating.
Despite Windows 10 being one of the most reliable operating systems, bugs and glitches still happen. A broken Windows Spotlight could be due to misconfigured settings, corrupted system files, or problems syncing with Microsoft servers. In this guide, we’ll explain exactly how Windows Spotlight works, why it may stop functioning, and walk you through several proven methods to get it working again. Let’s dive in and restore your lock screen to its full, eye-catching glory.
What Is Windows Spotlight ?
Windows Spotlight is one of the most visually appealing features in Windows 10, designed to enhance your lock screen with beautiful, high-resolution images curated from Bing. Introduced with the launch of Windows 10, this dynamic feature automatically showcases stunning landscapes, nature scenes, architecture, and even animals from around the world every time you lock your computer or boot up your system. From Perce Rock in Canada to the breathtaking Deogyusan mountains in South Korea, Windows Spotlight transforms your lock screen into a rotating gallery of global beauty.
In 2017, Microsoft enhanced this experience by including location details, allowing users to learn more about each image with a single click. While this adds educational and visual value, the feature often goes underappreciated—until it suddenly stops working. When Spotlight gets stuck on a single image or fails to load new backgrounds, it can be frustrating for users who rely on it for a fresh and polished look.
If you’re dealing with Windows Spotlight not working, you’re not alone. Many users face this issue due to misconfigured settings, corrupted files, or syncing issues with Microsoft servers. Fortunately, restoring Spotlight is easier than you think.
Method 1: Restart Windows Spotlight to Fix Lock Screen Issues
One of the simplest and most effective solutions is restarting the Windows Spotlight feature. This involves temporarily disabling it, rebooting your PC, and then re-enabling it to refresh its settings. Follow these steps:
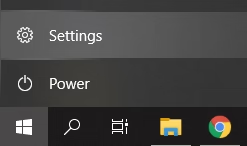
- Click the Windows Start button and select Settings (or press Windows + I).
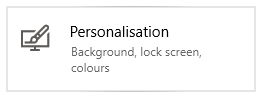
2. Navigate to Personalization > Lock screen.

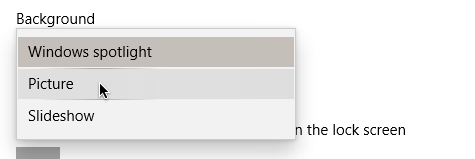
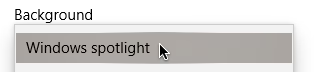
3. Under the Background dropdown menu, select Picture or Slideshow instead of Windows Spotlight.
4. Close the Settings window then restart your computer.
5. After the reboot, Go to Settings > Personalization > Lock screen.
6. Change the Background option back to : Windows Spotlight.
7. Restart your computer once more.
After completing these steps, your lock screen should once again feature new images selected by Windows Spotlight. If not, don’t worry—there are additional methods you can try to fully restore this feature and bring your lock screen back to life.
Method 2: How Manually Reset Windows Spotlight by Clearing Spotlight Assets
If restarting Windows Spotlight didn’t resolve the issue, a deeper reset might be necessary. Sometimes, corrupted Spotlight files can prevent the feature from functioning properly. In this case, manually deleting the Spotlight assets and resetting its configuration can help restore normal operation.
Here’s a step-by-step guide to completely reset Windows Spotlight on your Windows 10 device:
Step 1: Temporarily Disable Windows Spotlight
Before you reset anything, you need to disable Spotlight temporarily to avoid conflicts during the reset.
- Press Windows + I to open Settings.

2. Go to Personalization > Lock screen.
3. Under the Background section, select either Picture or Slideshow (this turns off Windows Spotlight for now).
Step 2: Delete Spotlight Asset Files
Once Spotlight is disabled, you can safely remove the cached images and data associated with it.
- Press Windows + R to open the Run dialog box.
- Type the following path and press OK:
%USERPROFILE%\AppData\Local\Packages\Microsoft.Windows.ContentDeliveryManager_cw5n1h2txyewy\LocalState\Assets
- In the folder that opens, press Ctrl + A to select all files, right-click, and select Delete. These are cached Spotlight images that might be causing issues.
Step 3: Rename the Spotlight Configuration Files
Now, reset Spotlight’s configuration files to force Windows to generate new ones.
- Press Windows + R again and run the following path:
%USERPROFILE%\AppData\Local\Packages\Microsoft.Windows.ContentDeliveryManager_cw5n1h2txyewy\Settings
- Inside the folder, locate two files:
settings.datroaming.lock
- Right-click each file and rename them:
- Rename
settings.dattosettings.dat.bak - Rename
roaming.locktoroaming.lock.bak
- Rename
- Close the folder and restart your computer to apply the changes.
Step 4: Re-enable Windows Spotlight
Now that the old Spotlight data is removed and reset, you can turn the feature back on.
- Open Settings > Personalization > Lock screen.
- Under Background, choose Windows Spotlight again.
- Restart your computer once more to ensure changes take effect.
After completing these steps, your Windows lock screen should start displaying new and refreshing Spotlight images again.
Method 3: Re-register the Windows Spotlight App Using PowerShell
If restarting and resetting Windows Spotlight didn’t fix the issue, it’s time to try a more advanced approach — re-registering the Windows Spotlight feature using Windows PowerShell. While it may sound complex, this method has proven to be effective for many users experiencing issues with Spotlight not working properly on Windows 10.
Note: You must have administrator privileges to perform this method.
Follow the steps below carefully to re-register the Windows Spotlight app and restore its functionality:
Step 1: Disable Windows Spotlight Temporarily
Before running any commands, you’ll need to turn Spotlight off temporarily:
- Open the Settings app by pressing Windows + I.
2. Navigate to Personalization > Lock screen.
3. Under the Background section, choose either Picture or Slideshow to disable Spotlight for now.
Step 2: Launch PowerShell as Administrator
To execute the necessary commands, open PowerShell with elevated permissions:
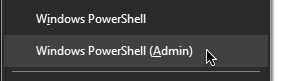
- Press Windows + X on your keyboard and select Windows PowerShell (Admin) from the menu.
2. When prompted by User Account Control (UAC), click Yes to grant administrator access.
Step 3: Run the Re-registration Command
In the PowerShell window, copy and paste the following command, then press Enter:
Get-AppxPackage -allusers *ContentDeliveryManager* | foreach {Add-AppxPackage "$($_.InstallLocation)\appxmanifest.xml" -DisableDevelopmentMode -register }
This command re-registers the Content Delivery Manager, which powers the Windows Spotlight feature, and restores all associated files and configurations.
Step 4: Restart and Re-enable Spotlight
Once the command completes successfully:
- Restart your computer.
- Go back to Settings > Personalization > Lock screen.
- Under the Background drop-down, select Windows Spotlight.
- Restart your device once more to ensure changes take full effect.
After these steps, Windows Spotlight should be working again — delivering beautiful, curated images to your lock screen just like before.
Final Thoughts
Windows Spotlight is a visually engaging feature that adds personality and vibrancy to your lock screen — but when it stops working, it can be frustrating. Fortunately, with the step-by-step solutions outlined above — from restarting the feature and clearing Spotlight assets to running system commands like SFC, DISM, and PowerShell — you have everything you need to troubleshoot and fix the issue effectively.
By following these proven methods, you can restore Windows Spotlight and enjoy stunning Bing-curated images once again every time you lock or start your PC. If none of the solutions work, consider checking for Windows updates or creating a new user profile as a last resort.
For more helpful Windows 10 tips, troubleshooting guides, and system performance fixes, be sure to bookmark our blog. We’re here to make tech easier for you — one solution at a time.
One more thing
If you’re in search of a software company that embodies integrity and upholds honest business practices, your quest ends here at Ecomkeys.com. As a Microsoft Certified Partner, we prioritize the trust and satisfaction of our customers. Our commitment to delivering reliable software products is unwavering, and our dedication to your experience extends far beyond the point of sale. At Ecomkeys.com, we provide a comprehensive 360-degree support system that accompanies you throughout your software journey. Your trust is our foundation, and we’re here to ensure that every interaction with us is a positive and trustworthy one.