
For many gamers, locating the Steam screenshot folder can feel like navigating a hidden maze. While Steam provides an easy way to capture your in-game moments, finding your saved screenshots isn’t always straightforward.
If you’re using the Windows + Print Screen shortcut, your system saves the captured images in C:\Users[Your Name]\Pictures\Screenshots as PNG files. However, Steam screenshots follow a different path, stored in a dedicated Steam screenshot folder within its directory.
In this guide, we’ll reveal where Steam stores your screenshots on Windows 10 and how you can easily access and manage them. Stay tuned to uncover the quickest methods to find, view, and share your Steam screenshots effortlessly!
Capturing the Essence: The Power of In-Game Screenshots
The Power of Steam Screenshots: Capture, Organize, and Share Your Gaming Legacy
Are you an avid gamer navigating the digital realms? In these virtual landscapes, the importance of capturing your in-game moments through screenshots is undeniable. These visual records stand as trophies of achievement, showcasing victorious battles and hard-earned milestones in the vast world of online gaming.
However, beyond personal glory, screenshots serve a greater purpose. They act as crucial tools for troubleshooting, helping uncover hidden bugs, glitches, and design flaws that impact the gaming experience. These captured frames hold valuable insights, guiding both players and developers in refining the gaming environment.
Just like the photo albums on your smartphone, your gaming screenshots demand organization and accessibility. This is where Steam’s Screenshot Manager becomes your ultimate digital archive. It allows you to categorize, store, and manage your gaming snapshots effortlessly, ensuring each image finds its rightful place within your gaming collection.
But Steam offers more than just storage. It gives you full control over your captured memories—choose to share your epic moments with the Steam community, sparking engagement and discussion, or keep them private as cherished digital keepsakes on your hard drive. The choice is yours, and Steam ensures your gaming legacy remains preserved.
Unveiling the Hidden Path: Navigating to the Steam Screenshot Folder
Embarking on a quest to uncover the elusive Steam screenshot folder is a journey many gamers undertake. As the digital snapshots of epic moments and virtual triumphs accumulate, the need to locate their storage becomes a common desire.
The adventure begins in the heat of gameplay, where a simple press of the F12 key summons the Steam Screenshot Manager. In this digital realm, screenshots are captured, ready to be curated, preserved, or shared—all without interrupting your in-game odyssey.
Yet, across countless online forums, one question echoes: “Where does the Steam screenshot folder reside?” or “How can I access this hidden treasure trove of gaming memories?”
Fear not, for there are two paths that lead to this sacred trove:
Path #1: The Gateway of the Steam Client
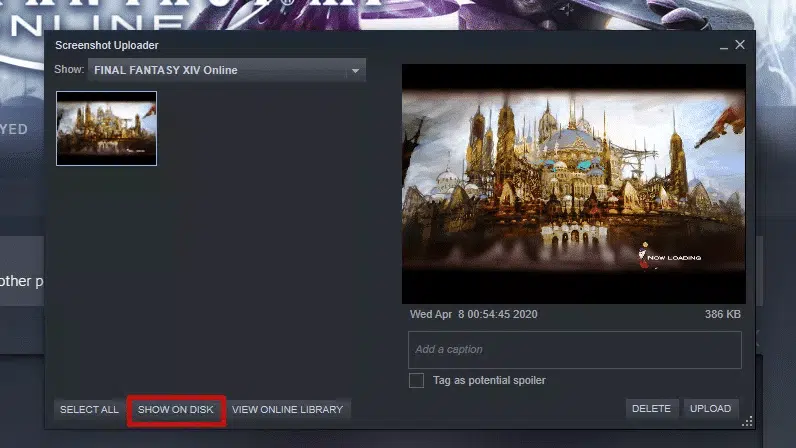
Enter the Steam Client, your gateway to both virtual and real worlds. To uncover the hidden location of your Steam screenshot folder, follow this simple path:
- At the top menu bar, locate and click on “View.”
- A dropdown menu appears—select “Screenshots.”
- This opens the Steam Screenshot Manager, where all your captured gaming moments are displayed.
- Spot the “Show On Disk” button—click it to be instantly transported to your File Explorer.
- And there it is! Your Steam screenshot folder, home to every screenshot you’ve taken, neatly stored and ready for access.
With this quick guide, you now hold the key to finding, organizing, and sharing your Steam screenshots. Whether for troubleshooting, nostalgia, or showcasing victories, your digital gallery is just a few clicks away.
Unveiling Alternate Routes: Navigating to the Ethereal Steam Screenshot Realm
As we venture deeper into this realm, a second path reveals itself— a digital labyrinth leading to the fabled Steam screenshot folder. In this path, the virtual world becomes your sanctuary, guarding your treasures with the enchantment of online storage.
Path #2: The Gateway of Online Storage
Within the vast realm of Steam, a sanctuary of online storage awaits—where your captured gaming moments transcend physical limits. Here, your screenshots are safeguarded, forever linked to your Steam account.
To access this virtual archive, follow these steps:
- Launch Steam, your portal to the gaming universe.
- Navigate to “View” in the top menu, your guide to hidden realms.
- Click on “Screenshots”, unveiling the path to your stored memories.
- Select “View Online Library”, the key to your ethereal screenshot collection.
Within these digital walls, every screenshot becomes part of your Steam community profile, woven into the fabric of your gaming journey. With 1 GB of free storage on the Steam Cloud, you can store thousands of screenshots, accessible from any device, anytime.
Whether you choose to share your triumphs with the world or keep them private, Steam grants you complete control over your gaming legacy. Your virtual adventures are now preserved for eternity.
Path #3: The Gateway of File System
Within your computer’s memory, every screenshot is more than just pixels—it’s a frozen moment of your gaming journey, waiting to be rediscovered. These captured dreams are stored deep within your Steam game’s installation directory, safeguarded within your PC’s file structure.
To locate your Steam screenshot folder, follow these steps:
- Open File Explorer using Win Key + E on Windows 10/11.
- Navigate to Local Disk (C:), where your Steam directory resides.
- Follow the path:
C:\Program Files (x86)\Steam\userdata\YourAccountID\760\remote<AppID>\screenshots - Each folder corresponds to a specific game, identified by its App ID—a unique numeric code assigned by Steam.
- If you’re unsure of a game’s App ID, visit SteamDB.info or check your Steam library for reference.
Once inside, your screenshots are unveiled, each one a testament to your virtual conquests. Whether for troubleshooting, nostalgia, or sharing epic moments, you now hold the key to accessing your Steam gaming memories with ease.
Decoding Your Steam Enigma: Unveiling the App-ID
As we journey deeper into the digital labyrinth, a crucial key emerges—the Steam App ID, the numeric cipher that unlocks the hidden world of your Steam screenshots.
How to Find Your Steam ID
- Launch the Steam client, your portal to digital adventures.
- Click on “View” in the top menu bar to access hidden paths.
- Navigate to “Settings” on the left-side menu.
- Enter the “Interface” section, where Steam’s secrets are revealed.
- Check the box for “Display Steam URL address when available” to unveil your unique Steam ID.
- Click “OK” to confirm, sealing your settings.
- Visit your Steam profile—your Steam ID appears at the end of the URL in the browser or client.
With this powerful knowledge, you now hold the key to locating, organizing, and accessing your Steam screenshots. Whether for troubleshooting, nostalgia, or sharing gaming triumphs, your Steam ID ensures you never lose track of your captured gaming memories.
Changing the Domain: Altering the Steam Screenshot Nexus
A true adventurer’s journey doesn’t end with mere discovery—it extends to mastery. To safeguard your captured gaming moments from system failures or space limitations, you hold the power to relocate your Steam screenshot folder to a more secure domain.
How to Change Your Steam Screenshot Folder Location
- Open Steam, your portal to digital transformation.
- Click on “View” in the menu bar, then proceed to “Settings.”
- Enter the “In-Game” section—this is where screenshot settings reside.
- Locate the “Screenshot Folder” button—your gateway to customization.
- Choose a new destination, such as Local Disk D or an external storage device, ensuring safety and accessibility.
- Click “Select” to confirm, binding the change to your will.
With this simple yet powerful customization, your Steam screenshots now rest in a location of your choosing, shielded from unexpected system crashes and storage constraints. Every captured moment becomes part of your ever-growing digital legacy, preserved for future triumphs and nostalgia-filled revisits.
Concluding Reflections
In this comprehensive guide, we trust that our insights have served as a guiding light, illuminating the process to unveil and harness the elusive Steam screenshot folder on Windows 10. Your quest to seamlessly navigate this digital realm has been our privilege to assist.
Should your curiosity lead you further, know that our digital hub remains ever open. Return to our sanctum of knowledge, where a wealth of guidance and expert insights awaits your every query. Beyond the arcane secrets of Steam, our platform also offers treasures on Microsoft Office software and a bounty of informative resources designed to empower your digital adventures.
The Realm of Opportunity Awaits
But the chronicles of this journey extend far beyond these pages. To receive exclusive whispers of promotions, deals, and discounts on our offerings, a simple pact awaits—one sealed by your email. This covenant unlocks a gateway to unrivaled knowledge, ensuring you stay ahead with the latest technological marvels, delivered straight to your digital haven.
With this, our saga reaches its final chapter—but your journey of discovery continues. Every keystroke, click, and screenshot expands the canvas of your digital narrative. As you venture further into the realms of productivity and innovation, know that we stand beside you as custodians of knowledge, ready to guide your future expeditions into limitless possibilities.
One more thing
If you’re in search of a software company that embodies integrity and upholds honest business practices, your quest ends here at Ecomkeys.com. As a Microsoft Certified Partner, we prioritize the trust and satisfaction of our customers. Our commitment to delivering reliable software products is unwavering, and our dedication to your experience extends far beyond the point of sale. At Ecomkeys.com, we provide a comprehensive 360-degree support system that accompanies you throughout your software journey. Your trust is our foundation, and we’re here to ensure that every interaction with us is a positive and trustworthy one.