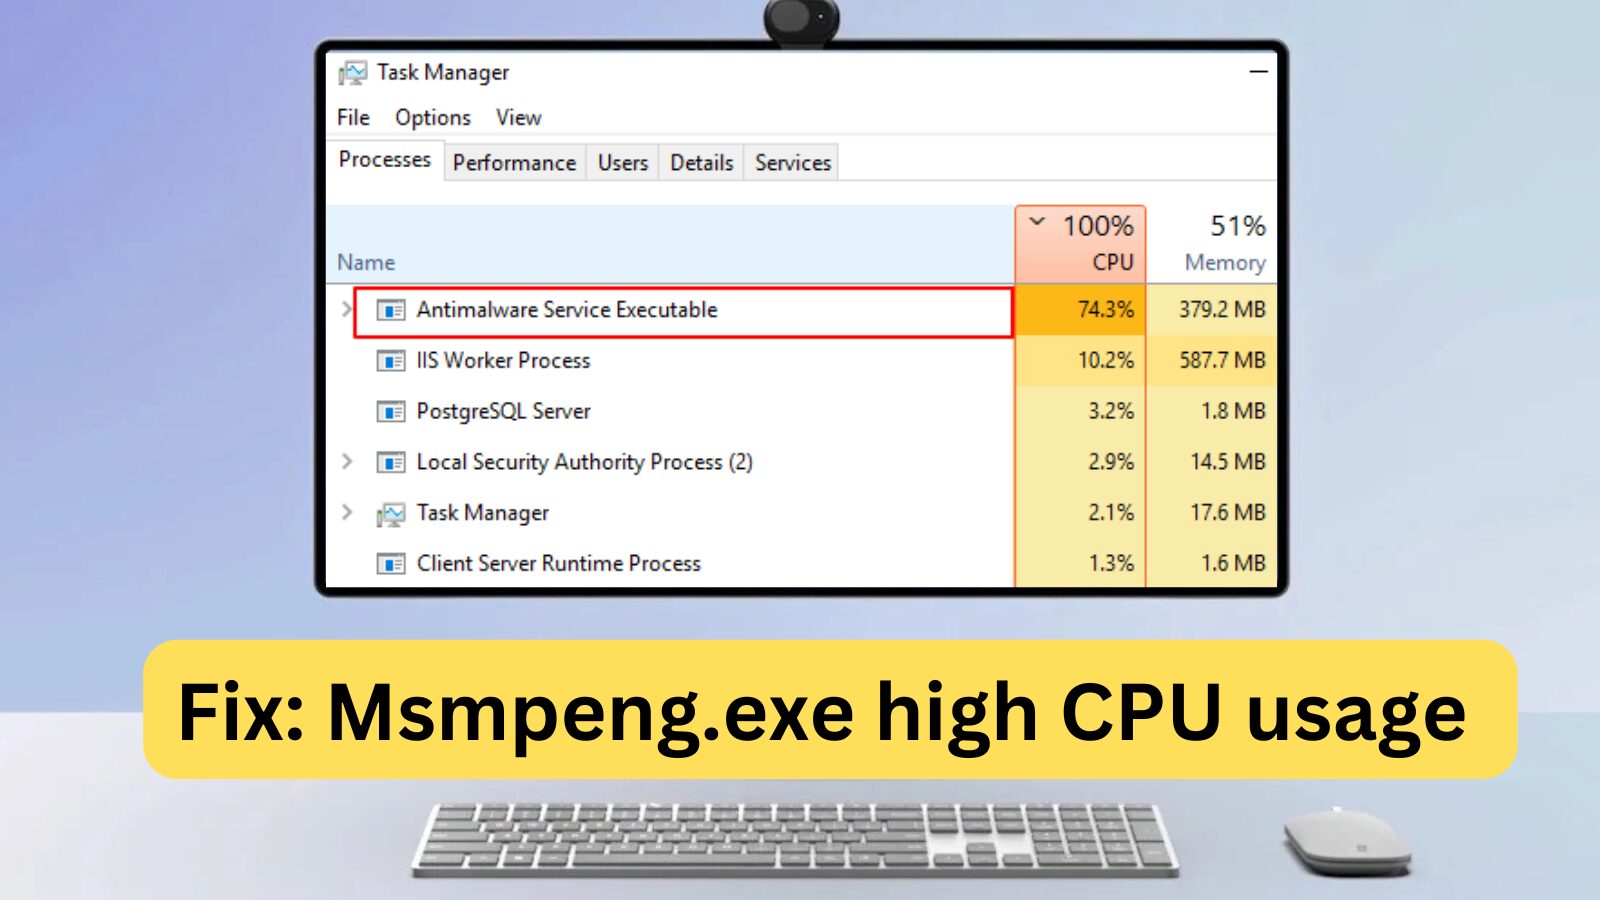
Windows Defender relies on the Antimalware Service Executable (MsMpEng.exe) process to perform its security functions. However, many Windows users experience high CPU usage due to this process, which can slow down system performance.
Learn how to fix Windows Defender’s Antimalware Service Executable (MsMpEng.exe) high CPU usage and restore your computer’s speed and efficiency.
What Is Antimalware Service Executable (MsMpEng.exe)? – Windows Security Explained
Antimalware Service Executable (MsMpEng.exe) is a core Windows Security process responsible for real-time protection against malware. Running in the background, this process continuously scans files and programs to detect potential threats.
When MsMpEng.exe detects malware, viruses, or other security threats, it either removes them or quarantines them, ensuring your Windows system stays protected from harmful attacks.
Why Does Antimalware Service Executable (MsMpEng.exe) Use High CPU?
The Antimalware Service Executable (MsMpEng.exe) is responsible for Windows Defender’s real-time protection, continuously monitoring your PC for potential threats. However, many users have reported that MsMpEng.exe can cause high CPU, memory, and disk usage, slowing down their system.
Main Reasons for High CPU Usage by Antimalware Service Executable:
✔ Real-Time Protection: Constantly scanning files, connections, and programs in the background can consume significant CPU resources, especially on low-end PCs.
✔ Full System Scans: Windows Defender performs scheduled full system scans when the PC wakes up or connects to a network, leading to high CPU usage, system lagging, and delays.
✔ Self-Scanning Loop: The Antimalware Service Executable scans its own folder (C:\Program Files\Windows Defender), which can lead to unnecessary resource consumption.
Other Possible Causes of High CPU Usage:
- Low hardware resources
- Windows software conflicts
- Malware infections
- Corrupt system files
- Outdated Windows Defender definitions
- Misconfigured Windows settings
How to Fix High CPU Usage by MsMpEng.exe (Antimalware Service Executable) in Windows 10
If your Windows Defender’s Antimalware Service Executable (MsMpEng.exe) is consuming too much CPU, memory, or disk usage, follow these proven solutions to fix the issue. These methods are based on the latest Windows 10 updates and will help optimize system performance.
Fix #1: Scan Your Computer for Malware
High CPU usage by MsMpEng.exe might be caused by a hidden malware infection. Some malicious scripts and programs can manipulate Windows Defender, leading to increased memory and CPU usage.
To rule out malware, perform a full system scan using Windows Defender:
Steps to Scan Your PC for Malware Using Windows Defender:
- 1️⃣ Click on the Search bar in your taskbar (or press Windows + S).
- 2️⃣ Type Windows Security and select it from the search results.
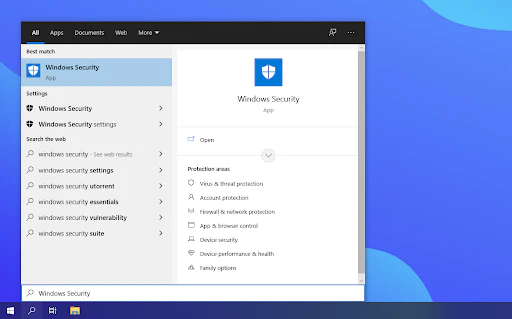
- 3️⃣ In Windows Security, go to Virus & Threat Protection.
- 4️⃣ Click on Scan options, then choose Full Scan.
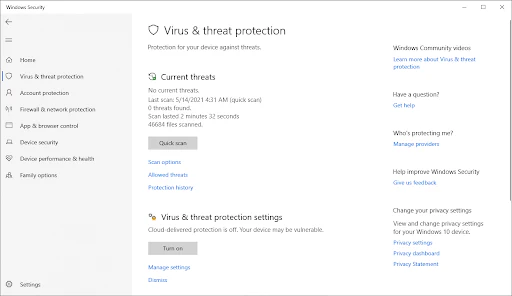
- 5️⃣ Click Scan now and wait for the scan to complete (may take 1-2 hours, depending on the number of files).

- 6️⃣ If a threat is detected, Windows 10 will quarantine or remove it. Review the scan results for details
✅ Pro Tip: If Windows Defender doesn’t find anything but you still experience high CPU usage, consider using a third-party antivirus to perform a deep scan for malware.
Fix #2: Change Windows Defender Scheduling Settings
If Antimalware Service Executable (MsMpEng.exe) causes high CPU usage, it may be because Windows Defender is performing automatic full system scans at inconvenient times. You can reschedule these scans to run when you’re not actively using your PC.
Steps to Reschedule Windows Defender Scans:
- 1️⃣ Open Windows Search and type Task Scheduler, then click to open it.
- 2️⃣ In the left pane, double-click on Task Scheduler Library.
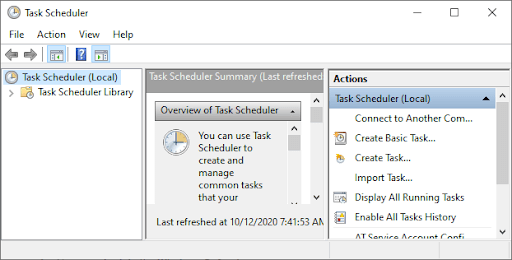
- 3️⃣ Navigate through the folders using the following path:
- 📂 Library → Microsoft → Windows → Windows Defender
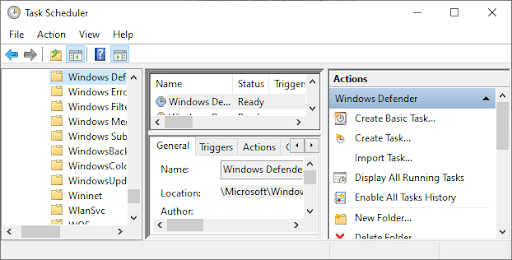
- 4️⃣ In the Windows Defender folder, locate Windows Defender Scheduled Scan in the middle pane and double-click it.
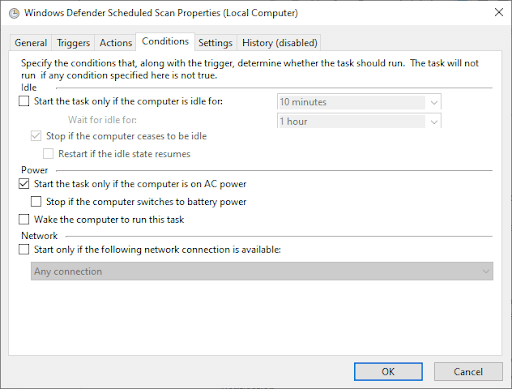
- 5️⃣ In the new window, go to the Conditions tab and uncheck all options, then click OK to disable automatic scans.
✅ Now, reschedule Windows Defender scans for optimal performance:
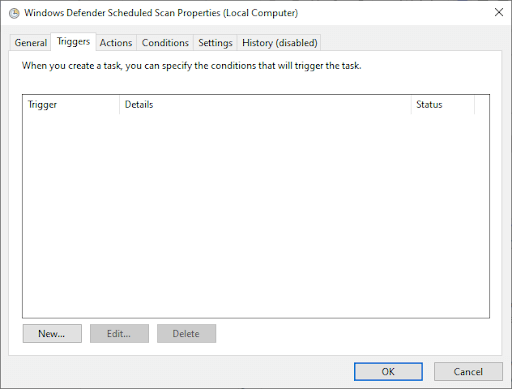
- 6️⃣ Double-click on Windows Defender Scheduled Scan again.
- 7️⃣ Go to the Triggers tab and click New to create a new scan schedule.
- 8️⃣ Set the scan frequency to weekly or monthly, depending on what works best for you.
- 9️⃣ Choose the day and time for the scan when your PC is least active, then click OK to save changes.
- 🔟 Repeat this process for the following three additional Defender tasks:
- Windows Defender Cleanup
- Windows Defender Cache Maintenance
- Windows Defender Verification
- Windows Defender Cache Maintenance
- Windows Defender Cleanup
Once you’ve rescheduled these tasks, restart your PC and check if Windows Defender still causes high CPU usage. This should help reduce system resource consumption while keeping your computer protected.
Fix #3: Add Antimalware Service Executable to Windows Defender’s Exclusion List
If Antimalware Service Executable (MsMpEng.exe) is causing high CPU usage by scanning its own files during Windows Defender scans, you can add it to the exclusion list to prevent this unnecessary scanning. This method will help reduce system lag and improve overall performance.
Steps to Add Antimalware Service Executable to Exclusions:
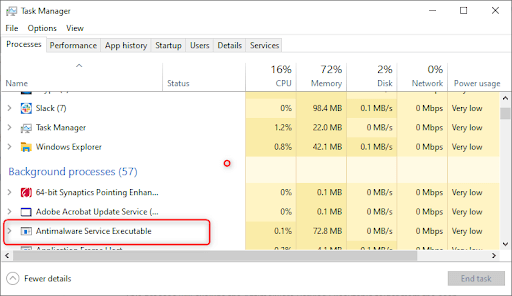
- 1️⃣ Open Task Manager by pressing Ctrl + Shift + Esc or by right-clicking the Taskbar and selecting Task Manager.
- 2️⃣ In the list of processes, find Antimalware Service Executable. Right-click on it and select Open File Location.
- 3️⃣ Copy the full path of the Antimalware Service Executable from the address bar.
- 4️⃣ Open the Start menu, type “Windows Defender”, and click the top result to launch Windows Defender Security Center.
- 5️⃣ In the Windows Defender Security Center, click Virus & Threat Protection, then click Virus & Threat Protection Settings and select Manage Settings.
- 6️⃣ Scroll down to the Exclusions section and click Add or Remove Exclusions.
- 7️⃣ Click Add an exclusion, select the Folder option, and paste the path you copied from the address bar.
- 8️⃣ Click Open to confirm.
By following these steps, you will exclude the Antimalware Service Executable folder from being scanned, which will prevent Windows Defender from scanning itself and reduce unnecessary CPU usage. This method fixes the issue without completely disabling Windows Defender or its protection.
Fix #4: Disable Windows Defender Service
If MsMpEng.exe continues to cause high CPU usage even after trying the previous solutions, you may need to disable Windows Defender entirely. However, it’s important to note that disabling Windows Defender leaves your system vulnerable to malware and cyberattacks, so it’s crucial to have a reliable third-party antivirus program installed if you choose this option.
Here’s how to turn off the Antimalware Service Executable (MsMpEng.exe) through the Registry Editor:
Steps to Disable Windows Defender via Registry Editor:
- 1️⃣ Press Windows Key + R to open the Run Dialog Box.
- 2️⃣ Type Regedit and click OK to open the Registry Editor.
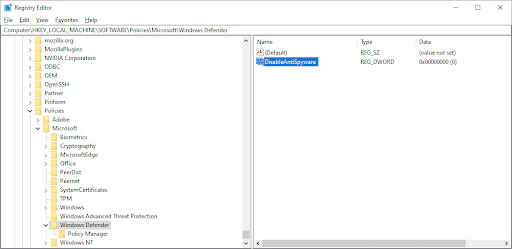
- 3️⃣ In the left navigation pane, double-click on the folders to navigate to the following path:
- HKEY_LOCAL_MACHINE\SOFTWARE\Policies\Microsoft\Windows Defender
- 4️⃣ Look for a registry entry named DisableAntiSpyware. Double-click on it and set its value data to 1.
- 5️⃣ If there is no entry for DisableAntiSpyware, go back to the main Registry Editor pane. Right-click on it, select New, then click DWORD (32-bit) Value.
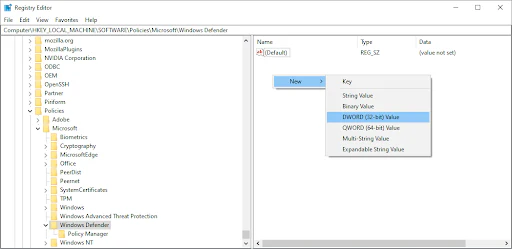
- 6️⃣ Name the new registry entry DisableAntiSpyware, double-click on it, and set its value data to 1.
Once these steps are completed, Windows Defender will be disabled, and the Antimalware Service Executable will no longer be active.
🔔 Important: Disabling Windows Defender increases your vulnerability to malware, viruses, and cyberattacks. We highly recommend that you install a third-party antivirus solution such as Kaspersky. Kaspersky Premium offers advanced protection at a competitive price, ensuring your computer stays safe from threats.
Fix #5: Roll Back Windows Defender Definition Updates
In some rare cases, Windows Defender may receive a bad definition update that causes legitimate Windows 10 files to be incorrectly flagged as viruses. This can result in a significant increase in CPU usage and overload your system with false positives. If you suspect that a definition update is the cause of the high CPU usage by MsMpEng.exe, here’s how to roll it back.
Steps to Roll Back Windows Defender Definition Updates:
- 1️⃣ Open the search bar in your taskbar by clicking on the magnifying glass icon or press Windows + S.
- 2️⃣ Type Command Prompt in the search box. When you see it in the results, right-click and select Run as Administrator.
- 3️⃣ When prompted by User Account Control (UAC), click Yes to allow the app to launch with administrative permissions.
- 4️⃣ Once the Command Prompt window is open, type the following command and press Enter:
-
"%PROGRAMFILES%\Windows Defender\MPCMDRUN.exe" -RemoveDefinitions -All
-
- 5️⃣ After the first command finishes, input the following command and execute it by pressing Enter:
-
"%PROGRAMFILES%\Windows Defender\MPCMDRUN.exe" -SignatureUpdate
-
🔄 After these steps, Windows Defender will remove the problematic definitions and update the signatures. Check if the Antimalware Service Executable (MsMpEng.exe) has reduced its high CPU usage.
Watch: 10 Must-Have Apps and Software for Windows 2025
Discover the top essential apps and software you need to boost your Windows 2025 experience. From productivity tools to entertainment and security, these must-have apps will take your computer to the next level. Watch the video for a comprehensive rundown of the best apps for Windows 2025!
Wrapping Up
Windows Defender is an essential tool that comes free with your Windows operating system, offering real-time protection against malware and other threats. However, it can sometimes drain your system’s CPU. By following the steps outlined in this article, you’ll be able to take control of the Antimalware Service Executable (MsMpEng) and keep your PC running at its optimal speed.
Did you find this guide helpful? Share it with your colleagues to boost your team’s productivity! Also, don’t forget to visit our website for great Microsoft Office software deals and more useful guides and articles on Microsoft’s top productivity tools.
One more thing
If you’re in search of a software company that embodies integrity and upholds honest business practices, your quest ends here at Ecomkeys.com. As a Microsoft Certified Partner, we prioritize the trust and satisfaction of our customers. Our commitment to delivering reliable software products is unwavering, and our dedication to your experience extends far beyond the point of sale. At Ecomkeys.com, we provide a comprehensive 360-degree support system that accompanies you throughout your software journey. Your trust is our foundation, and we’re here to ensure that every interaction with us is a positive and trustworthy one.