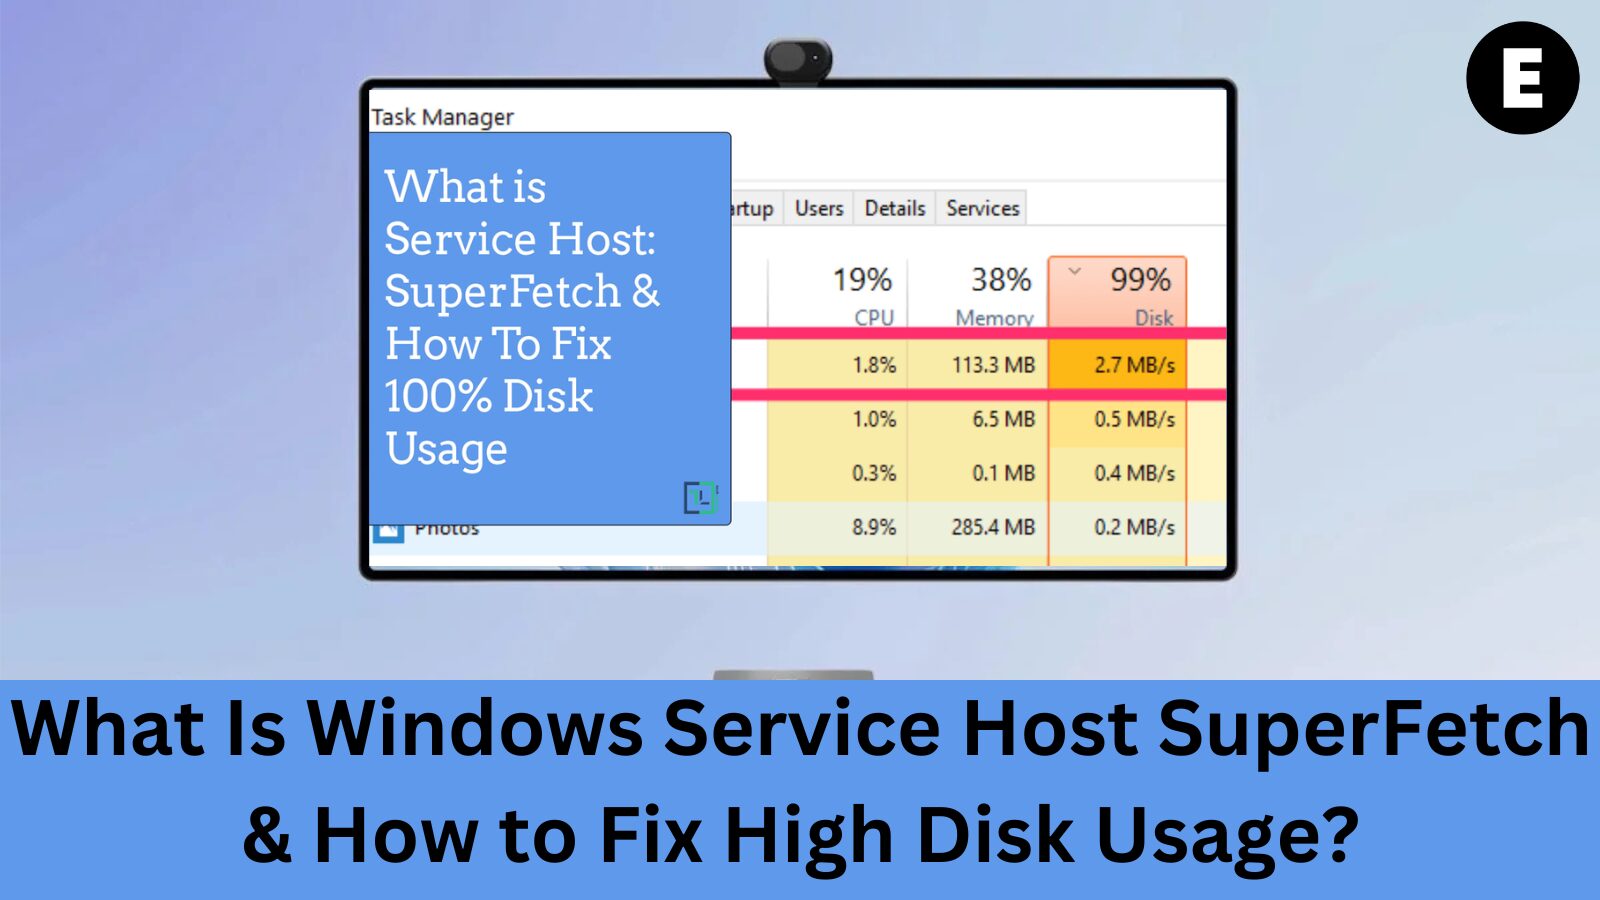
Service Host Superfetch in Windows is a crucial system process designed to enhance performance, but at times, it can cause high disk usage issues instead of boosting speed.
Have you ever encountered this situation: “Your computer ran into a problem it couldn’t handle, disk usage spiked to nearly 100%, and you discovered that Service Host Superfetch was the culprit?”
Many Windows 10 users have raised concerns about Service Host Superfetch, frequently asking:
- What is Service Host Superfetch?
- What does Service Host Superfetch do?
- How do you fix Service Host Superfetch high disk usage?
In this article, we’ll provide clear answers to all your questions about Service Host Superfetch, helping you understand its role and how to fix related issues.
What is Service Host SuperFetch on Windows 10?
Many users are unaware that Service Host SuperFetch was first introduced in Windows Vista and has remained a core feature in every Windows OS, including Windows 10.
Service Host SuperFetch is a critical Windows process designed to enhance system performance by managing RAM (Random Access Memory) efficiently. Its main goal is to boost application performance and ensure a smooth PC experience without system slowdowns or crashes.
Some experts describe SuperFetch as a generic performance optimization tool. It allows the Windows OS to run smoothly, preventing apps, programs, and downloads from crashing while keeping them responsive.
What Does Service Host SuperFetch Do?
As mentioned earlier, the primary function of Service Host SuperFetch is system optimization. It continuously analyzes your system’s RAM usage and builds a profile of frequently used applications.
Over time, SuperFetch learns which apps you use the most and pre-loads their essential components into RAM. This reduces loading times, making your apps open much faster than usual.
Key Benefits of Service Host SuperFetch:
✔ Reduces PC boot time
✔ Speeds up application performance
✔ Improves app loading times
✔ Enhances system responsiveness
Important Note:
SuperFetch primarily benefits users with traditional hard drives (HDDs), as it helps compensate for slower read speeds. However, if you’re using a Solid State Drive (SSD), you may not notice a significant improvement.
If you have a mixed storage setup (e.g., an SSD for the OS and an HDD for storage), SuperFetch can still enhance performance without affecting SSD operations.
Why Is Service Host SuperFetch in My Task Manager?
If you’ve noticed Service Host SuperFetch in your Task Manager, you might be wondering what it is and why it’s running. First, SuperFetch is not a virus—it’s a legitimate Windows background process designed to optimize system performance.
Unlike standalone applications, Service Host SuperFetch runs as part of the broader “Service Host” (svchost.exe) processes in Windows 10. This means you won’t see it listed as an independent task but rather as a grouped process under Service Host.
Why Is SuperFetch Grouped Under Service Host?
- SuperFetch operates as a .DLL process rather than an .EXE file, making it more stable and secure.
- Microsoft has shifted away from .EXE files due to their vulnerability to malware and system crashes.
- It runs in the background and works alongside other Windows 10 services to manage RAM usage and speed up application loading times.
How to Find SuperFetch in Task Manager
- Open Task Manager (Ctrl + Shift + Esc).
- Scroll through the list of Service Host processes running in the background.
- Look for the one labeled Service Host: SuperFetch.
By identifying SuperFetch in Task Manager, you can monitor its activity and determine if it’s helping performance or causing high disk usage.
Service Host SuperFetch High Disk Usage – What You Need to Know

Service Host SuperFetch is generally a helpful Windows process, designed to enhance system performance. However, many users experience high disk usage issues, leading to slow performance, system lag, and even 100% disk usage.
If you’re running Windows 10 and notice that Service Host: SuperFetch is consuming excessive CPU, memory, or disk resources, you’re not alone. Many Windows users have reported this issue, where SuperFetch sometimes maxes out memory usage and significantly slows down the system.
Why Does Service Host SuperFetch Cause High Disk Usage?
- SuperFetch continuously manages RAM, cleaning it up and preloading frequently used files.
- It forces your PC to use maximum resources to handle I/O (input/output) requests.
- Sometimes, SuperFetch overloads system memory, leading to 100% disk usage and slowing down the PC.
Will High Disk Usage Go Away on Its Own?
In most cases, once SuperFetch finishes optimizing RAM, the disk usage will return to normal. However, if it remains high for an extended period, it could indicate a problem that needs fixing.

If your PC performance is suffering due to SuperFetch high disk usage, you might need to disable or troubleshoot the service to restore system stability.
Should I Disable SuperFetch?
The answer depends on your experience with Service Host: SuperFetch. In most cases, SuperFetch high disk usage is normal and not a cause for concern.
However, if you notice that SuperFetch is consistently consuming high disk, CPU, or memory resources, it may be time to disable it.
Will Disabling SuperFetch Affect My PC?
- No, disabling SuperFetch won’t cause system instability or glitches.
- However, you might experience slight delays when opening frequently used applications, as they won’t be preloaded into RAM like before.
- If your system is running fine, it’s best to leave SuperFetch enabled. But if it’s causing performance issues, disabling it could improve your PC’s speed and responsiveness.
If you’re dealing with persistent high disk usage, disabling SuperFetch might be a good solution to boost performance.
How to Fix Service Host SuperFetch High Disk Usage
(How to Disable Service Host SuperFetch)
If you’re experiencing high disk usage due to Service Host SuperFetch, the best solution is to disable SuperFetch. Here are three easy methods to do it.
Method #1: Disable SuperFetch in Windows Services
Follow these steps to disable SuperFetch using Windows Services:
- Press
Windows Key + Rto open the Run dialog box. - Type
services.mscand pressEnter. - Scroll down and locate SuperFetch in the list of services.
- Right-click on SuperFetch and select Properties.
- In the General tab, find Startup type and select
Disabledfrom the dropdown menu. - Under Service status, click Stop to disable the service immediately.
- Click Apply, then OK to save the changes.
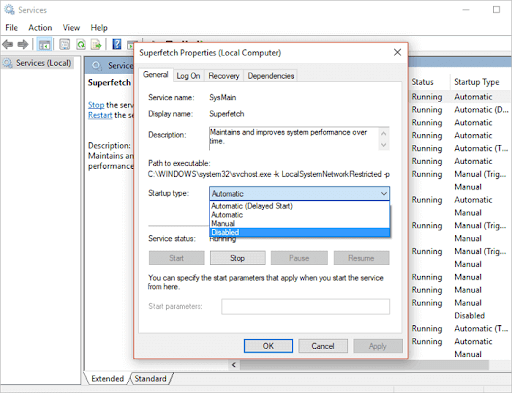
By following these steps, you can disable SuperFetch and potentially reduce high disk usage, improving your system’s overall performance.
Method #2: Disable SuperFetch in the Windows Registry
Another way to disable Service Host SuperFetch is through the Windows Registry Editor. However, be cautious—making incorrect changes in the Windows Registry can cause system issues. Follow these steps carefully:
Steps to Disable SuperFetch Using the Registry Editor:
- Press
Windows Key + Rto open the Run dialog box. - Type
regeditand pressEnter. - If prompted by User Account Control (UAC), click “Yes” to allow changes.
- When the Registry Editor opens, navigate to the following path: pgsql
-
HKEY_LOCAL_MACHINE > SYSTEM > CurrentControlSet > Control > Session Manager > MemoryManagement > PrefetchParameters
-
- In the right pane, look for Enable Superfetch (on some systems, it may be labeled Disable Superfetch).
- Double-click on it and change the Value Data to
0to disable SuperFetch. - Click OK, then close the Registry Editor.
- Restart your PC to apply the changes.
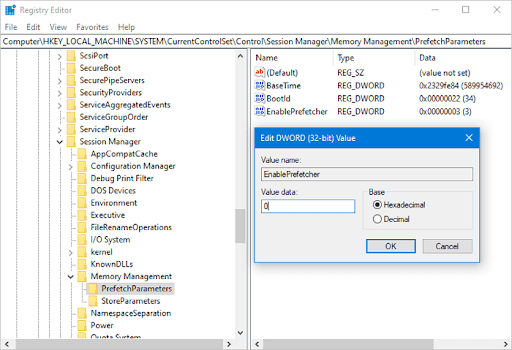
After restarting, open Task Manager to check if Service Host: SuperFetch is still running or consuming high disk usage.
Method #3: Disable SuperFetch Using Command Prompt
Another quick way to disable Service Host SuperFetch is by using the Command Prompt. Follow these steps:
Steps to Disable SuperFetch via Command Prompt:
- Click the Windows Start button and search for Command Prompt.
- On Windows 10, select “Run as administrator” (on older Windows versions, right-click Command Prompt and select “Run as administrator”).
- Type the following command and press Enter: arduinoCopyEdit
net.exe stop Superfetch - If you receive an error stating the command is invalid, try this alternative command: arduinoCopyEdit
net.exe stop sysmain - Wait a few minutes for the process to complete.
- Open Task Manager (
Ctrl + Shift + Esc) and check your disk usage. The SuperFetch high disk usage issue should now be resolved.
Wrapping Up
We hope this guide has provided you with valuable insights into Service Host SuperFetch and how to fix high disk usage by disabling it.
If you found this article helpful, share it with your friends, family, and colleagues to help them optimize their Windows performance!
For more tech tutorials and productivity tips, be sure to check back for new articles. If you need further assistance, our customer support team is available 24/7 to help you! 🚀
One more thing
If you’re in search of a software company that embodies integrity and upholds honest business practices, your quest ends here at Ecomkeys.com. As a Microsoft Certified Partner, we prioritize the trust and satisfaction of our customers. Our commitment to delivering reliable software products is unwavering, and our dedication to your experience extends far beyond the point of sale. At Ecomkeys.com, we provide a comprehensive 360-degree support system that accompanies you throughout your software journey. Your trust is our foundation, and we’re here to ensure that every interaction with us is a positive and trustworthy one.