Is Windows Defender not opening or refusing to turn on? You’re not alone—this is a common problem faced by many Windows 10 users.
Why Windows Defender Is Important
Your antivirus software is essential for protecting your system against malware, cyberattacks, and hackers. Whether you’re connected to a public WiFi network or a private home network, your device remains vulnerable to viruses and ransomware.
Since Windows Defender is built into Windows 10, it provides real-time protection against cyber threats. If it won’t start, your PC is left exposed to potential security risks.
Common Reasons Why Windows Defender Won’t Turn On
🚨 Third-party antivirus software conflict
🚨 Corrupted system files or Windows Update issues
🚨 Group Policy settings blocking Windows Defender
🚨 Malware infections preventing Windows Defender from running
How to Fix Windows Defender Not Turning On
If you’re facing this issue, don’t worry! Our step-by-step guide will help you troubleshoot and fix Windows Defender, ensuring your system is protected against threats.
✅ Disable third-party antivirus software that may be interfering
✅ Check Windows Update to ensure your system is fully updated
✅ Modify Group Policy settings to allow Windows Defender to run
✅ Scan for malware using Windows Security or another trusted tool
Follow our detailed guide to get Windows Defender working again and keep your PC secure! 🔒
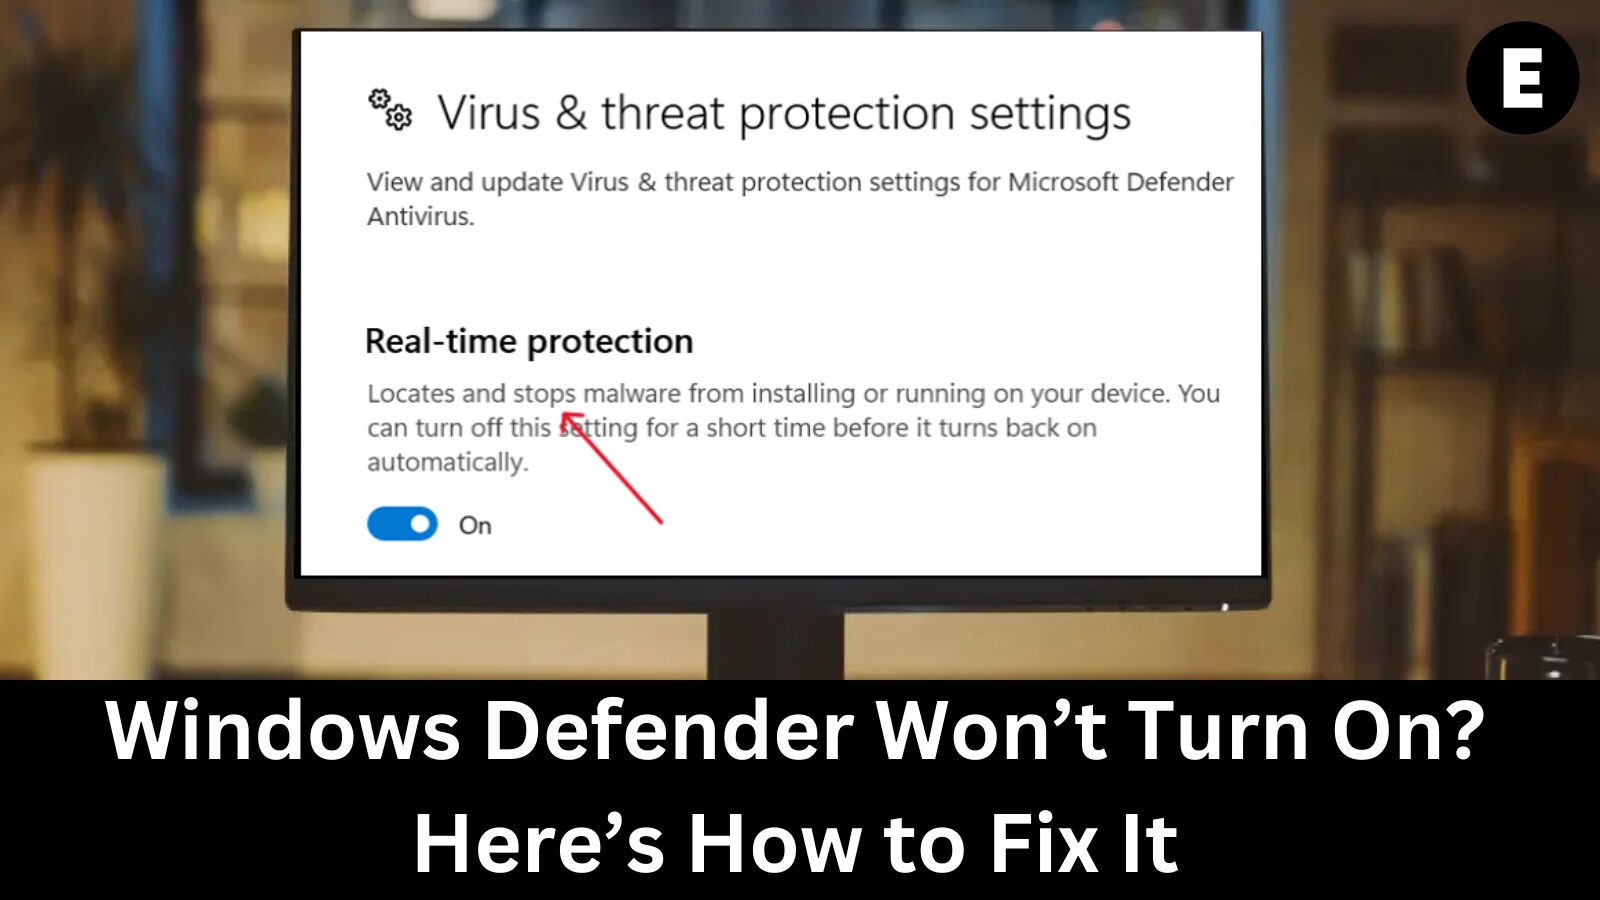
Method 1: Turn On Real-Time Protection to Fix Windows Defender
If Windows Defender isn’t opening or functioning properly, it’s possible that real-time protection has been turned off. Real-time protection is a crucial feature of Windows Defender, and disabling it may cause the software to appear as if it isn’t opening. Enabling it ensures that your system is fully protected against viruses, malware, and other cyber threats.
How to Enable Real-Time Protection in Windows 10
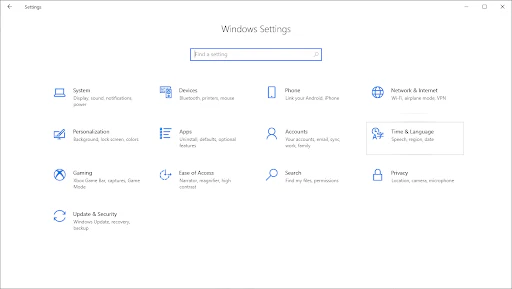
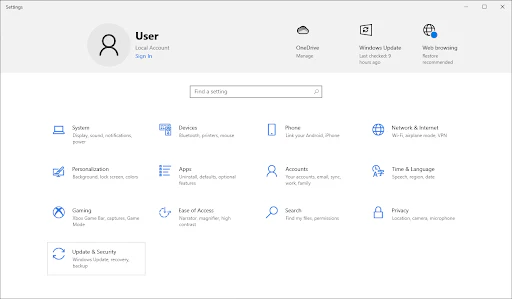
1️⃣ Open Windows Settings
- Click on the Windows icon in the bottom-left corner of your screen to open the Start menu.
- Choose Settings, or use the shortcut Windows + I.

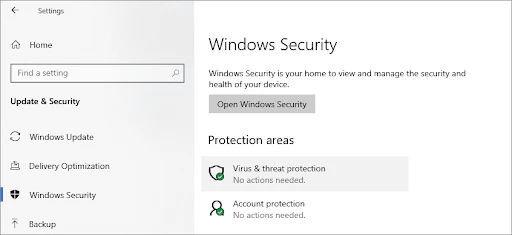
2️⃣ Access Update & Security Settings
- In the Settings window, click on Update & Security.
- Then, select the Windows Security tab from the left menu.
3️⃣ Go to Virus & Threat Protection
- Under Windows Security, click on Virus & threat protection.
4️⃣ Manage Virus & Threat Protection Settings
- Click on the Manage settings link located under the Virus & threat protection settings section.
5️⃣ Enable Real-Time Protection
- Toggle the Real-time protection setting to On.
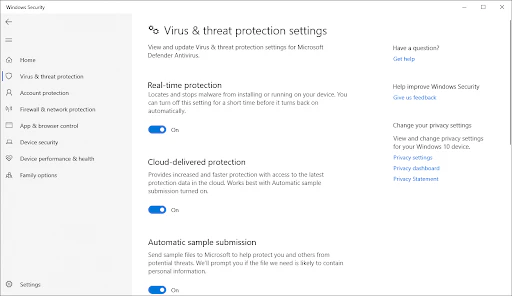
By enabling real-time protection, you ensure that Windows Defender actively monitors your system for any potential threats, providing continuous defense against cyberattacks. 🔒
Method 2: Temporarily Disable Your Third-Party Antivirus to Fix Windows Defender
Sometimes, third-party antivirus software can interfere with Windows Defender, preventing it from turning on or functioning correctly. To identify if your antivirus is causing the issue, try temporarily disabling it and see if that resolves the problem.
📌 Note: Disabling your antivirus is not recommended for regular use, as it leaves your system vulnerable to cyber threats. Only proceed with this method if you understand the risks and have a system backup to revert any damage if needed.
How to Disable Your Antivirus Program
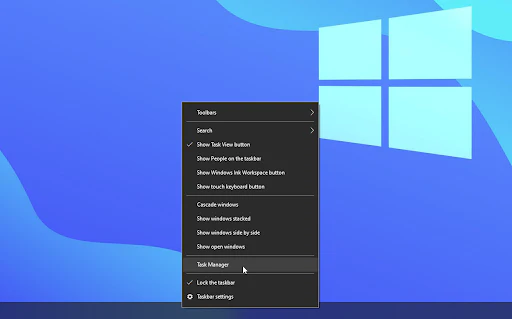
1️⃣ Open Task Manager
- Right-click on an empty space in your taskbar and select Task Manager from the context menu.
2️⃣ Expand Task Manager Details
- If Task Manager opens in compact mode, click on More details at the bottom of the window to expand it.
3️⃣ Disable Antivirus from Startup
- Switch to the Startup tab at the top of the Task Manager window.
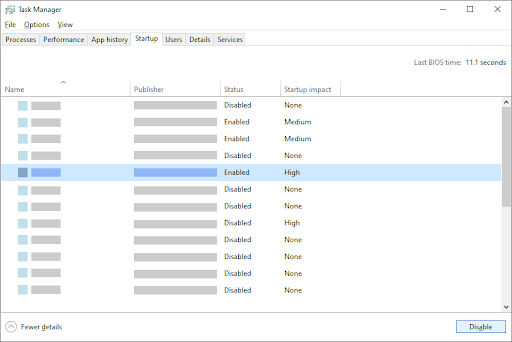
- Find your antivirus software in the list, select it, and click on the Disable button at the bottom-right corner.
4️⃣ Restart Your Computer
- After disabling the antivirus, restart your computer and check if Windows Defender turns on without any issues.
By temporarily disabling third-party antivirus software, you can troubleshoot conflicts and restore proper functionality to Windows Defender. However, remember to re-enable your antivirus once the issue is fixed. 🔒
Method 3: Restore Corrupted System Files to Fix Windows Defender
Corrupted system files can cause significant issues, including preventing Windows Defender from opening or functioning properly. If Windows Defender isn’t working, it could be due to file corruption in your operating system. Fortunately, you can use the System File Checker (SFC) tool to identify and repair corrupted files.
What is the System File Checker (SFC)?
The SFC tool is a built-in utility in Windows 10 that automatically scans and repairs corrupted or missing system files, potentially resolving a variety of errors, including issues with Windows Defender.
How to Run the SFC Scan to Fix Corrupted Files
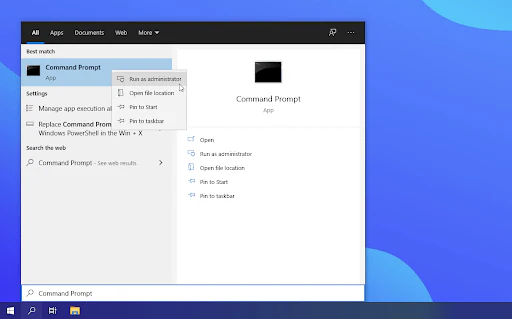
1️⃣ Open Command Prompt as Administrator
- Click on the magnifying glass icon in your taskbar or press Windows + S to open the search bar.
- Type Command Prompt and right-click on it when it appears in the search results. Select Run as Administrator.
2️⃣ Allow Administrative Permissions
- If prompted by User Account Control (UAC), click Yes to grant administrative permissions.
3️⃣ Run the SFC Scan
- Type the following command and press Enter:
sfc /scannow
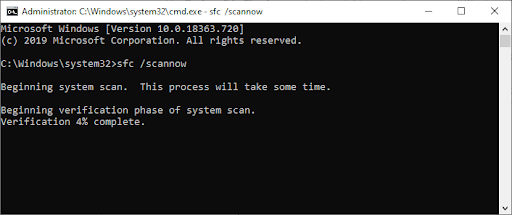
- Wait for the System File Checker to finish scanning your system. If it detects any discrepancies or corrupted files, it will automatically restore the necessary files and attempt to fix any related errors.
4️⃣ Wait for the Scan to Complete
- The SFC scan may take some time, depending on your system. Even if the scan doesn’t find any issues, users have reported that their PC’s functionality improved after running it.
Running the SFC scan can help restore corrupted system files and fix issues preventing Windows Defender from opening or working properly. 🔧
Method 4: Use the DISM Command to Repair System Images and Fix Windows Defender
The DISM (Deployment Imaging Service and Management) tool is a powerful utility that can fix system corruption issues and restore missing or damaged files. This tool works by scanning and repairing system images, which can help resolve issues with Windows Defender not opening.
What is the DISM Tool?
The DISM tool scans your system for corruption and automatically attempts to restore the damaged or missing files, helping to fix errors that may prevent Windows Defender from functioning properly.
How to Use the DISM Command to Repair System Images
1️⃣ Open Command Prompt as Administrator
- Follow the instructions in Method 3 above to open the Command Prompt with administrator privileges.
2️⃣ Run the DISM Scan
- Type the following command and press Enter:
DISM.exe /Online /Cleanup-image /Scanhealth
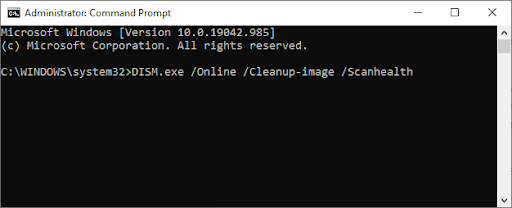
- This command will scan your system for any corruption issues and detect if anything is wrong with the Windows image.
3️⃣ Restore System Health
- After the scan completes, type the following command and press Enter:
DISM.exe /Online /Cleanup-image /Restorehealth

- This command will attempt to fix any detected issues and restore the system health.
4️⃣ Wait for the Process to Complete
- The DISM tool may take a while to finish the scan and repair process. Once completed, close the Command Prompt and restart your device.
After restarting, try turning Windows Defender back on. Hopefully, your issue with Windows Defender not opening or functioning properly will be resolved. 🔧
Method 5: Restart the Security Center Service to Fix Windows Defender
To run Windows Defender, certain services need to be enabled. If these services are stopped, Windows Defender may fail to launch. Fortunately, you can restart the Security Center service to resolve this issue and ensure that Windows Defender works properly moving forward.
How to Restart the Security Center Service
1️⃣ Open the Run Utility
- Press the Windows + R keys on your keyboard to open the Run utility.
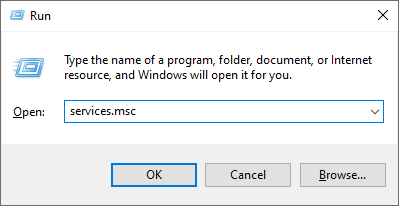
2️⃣ Launch the Services Application
- Type services.msc into the Run box and press Enter to open the Services window.
3️⃣ Find and Restart the Security Center Service
- In the Services application, scroll down to find the Security Center service.
- Right-click on the Security Center service and select Refresh from the context menu to ensure that the service is properly enabled.
4️⃣ Check Windows Defender
- After restarting the Security Center service, check if Windows Defender is able to launch.
If Windows Defender still doesn’t open, don’t worry—there are more steps to try! Keep going with the following methods to resolve the issue. 🔄
Method 6: Enable Windows Defender in Group Policy
In some cases, Windows Defender may be turned off through the Group Policy, either by accident or by another user. Malware can also disable Windows Defender in rare instances. Fortunately, you can easily enable Windows Defender again by following these simple steps.
How to Enable Windows Defender Using Group Policy
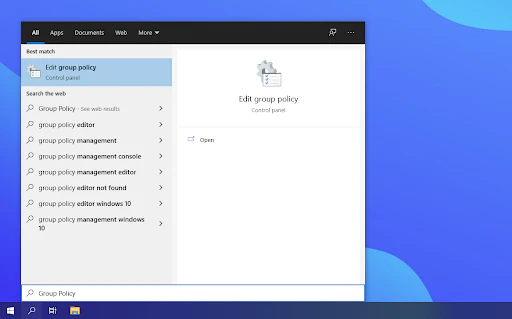
1️⃣ Open Group Policy Editor
- Type Group Policy into the search bar and select Edit Group Policy from the search results.
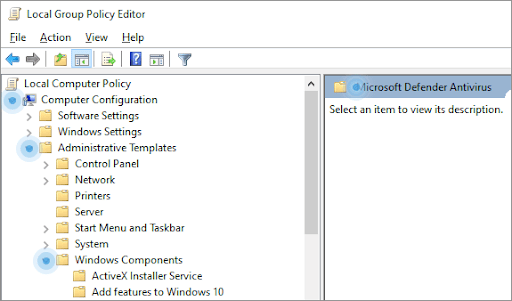
2️⃣ Navigate to the Microsoft Defender Antivirus Settings
- In the Group Policy Editor, navigate to the following location:
Computer Configuration → Administrative Templates → Windows Components → Microsoft Defender Antivirus
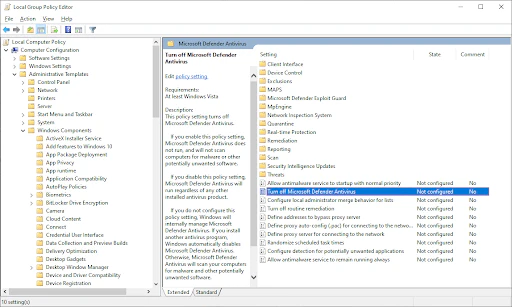
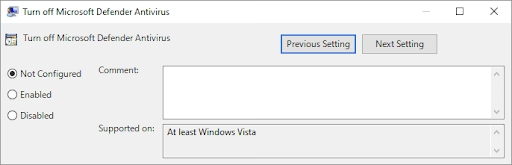
3️⃣ Modify the “Turn Off Microsoft Defender Antivirus” Setting
- In the right pane, double-click on the Turn off Microsoft Defender Antivirus entry. A new window will pop up.
4️⃣ Set the Policy to Not Configured
- In the new window, set the configuration to Not Configured, then click the Apply button.
5️⃣ Restart Your Computer
- After applying the changes, restart your computer and check if Windows Defender has been restored.
This simple fix should help you enable Windows Defender through Group Policy, allowing it to function correctly once again. 🔧
Method 7: Turn On Windows Defender Using the Registry Editor
For Windows 10 Home users or if the Group Policy method didn’t work, you can enable Windows Defender through the Registry Editor. This method can help restore Windows Defender functionality, especially if it’s been disabled by a third party or system error.
How to Enable Windows Defender Using the Registry Editor
1️⃣ Open the Run Utility
- Press the Windows + R keys on your keyboard to open the Run utility.
2️⃣ Launch the Registry Editor
- Type regedit in the Run box and press Enter to open the Registry Editor.
3️⃣ Navigate to the Registry Key
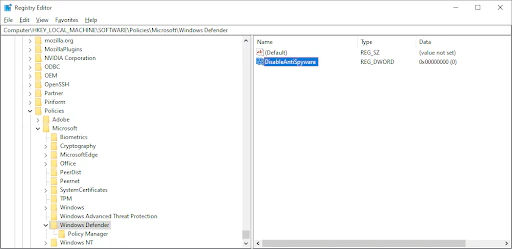
- Use the Navigation pane or address bar to go to the following registry key:
HKEY_LOCAL_MACHINE\SOFTWARE\Policies\Microsoft\Windows Defender
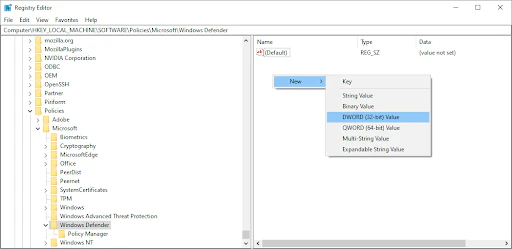
4️⃣ Find or Create the DisableAntiSpyware Key
- Locate the DisableAntiSpyware entry. If it’s not there, right-click on any empty space, select New → DWORD (32-bit) Value, and name it DisableAntiSpyware. Then, double-click on it to open its properties.
5️⃣ Enable Windows Defender
- Set the Value data to 0 in order to enable Windows Defender on your system.

6️⃣ Exit and Restart Your Computer
- Close the Registry Editor and restart your computer for the changes to take effect.
After the restart, Windows Defender should be enabled and ready to use. 🔄
Method 8: Correct the Time and Date on Your Device
In some cases, having the incorrect time and date on your Windows 10 device can cause various errors, including issues with Windows Defender. Fixing the time and date settings may resolve this problem and allow Windows Defender to turn on.
How to Fix the Time and Date in Windows 10
1️⃣ Open the Settings Menu
- Click on the Windows icon in the bottom left of your screen to open the Start menu. Then, select Settings, or use the Windows + I shortcut.
2️⃣ Go to Time and Language Settings
- In the Settings window, select the Time and Language tab.
3️⃣ Enable Automatic Time and Time Zone Settings
- Toggle the Set time automatically and Set time zone automatically options to On. This will sync your date and time with the correct time in your time zone.

4️⃣ Adjust Region Settings
- Switch to the Region tab and under Country or region, select the country or state you’re currently located in. Make sure you are connected to the internet for the changes to take effect.

5️⃣ Restart Your Computer
- After adjusting the time and date settings, restart your computer and check if Windows Defender can now open.
Correcting the time and date settings could fix issues with Windows Defender and other system functionalities. ⏰
Method 9: Update Windows 10 to the Latest Version
If none of the methods above seem to work, updating your Windows 10 to the latest version can often resolve issues. Updating Windows 10 fixes bugs, introduces new features, and patches security holes. Here’s how to do it:
Steps to Update Windows 10
1️⃣ Open the Start Menu
- Click on the Windows icon in the bottom left of your screen to open the Start menu. You can also use the Windows + I shortcut.

2️⃣ Go to Update & Security Settings
- Select the Update & Security tile. This section houses most of your Windows Update settings.
3️⃣ Check for Updates
- Stay in the Windows Update tab. Click on the Check for updates option, and let Windows 10 search for available updates.
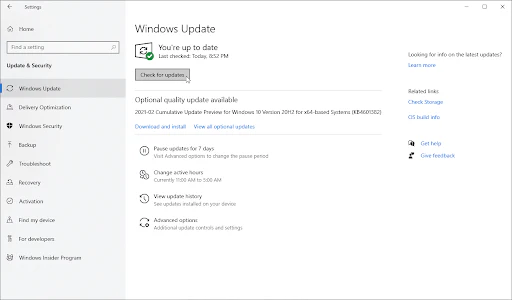
4️⃣ Install Available Updates
- If any updates are available, click on the Install button and wait for Windows 10 to download and apply the necessary updates.
By updating Windows 10, you’ll ensure that your system is running the latest features and is protected with the latest security patches.
Fixed! Windows Security Not Opening in Windows 11
Final Thoughts
We hope the steps above helped you fix the Windows Defender won’t turn on the issue.
You can now enjoy the benefits of having a strong antivirus application on your computer. Browse with confidence knowing you’re protected both online and offline.
One more thing
If you’re in search of a software company that embodies integrity and upholds honest business practices, your quest ends here at Ecomkeys.com. As a Microsoft Certified Partner, we prioritize the trust and satisfaction of our customers. Our commitment to delivering reliable software products is unwavering, and our dedication to your experience extends far beyond the point of sale. At Ecomkeys.com, we provide a comprehensive 360-degree support system that accompanies you throughout your software journey. Your trust is our foundation, and we’re here to ensure that every interaction with us is a positive and trustworthy one.