
Windows 10 requires a variety of system processes to function efficiently. While most of these processes are designed to enhance your user experience, they’re not always flawless. A common issue that many users face is high CPU and Memory usage from the SysMain process (previously known as Superfetch).
SysMain High CPU and Memory Usage
This issue can be quite detrimental. When your system’s resources are consistently running at high levels, the performance of your computer can drastically decline. This can even result in serious problems such as blue screen errors, data loss, or in some cases, physical damage to your hardware.
In this article, we’ll guide you through the best methods to fix the SysMain high CPU and memory usage issue on Windows 10. These tried-and-true solutions will help you restore your system’s performance and improve its efficiency.
What is SysMain? Can I Disable It?
SysMain is a certified Windows 10 process designed to analyze your computer usage and optimize performance by utilizing the collected data. For instance, it helps speed up app launch times and improves overall system performance.
However, leaving SysMain enabled can sometimes do more harm than good. Many users have reported that the process consumes a significant amount of system resources, leading to slowdowns and potentially putting your hardware at risk. The good news is that SysMain isn’t an essential system process, and you can disable it if needed.
If you suspect that SysMain is causing performance issues on your Windows 10 device, it’s recommended to disable it. Follow the methods provided below to find an effective solution and restore your computer’s efficiency.
How to Fix the SysMain Process’ High CPU and Memory Usage on Windows 10
Note: Some of the steps outlined below may require you to have access to a local administrator account.
Method 1: Disable the SysMain Service in Services
Follow these steps to disable SysMain directly through the Service Manager:
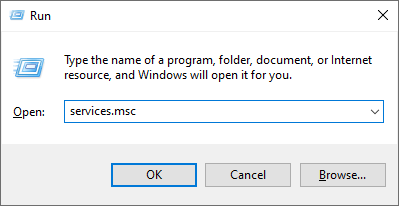
- Press the Windows + R keys on your keyboard to bring up the Run utility.
- Type in “services.msc” (without quotation marks) and press Enter to open the Services window.
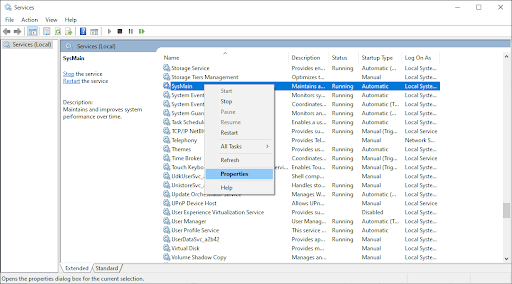
- Scroll down until you locate the SysMain service. Right-click on it and select Properties from the context menu.
- In the General tab, ensure the Startup type is set to Disabled. Then, click the Stop button next to Service status to prevent the service from starting automatically upon boot-up.
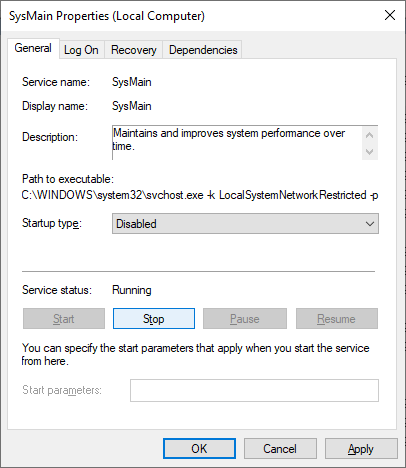
- Click Apply and then OK to exit out of the window.
By completing these steps, you should notice a significant improvement in your system’s performance.
Method 2: Disable SysMain with the Command Prompt
Use the steps below to disable SysMain via the elevated Command Prompt. This method is recommended for intermediate users, as it requires executing a command with administrator permissions.
If you need assistance, feel free to reach out to us via Live Chat. Our experts are available to guide you through the troubleshooting process.
- Open the Command Prompt in one of the following ways:
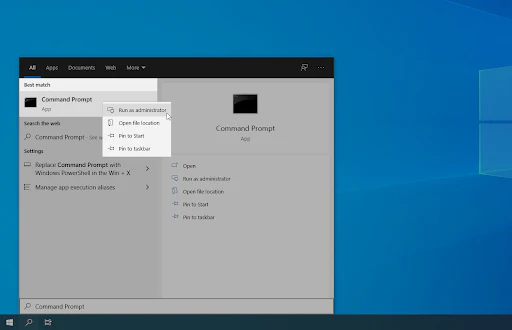
- Search Method: Open the Search function on your taskbar (or press Ctrl + S) and search for “Command Prompt”. Right-click on it in the results and select Run as Administrator.

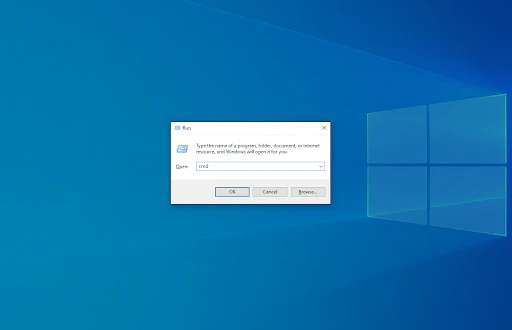
Run Method: Press the Windows + R keys to open the Run utility, type in “cmd”, and then press Ctrl + Shift + Enter to launch the Command Prompt with administrator permissions.
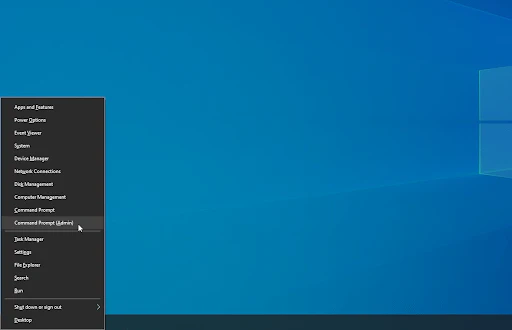
Quick Access Menu: Press the Windows + X keyboard shortcut, and then select Command Prompt (Admin).

- When prompted by User Account Control (UAC), click Yes to allow the app to launch with administrative permissions.
- Execute the following command:
sc stop "SysMain" & sc config "SysMain" start=disabled

- After successfully executing the command, restart your computer.
This method will disable SysMain and can help improve your system’s performance by reducing CPU and memory usage.
Method 3: Disable SysMain Using the Registry Editor
This method involves using the Registry Editor to disable the SysMain service. Please note that modifying the registry can be risky, so it’s highly recommended to create a backup before proceeding.
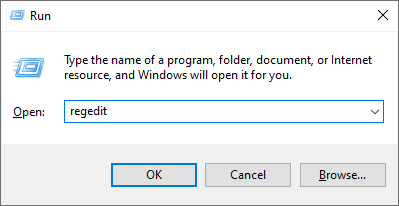
- Press the Windows + R keys on your keyboard to bring up the Run utility.
- Type in “regedit” (without quotes) and press Enter to launch the Registry Editor application.
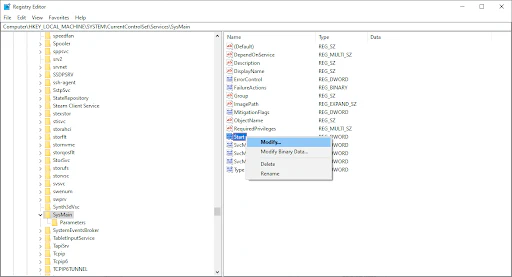
- Navigate to the following key:
HKEY_LOCAL_MACHINE\SYSTEM\CurrentControlSet\Services\SysMainYou can also use the address bar in the Registry Editor to type or paste the key for faster navigation.

- Select the Start value, right-click on it, and choose Modify from the context menu.
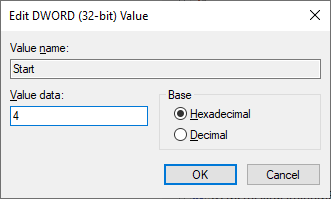
- Change the Value data to 4 and click OK to save your settings. Be sure not to modify any other settings to ensure the method works correctly.
- Exit the Registry Editor and restart your computer.
By following these steps, you will have successfully disabled SysMain via the Registry Editor, which can help improve your system’s performance by reducing CPU and memory usage.
Method 4: Run the System File Checker (SFC)
The System File Checker (also known as SFC scan) is a built-in tool in most versions of Windows that automatically fixes corrupted system files and other related issues.
Follow these steps to run the SFC scan:
- Open the Command Prompt in one of the following ways:
- Search Method: Open the Search function in your taskbar (or press Ctrl + S) and search for “Command Prompt”. Right-click on it in the results and select Run as Administrator.
Run Method: Press the Windows + R keys to open the Run utility, type “cmd”, and press Ctrl + Shift + Enter to launch Command Prompt with administrator permissions.

Quick Access Menu: Press the Windows + X keyboard shortcut, then select Command Prompt (Admin).
- When prompted by User Account Control (UAC), click Yes to allow the app to run with administrative permissions.
- Type in the following command and press Enter to execute the SFC scan:
sfc /scannow
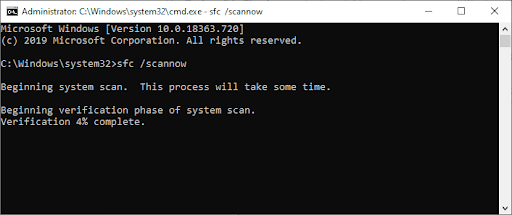
- Wait for the SFC scan to complete. The scan will check your system for any corrupt files and repair them. This may take some time, so ensure that you don’t close the Command Prompt or shut down your computer during the process.
- Once the scan is finished and repairs are made, restart your device.
Running the SFC scan can help fix system file corruption that may be causing high CPU or memory usage by SysMain and improve your computer’s overall performance.
Final thoughts
We hope you found this article helpful. If you need more articles like this, our Help Center offers hundreds of guides to assist you if you’re in need of further help. Return to us for more informative articles, or get in touch with our experts for immediate assistance.
One more thing
If you’re in search of a software company that embodies integrity and upholds honest business practices, your quest ends here at Ecomkeys.com. As a Microsoft Certified Partner, we prioritize the trust and satisfaction of our customers. Our commitment to delivering reliable software products is unwavering, and our dedication to your experience extends far beyond the point of sale. At Ecomkeys.com, we provide a comprehensive 360-degree support system that accompanies you throughout your software journey. Your trust is our foundation, and we’re here to ensure that every interaction with us is a positive and trustworthy one.