
Keeping Windows 10 up to date is essential for system performance, stability, and security. Microsoft regularly releases updates containing patches, driver updates, and performance improvements. However, some of these updates may inadvertently introduce new issues — one such case involves the Sedlauncher.exe file, a component associated with the Windows 10 Update Patch KB4023057.
Many users have reported that after this update, Sedlauncher.exe causes high disk or CPU usage, slowing down their systems and negatively affecting performance. This has sparked concern and questions like, “What exactly is Sedlauncher.exe?” and “Should it be disabled?”
In this guide, we’ll break down what Sedlauncher.exe does, why it might be using so many resources, and provide actionable steps on whether and how to safely disable it to optimize your Windows 10 experience.
What Is Sedlauncher.exe in Windows 10 and Should You Disable It?
Sedlauncher.exe is a program introduced through the Windows 10 update patch KB4023057, designed to improve the performance and reliability of the Windows Update process. However, shortly after installing this update, many users report that sedlauncher.exe begins consuming a significant amount of disk and CPU resources, slowing down their computers and negatively affecting system performance.
Understanding Sedlauncher.exe and Update Patch KB4023057
Microsoft released KB4023057 to enhance the Windows Update Service Components, ensuring smoother and more reliable updates across multiple Windows 10 versions, including:
🔹 Version 1507
🔹 Version 1511
🔹 Version 1607
🔹 Version 1703
🔹 Version 1709
🔹 Version 1803
This patch also includes tools to free up disk space if your PC is low on storage — a common issue that can prevent updates from installing correctly. As part of this patch, sedlauncher.exe plays a critical role by helping safeguard and accelerate the update process.
The executable is located in:C:\Program Files\rempl\sedlauncher.exe
It’s part of the Windows Remediation Service, working alongside related tools such as:
sedsvc.exerempl.exeluadgmgt.dllsedplugins.dll
While sedlauncher.exe is a legitimate Microsoft-signed process and not a virus, it can cause issues like high disk usage or spikes in CPU usage, which leads many users to consider disabling it.
Should You Disable Sedlauncher.exe?
While sedlauncher.exe is safe and not malicious, there are situations where disabling it might be justified:
✅ If your PC is running slowly due to high resource usage caused by sedlauncher.exe
✅ If you’re not planning to update Windows immediately and want to free up system performance
✅ If the process is consuming excessive disk or CPU power consistently
🚨 Important Security Tip: If sedlauncher.exe is located outside of the C:\Program Files\rempl folder — for example, if it’s running from C:\Windows or C:\Windows\System32 — it could be a disguised malware. In this case, run a full antivirus scan immediately using a trusted security tool.
If you’re confident the file is legitimate but still want to stop it from hogging resources, you can temporarily or permanently disable sedlauncher.exe without affecting your core system functionality.
How to Fix Sedlauncher.exe Full Disk Usage in Windows 10
If you’re experiencing high disk usage caused by sedlauncher.exe, you’re not alone. Many Windows 10 users have reported this issue, especially after installing update patch KB4023057, which includes the Sedlauncher.exe component as part of the Windows Remediation Service (WRS).
Before diving into fixes, it’s crucial to scan your PC with a reputable antivirus tool. Although Sedlauncher.exe is a legitimate Microsoft process, malware can sometimes disguise itself under the same name. If your antivirus identifies it as malicious, the threat will be removed automatically.
If no malware is found, follow the steps below to reduce or eliminate high disk usage caused by Sedlauncher.exe.
✅ Fix #1: Disable Sedlauncher.exe from Task Manager
One of the simplest and most effective ways to reduce high CPU or disk usage is to end the Sedlauncher.exe process directly from the Task Manager.
Here’s how to do it:
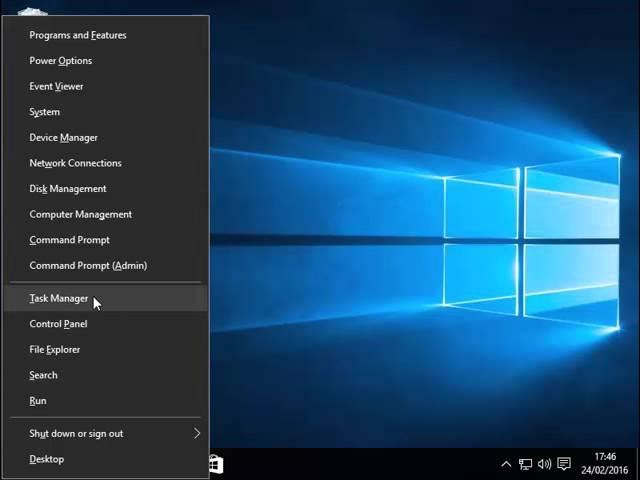
- 1️⃣ Right-click on the Taskbar and select Task Manager.
- 2️⃣ Scroll through the list of running processes until you find Windows Remediation Service (WRS) — this service hosts Sedlauncher.exe.
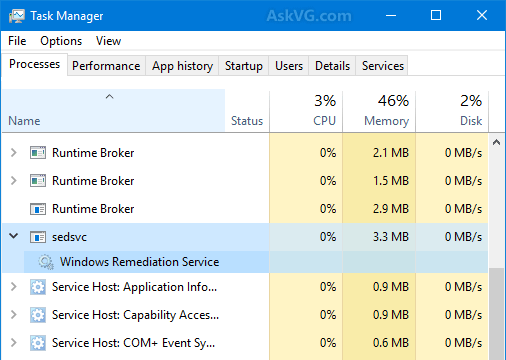
- 3️⃣ Right-click on Windows Remediation Service and select End Task.
- 4️⃣ Restart your computer to apply the changes and check if your system performance has improved.
By ending the Windows Remediation Service, you temporarily stop Sedlauncher.exe from running and using excessive resources. If your system performance improves, you can proceed to disable the service permanently if needed.
🔧 Fix #2: Turn Off Sedlauncher.exe Using the Services Tool
If ending the Sedlauncher.exe process from Task Manager didn’t completely solve the high disk usage issue, you can take a more permanent approach by disabling it through Windows Services. This method stops the Windows Remediation Service—which hosts Sedlauncher.exe—from running every time your system boots up.
Follow these steps to disable Sedlauncher.exe using the Services utility:
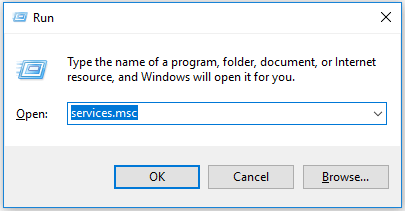
- 1️⃣ Open the Run utility by pressing Windows Key + R on your keyboard.
- 2️⃣ In the Run dialog box, type
services.mscand hit Enter. This opens the Windows Services Manager.
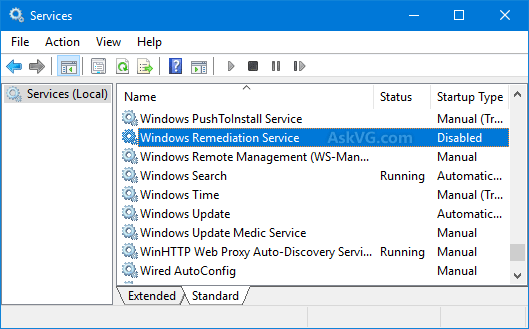
- 3️⃣ Scroll through the list of services and locate Windows Remediation Service.
- 4️⃣ Right-click on it and select Properties.
- 5️⃣ Under the General tab, go to the Startup type dropdown menu and select Disabled.
- 6️⃣ Next, click the Stop button under Service status to immediately halt the service.
- 7️⃣ Click Apply and then OK to save your changes.
- 8️⃣ Finally, restart your computer and open Task Manager again to ensure Sedlauncher.exe is no longer running.
By disabling this service, you prevent Sedlauncher.exe from launching automatically in the future—helping to significantly reduce disk and CPU usage.
🛡️ Fix #3: Block Sedlauncher.exe Using Windows Firewall or Antivirus Software
While Sedlauncher.exe plays a crucial role in the KB4023057 update patch for Windows 10, it’s no longer essential once the update has been installed. If you notice it continues to consume excessive disk or CPU resources even after disabling it, the best solution is to block it using Windows Firewall or your antivirus program.
Here’s how to prevent Sedlauncher.exe from running again on your PC:
- 1️⃣ Disable Sedlauncher.exe using Task Manager or Windows Services as outlined in previous steps.
- 2️⃣ If it keeps reappearing or reinstalling itself, it’s time to block the executable from launching using your security tools.
- 3️⃣ Open Windows Security > Firewall & network protection > Advanced Settings.
- 4️⃣ Choose Outbound Rules, then click New Rule.
- 5️⃣ Select Program, then browse to the location of Sedlauncher.exe (typically
C:\Program Files\rempl\sedlauncher.exe). - 6️⃣ Choose Block the connection, name the rule (e.g., “Block Sedlauncher”), and click Finish.
- 7️⃣ Alternatively, if you’re using a third-party antivirus, navigate to its program control or firewall section and manually block Sedlauncher.exe.
Once blocked, Sedlauncher.exe won’t be able to execute or download updates in the background, helping you regain full control of your system’s performance.
Final Thoughts
While Sedlauncher.exe is a legitimate Windows process designed to improve the reliability of updates in Windows 10, it can sometimes cause high disk or CPU usage, negatively impacting system performance. Fortunately, it’s not essential for daily operations once the update is complete—so disabling or blocking it is safe in most cases.
By following the solutions outlined in this article—whether it’s ending the process via Task Manager, disabling it in Services, or blocking it through your firewall or antivirus—you can effectively stop Sedlauncher.exe from slowing down your PC. Always remember to scan for malware first, as malicious software may sometimes disguise itself under trusted names.
Taking a proactive approach to managing background processes like Sedlauncher.exe ensures that your Windows 10 system remains fast, efficient, and secure. If you continue to notice sluggish performance, consider exploring other high-resource services or outdated drivers that might be affecting your PC.
One more thing
If you’re in search of a software company that embodies integrity and upholds honest business practices, your quest ends here at Ecomkeys.com. As a Microsoft Certified Partner, we prioritize the trust and satisfaction of our customers. Our commitment to delivering reliable software products is unwavering, and our dedication to your experience extends far beyond the point of sale. At Ecomkeys.com, we provide a comprehensive 360-degree support system that accompanies you throughout your software journey. Your trust is our foundation, and we’re here to ensure that every interaction with us is a positive and trustworthy one.