Many Windows 10 users have encountered a recurring issue in Google Chrome where the browser displays a message saying “Waiting for cache” in the bottom-left corner. This message usually appears when trying to load a website, causing the page to freeze for a few seconds—or even several minutes. In more severe cases, it can significantly slow down your system as Chrome consumes excess resources trying to connect.
If you’re experiencing this Chrome performance issue, you’re not alone. This guide will walk you through several effective methods to fix the “waiting for cache” error and get your browser running smoothly again.
What Does “Waiting for Cache” in Chrome Mean?
To understand the issue, it helps to first understand what a browser cache is. In simple terms, cache is a temporary storage space where Google Chrome saves website data, such as images and scripts, to load frequently visited pages faster. However, when Chrome can’t access this cache properly, you’ll encounter the “Waiting for cache” message, leading to lag, delays, or even freezing.
This problem is especially common on Windows 10 systems using SSDs (Solid-State Drives). Unlike traditional HDDs, SSDs can behave differently under certain storage or permission configurations, causing Chrome to mismanage cached data.
Get Ready to Fix the Issue
Luckily, resolving the “waiting for cache” problem is possible with some straightforward troubleshooting steps. Whether it’s clearing the browser cache, resetting Chrome settings, or modifying SSD configurations, we’ll cover multiple solutions to help you restore your browser’s speed and stability.
Stay tuned for the detailed step-by-step fixes coming next, and take control of your Chrome experience today.
Fix #1: Disable Write Caching for SSD to Resolve “Waiting for Cache” in Chrome
If you’re using a Solid-State Drive (SSD) and constantly see the “Waiting for cache” message in Google Chrome on Windows 10, the culprit might be your system’s write caching feature. While this feature is designed to boost performance by storing data temporarily before writing it to disk, it can sometimes cause conflicts with how Chrome accesses cached files—especially on SSDs.
Many users have found that disabling SSD write caching can resolve the issue, even if it slightly reduces overall system performance. Here’s how to turn off write caching safely on Windows 10:
How to Disable Write Caching on Your SSD
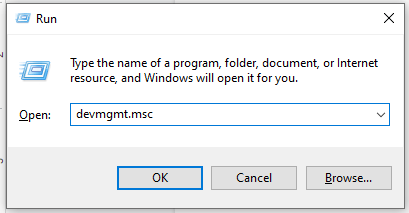
- Open Device Manager
PressWindows + Rto launch the Run dialog box.
Typedevmgmt.mscand hit Enter to open the Device Manager.
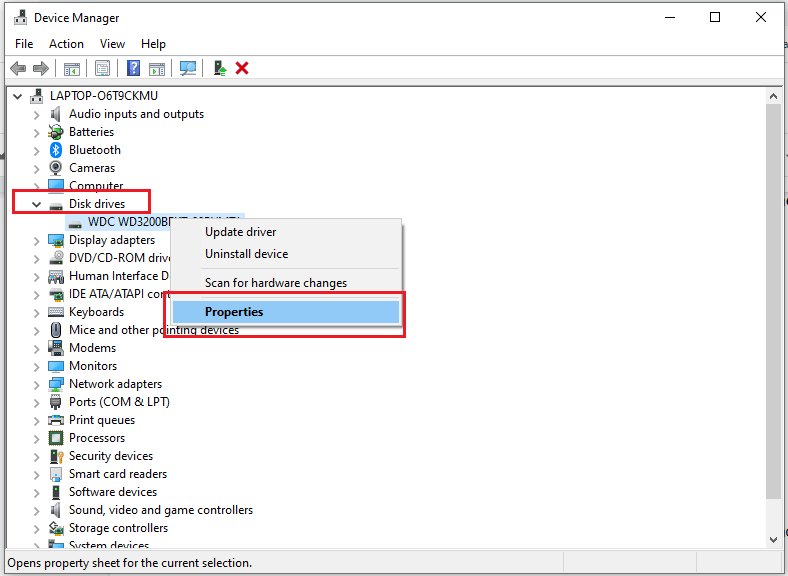
- Locate Your SSD
In Device Manager, expand the Disk Drives section.
Right-click on the SSD where Google Chrome is installed and select Properties.
- Modify Write Caching Settings
Go to the Policies section in the Properties window.
Uncheck the box labeled “Enable write caching on the device”
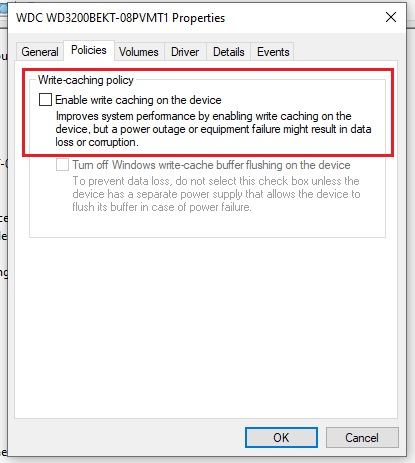
- Apply Changes and Restart
Click OK to save the settings.
Restart your computer to apply the changes.
Fix #2: Clear Google Chrome’s Browser Cache to Resolve “Waiting for Cache” on Windows 10
If you’re encountering the “Waiting for cache” message in Google Chrome on your Windows 10 PC, it may be due to corrupted or outdated cached files. The cache stores temporary website data to help Chrome load pages faster, but when these files become damaged, they can disrupt browser functionality and lead to delays or freezing.
Clearing Chrome’s browser cache is a simple yet highly effective method to eliminate the error and refresh your browser’s performance. Here’s how you can do it:
Clear the Chrome Cache on Windows 10
- Open Google Chrome
Launch Chrome as you normally would. - Access the Chrome Menu
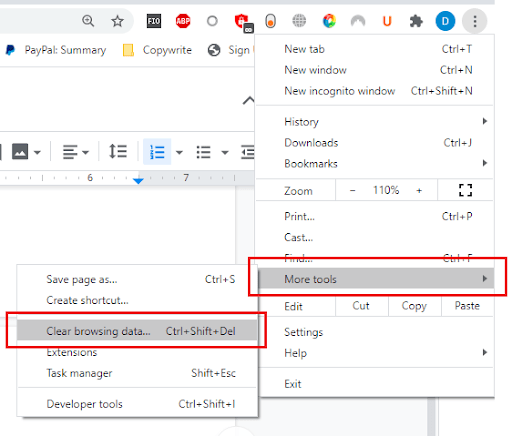
Click on the three vertical dots in the top-right corner of the browser window.

- Navigate to Clear Browsing Data
Hover over More tools and select Clear browsing data from the dropdown menu.
Alternatively, press Ctrl + Shift + Delete on your keyboard to open the Clear Browsing Data window directly.
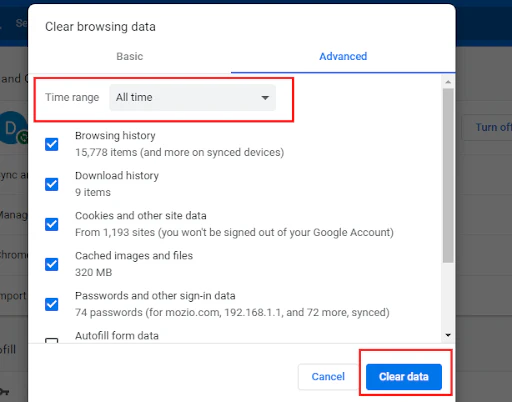
- Choose What to Delete
In the new window that appears, set the Time range to All time to ensure a thorough clean.
Check all the boxes, especially Cached images and files. You can switch between Basic and Advanced tabs to select specific data types. - Clear the Data
Click the Clear data button then wait for the process to complete.
- Restart Google Chrome
Once the cache is cleared, close and reopen Chrome to apply the changes.
Fix #3: Reset Google Chrome to Default Settings to Fix “Waiting for Cache” Error
If you’re still seeing the “Waiting for cache” message in Google Chrome on Windows 10, resetting your browser to its default settings may be the key to resolving the issue. This method reverts all custom configurations, extensions, and preferences back to Chrome’s original factory state, which can help eliminate hidden conflicts or corrupted settings causing browser delays.
Before proceeding, keep in mind that resetting Chrome will remove your homepage preferences, pinned tabs, extensions, and saved search engines, though your saved bookmarks and passwords will remain untouched.
Reset Google Chrome to Its Default Settings
- Launch Google Chrome
Open the Chrome browser on your Windows 10/11 PC. - Open the Chrome Menu
Click on the three vertical dots located at the top-right corner of your browser window.
- Access Chrome Settings
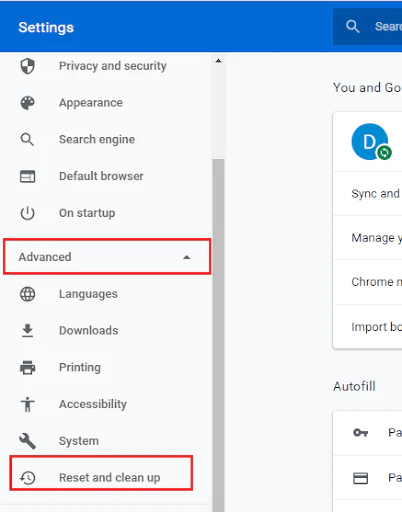
From the dropdown, select Settings. A new tab will open with your Chrome configuration options. - Expand the Advanced Section
On the left-hand menu, click on Advanced to reveal more options.
Then, click on Reset and clean up.
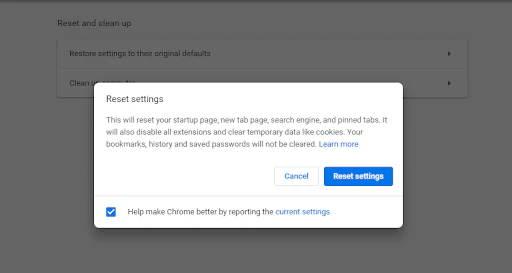
- Initiate the Reset
Click on Restore settings to their original defaults. - Confirm the Action
A pop-up window will appear. Click Reset Settings to proceed.
Fix #4: Create a New Google Chrome Profile to Eliminate the “Waiting for Cache” Error
If you’re still encountering the “Waiting for cache” error in Google Chrome on Windows 10, creating a fresh Chrome user profile may be a simple yet powerful solution. Corrupted user data or broken configuration files can sometimes trigger cache-related issues—and setting up a new profile helps you bypass those problems entirely.
This method is quick, easy, and doesn’t require any advanced tech skills. Here’s how to do it:
Steps to Create a New Chrome Profile:
- Open Google Chrome
Launch Chrome on your Windows 10 device. - Access the Profile Menu
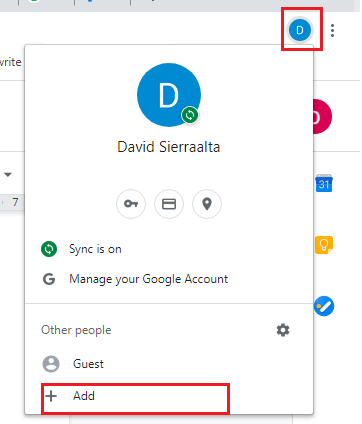
Click on your profile icon (this is usually your picture or the first letter of your name), located in the top-right corner, next to the three-dot menu. - Add a New Profile
Click on “Add” from the dropdown menu. A window will pop up prompting you to create a new Chrome user.
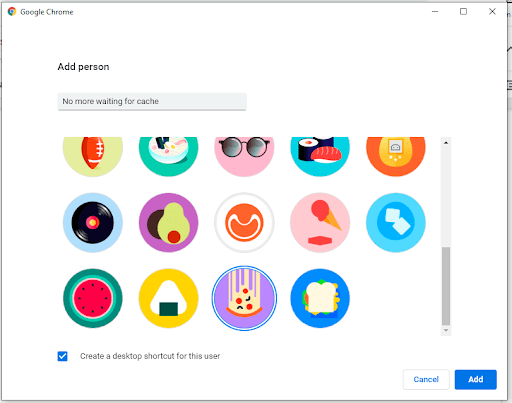
- Set Up the Profile
Enter a name for the new profile then choose an icon. You can leave the account unsigned for now or sign in later with your Google account.
- Launch the New Profile
Chrome will restart with a fresh, clean profile. Now test your browser to see if the “waiting for cache” error has been resolved.
Fix #5: Reinstall Google Chrome to Resolve the “Waiting for Cache” Issue
If all previous solutions failed to resolve the “Waiting for cache” error in Google Chrome, a full reinstallation might be the most effective fix. Reinstalling Chrome ensures that any corrupted installation files, browser settings, or hidden cache-related issues are completely wiped clean. This method guarantees a fresh start with the latest version of Chrome.
But before you jump into reinstalling, make sure to check for Chrome updates first. Sometimes, a simple browser update is all it takes to fix compatibility bugs or performance problems.
How to Reinstall Google Chrome on Windows 10
Follow these step-by-step instructions to uninstall and reinstall Chrome safely:
- Open the Control Panel
Click on the Start menu, search for Control Panel, then open it. - Access Program Settings
In the Control Panel, set the View by: to Category, and click on Uninstall a program under the Programs section. - Uninstall Google Chrome
Find Google Chrome in the list of installed programs. Right-click on it and choose Uninstall. Follow the on-screen prompts to complete the process. - Download the Latest Version of Chrome
Open another web browser like Microsoft Edge or Mozilla Firefox. - Visit the Official Chrome Website
Go to www.google.com/chrome and click on Download Chrome. - Install Google Chrome
Once the download is complete, run the installer and follow the setup instructions. In just a few minutes, you’ll have a freshly installed version of Google Chrome.
Final Thoughts
After reinstalling, open Chrome and test your browsing experience. You should notice that the “waiting for cache” error is gone and Chrome runs more smoothly.
This fix is highly effective for stubborn issues that aren’t solved by clearing the cache, disabling write caching, or resetting settings. With a clean install, you’re back in control—ready to enjoy a fast and error-free browsing experience on Windows 10.
One more thing
If you’re in search of a software company that embodies integrity and upholds honest business practices, your quest ends here at Ecomkeys.com. As a Microsoft Certified Partner, we prioritize the trust and satisfaction of our customers. Our commitment to delivering reliable software products is unwavering, and our dedication to your experience extends far beyond the point of sale. At Ecomkeys.com, we provide a comprehensive 360-degree support system that accompanies you throughout your software journey. Your trust is our foundation, and we’re here to ensure that every interaction with us is a positive and trustworthy one.