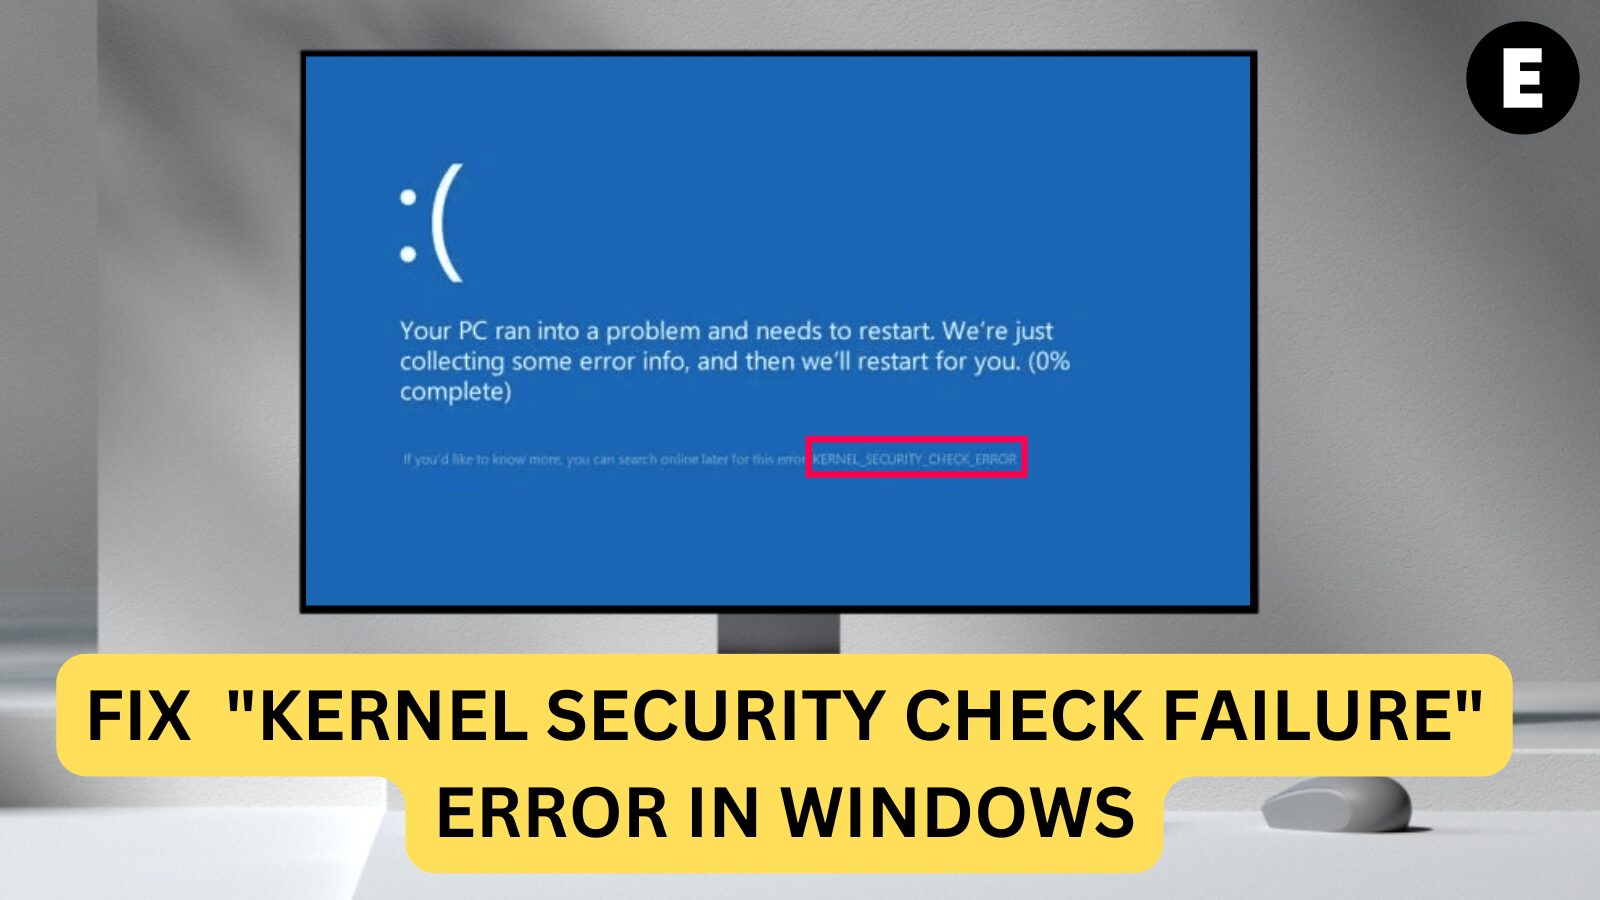
Experiencing the Kernel Security Check Failure Error on Windows 10? Here’s how to easily fix this stop code error. Common causes of the “Kernel Security Check Failure” include corrupted system files, faulty hardware, or outdated drivers.
To check if the error is due to corrupted or damaged system files, use the System File Checker tool. Simply open Command Prompt, type “sfc /scannow”, and hit Enter. This tool will scan and replace any corrupted files during reboot.
Continue reading for more methods to fix the Kernel Security Check Failure error on your Windows 10 PC.
Understanding the “KERNEL_SECURITY_CHECK_FAILURE” Stop Code Error in Windows 10
The “KERNEL_SECURITY_CHECK_FAILURE” stop code error is a Blue Screen of Death (BSOD) issue that typically occurs in Windows 10. It indicates that Windows has detected an issue with the system’s kernel that may be caused by corrupted system files, faulty drivers, or hardware problems.
This error prevents the system from functioning properly and may lead to a system crash. The stop code provides valuable information to help diagnose and resolve the underlying issues affecting your computer’s performance and stability.
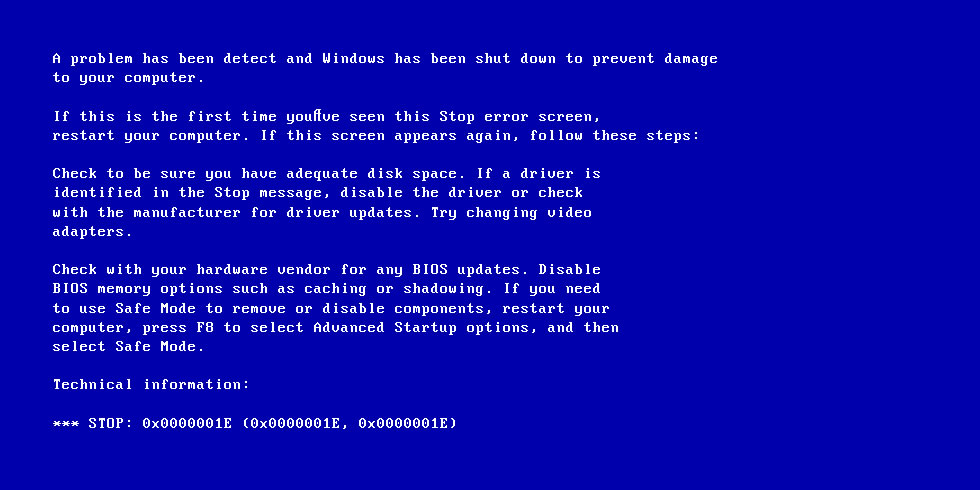
In earlier versions of Windows, the Blue Screen of Death (BSoD) would display a technical, text-heavy error screen, which could be quite difficult to understand. However, newer versions of Windows have updated this with a more user-friendly error screen, making it easier to identify the issue.
If you’re seeing the “KERNEL_SECURITY_CHECK_FAILURE” error code, you’ve come to the right place. This error typically appears after upgrading to Windows 10 from a previous version, but it can also occur randomly during regular use. Regardless of how it happened, we’re here to guide you through resolving it.
Top Reasons Behind the “Kernel Security Check Failure” Error in Windows 10
Common Causes of the “Kernel Security Check Failure” Error in Windows 10
The Kernel Security Check Failure error in Windows 10 can be caused by various factors, including:
- Memory problems
- Outdated drivers
- Malware infections
- Corrupted Windows system files
- Third-party security programs
- Damaged or corrupted hard drive
Here are some specific reasons why you might be encountering the KERNEL_SECURITY_CHECK_FAILURE stop code:
- Outdated System: Your system could be out of date, which can lead to the Kernel Security Check Failure. Installing the latest Windows 10 update can help resolve this error, as updates often fix bugs and security vulnerabilities.
- Malware Infection: If your system is infected with malware, it may trigger the KERNEL_SECURITY_CHECK_FAILURE error. Running a malware scan and removing identified threats could fix the issue.
- Outdated or Incompatible Drivers: Outdated drivers or drivers incompatible with your Windows 10 system can cause this error. Ensure that your drivers are updated to avoid compatibility issues.
- Corrupted System Files: Corrupted system files caused by malware or other issues can lead to this error. Running the SFC scan and disk check commands can restore these files.
- Third-party Antivirus Programs: Sometimes, third-party antivirus programs can interfere with your system’s functionality, leading to the Kernel Security Check Failure. Disabling or uninstalling the antivirus software may resolve the issue.
The most common cause is often incompatible drivers, especially if you recently upgraded to Windows 10 from an older version of Windows. In such cases, a driver that worked with older versions of Windows may cause issues on Windows 10.
When Windows detects corruption in critical data structures during startup, it triggers the KERNEL_SECURITY_CHECK_FAILURE error.
Warning: Some solutions below may only work if you can access your PC without it crashing. If your device is unable to boot, we recommend contacting Microsoft Support for further assistance.
How to Fix the Windows 10 KERNEL_SECURITY_CHECK_FAILURE Stop Code
Method 1: Update Windows 10 to the Latest Version
To resolve the KERNEL_SECURITY_CHECK_FAILURE stop code, we recommend starting by updating Windows 10 to the latest release. Regular updates help fix bugs, enhance security, and introduce new features. Here’s how you can update Windows 10:
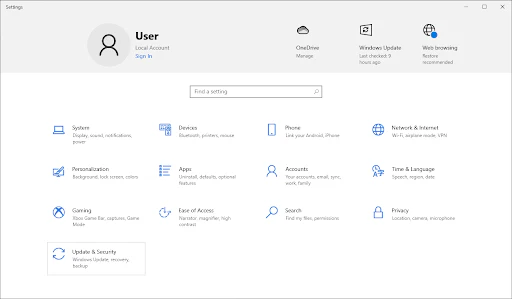
- Click on the Windows icon in the bottom left corner of your screen to open the Start menu. Alternatively, use the Windows + I shortcut to open Settings.

- Select Update & Security from the menu.
- Stay on the Windows Update tab and click on Check for updates.
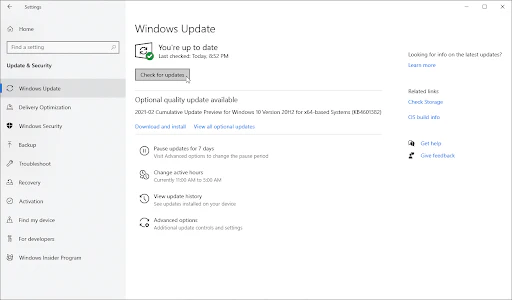
- If updates are available, click Install to download and apply the updates.
- After updating, restart your PC and check if the Kernel Security Check Failure error persists.
By keeping your system up to date, you reduce the chances of running into compatibility issues and system errors.
Method 2: Update Your Drivers to Fix KERNEL_SECURITY_CHECK_FAILURE
Outdated or incompatible drivers can often cause the Kernel Security Check Failure error on your Windows 10 device. Updating your drivers can help resolve this issue and restore proper functionality. Here’s how you can update your drivers:
- Press Windows + X on your keyboard, then select Device Manager from the context menu.

- Expand all the sections and look for any drivers with a yellow exclamation mark, which indicates an issue.
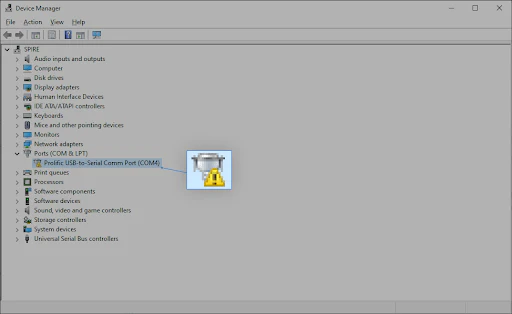
- Right-click on any driver that needs updating, then select Properties.
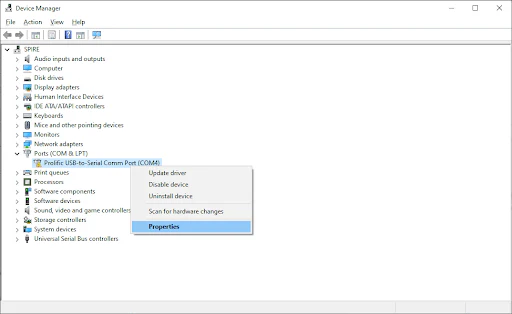
- Switch to the Driver tab and click Update Driver.
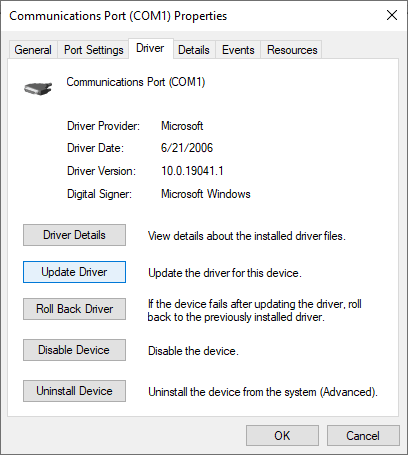
- Choose whether you want Windows to search for the latest driver automatically or manually locate a driver file on your computer.
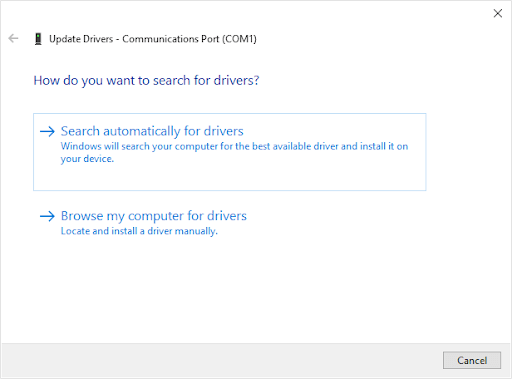
- Wait for the installation to complete, then repeat for any other outdated drivers.
After updating your drivers, restart your computer to finalize the changes. Check if the KERNEL_SECURITY_CHECK_FAILURE BSOD error is resolved. If not, proceed with the next solution.
Method 3: Check for Disk Errors to Fix KERNEL_SECURITY_CHECK_FAILURE
Disk errors can cause the Kernel Security Check Failure issue on your Windows 10 device. Fortunately, you can easily fix them using the built-in disk error checker. Follow these steps to check for and repair disk errors:
- Open File Explorer from the taskbar or by pressing Ctrl + E on your keyboard.
- Click on This PC in the left pane.
- Right-click on your system drive (usually C:) and select Properties from the context menu.
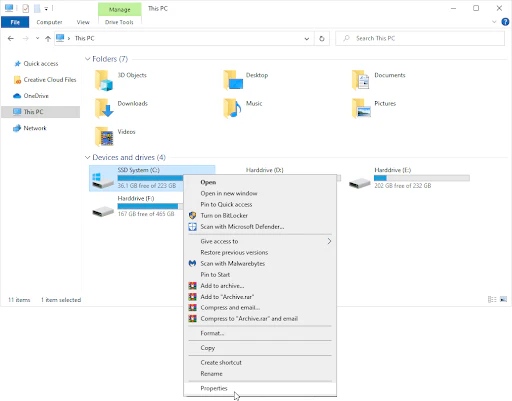
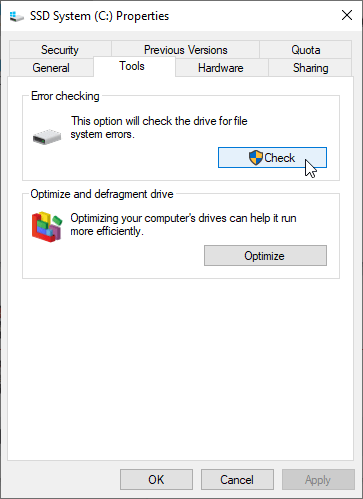
- Switch to the Tools tab and click on the Check button.
- You may be asked to grant administrator access to continue.
- Click on Scan drive to start a detailed scan of your system drive. The process may take some time, depending on your device.
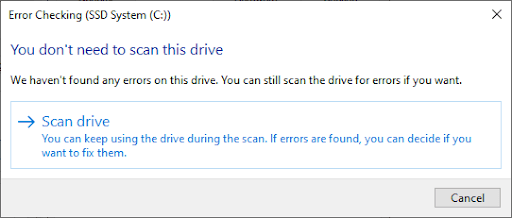
- Allow the tool to scan and fix any issues. If any errors are found, follow the on-screen instructions to repair them.
Once the process is complete, check if the Kernel Security Check Failure error has been resolved.
Method 4: Check for Memory Issues to Fix KERNEL_SECURITY_CHECK_FAILURE
Memory (RAM) issues can also contribute to the Kernel Security Check Failure error. Luckily, Windows 10 includes a built-in tool called Windows Memory Diagnostics to check for memory-related problems. Follow these steps to run the tool:
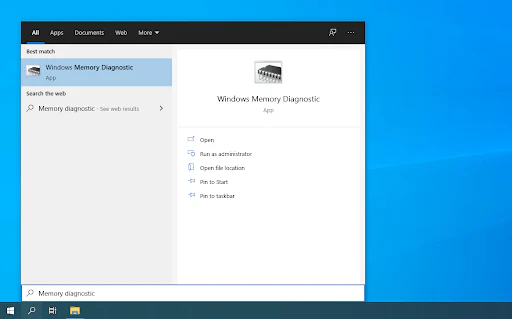
- Click the magnifying glass icon in your taskbar to open the search bar (or press Windows + S).
- Type Memory Diagnostic in the search box and click on the first search result.
- A pop-up window will appear. Make sure to save your files before proceeding.
- Select Restart now and check for problems (recommended) to begin the memory diagnostics process.
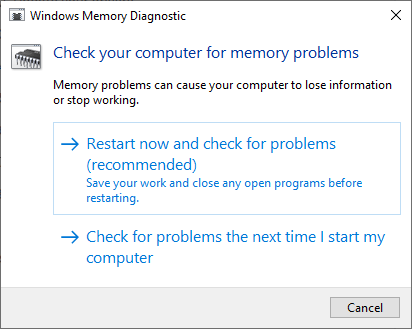
- Once your computer reboots, the Windows Memory Diagnostics tool will check for any memory issues. If any problems are found, you’ll be notified immediately.
Running this tool can help identify and resolve any memory-related problems that may be causing the blue screen error.
Method 5: Run the System File Checker (SFC) and ‘chkdsk’ Commands
The System File Checker (SFC) tool is an essential utility in Windows that automatically scans and fixes corrupted system files, which can help resolve the Kernel Security Check Failure error. If SFC doesn’t resolve the issue, you can use the Check Disk (chkdsk) command to address potential disk errors.
Follow these steps to run both tools:
- Open Command Prompt as Administrator:
- Option 1: Open the search bar in your taskbar, type “Command Prompt”, right-click the result, and select Run as Administrator.
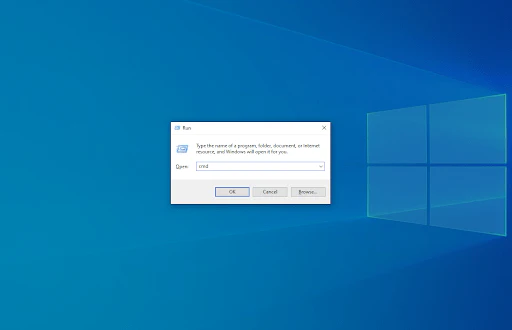
Option 2: Press Windows + R, type “cmd”, and then press Ctrl + Shift + Enter to open Command Prompt with administrative permissions.
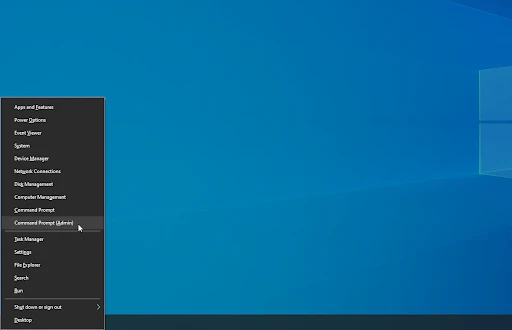
Option 3: Press Windows + X and select Command Prompt (Admin).
- Run the System File Checker:
- In the Command Prompt, type the following command and press Enter:
sfc /scannow
- In the Command Prompt, type the following command and press Enter:
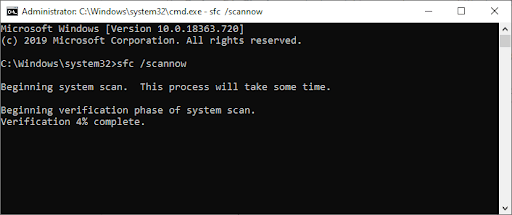
Wait for the scan to complete and repair any corrupted files. This may take some time, so don’t close Command Prompt or shut down your PC.
- Run the Check Disk Command:
- After the SFC scan completes, input the following command to check for disk errors:
chkdsk C: /f /r /x(Replace “C:” with your system drive letter if Windows is installed on a different drive.) - Press Enter to execute the command. This will check the disk for errors, attempt to fix any issues, and recover any readable information.
- After the SFC scan completes, input the following command to check for disk errors:
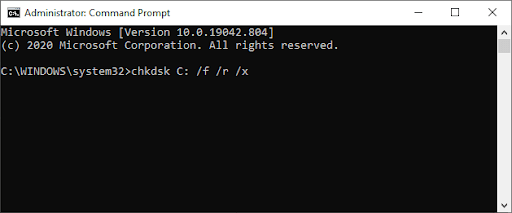
- Restart Your Device:
- After both scans finish, restart your computer to ensure the changes take effect.
These tools help repair system and disk issues that may be contributing to the Kernel Security Check Failure error.
Method 6: Use the Built-in Blue Screen Troubleshooter in Windows 10
The Blue Screen of Death (BSOD) error, including the Kernel Security Check Failure, has been a common issue in Windows for years. While it can be frustrating, Windows 10 offers a built-in troubleshooter that can help identify and fix the issue.
Here’s how to run the Blue Screen Troubleshooter:
- Open the Settings Menu:
- Click the Windows icon in the bottom-left corner of your screen to open the Start menu.
- Select Settings, or press Windows + I to open the Settings window.

- Navigate to Update & Security:
- In the Settings menu, click on the Update & Security tile.
- This section houses most of your troubleshooting tools.

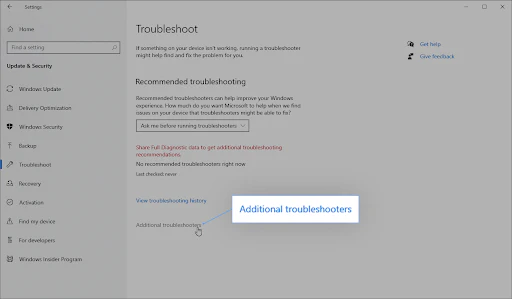
- Access Troubleshooters:
- In the left-side pane, select the Troubleshoot tab.
- You’ll see the Blue Screen troubleshooter listed here.
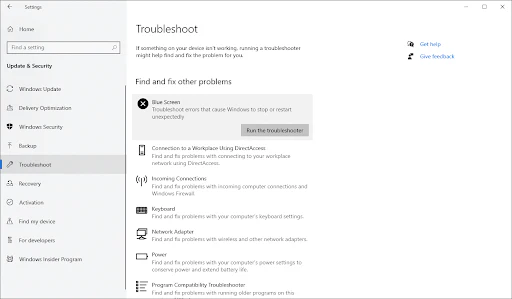
- Run the Troubleshooter:
- If you don’t see the troubleshooter, click on Additional troubleshooters and locate Blue Screen.
- Click on Run the troubleshooter and follow the on-screen instructions.
- Allow the Troubleshooter to Fix the Issue:
- The troubleshooter will attempt to diagnose the problem and apply any available fixes.
- Be aware that your device may shut down and restart during this process.
After the troubleshooter completes, check if the Kernel Security Check Failure error is resolved and if your system is working properly.
Method 7: Temporarily Disable Your Antivirus to Fix Kernel Security Check Failure
In some cases, antivirus software can interfere with your system, blocking essential apps and services from running properly. If you’re experiencing the Kernel Security Check Failure error, your antivirus might be the culprit. You can test this by temporarily disabling it.
Important: Disabling your antivirus is risky and leaves your system vulnerable. Only proceed if you understand the potential risks and have backed up your system.
Follow these steps to disable your antivirus:
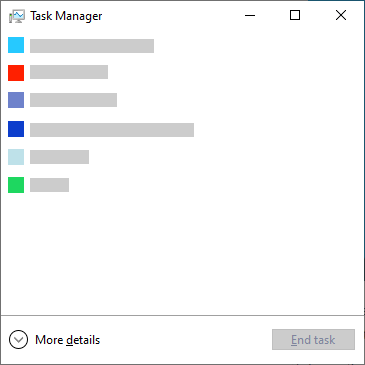
- Open Task Manager:
- Right-click on an empty space in your taskbar and choose Task Manager.
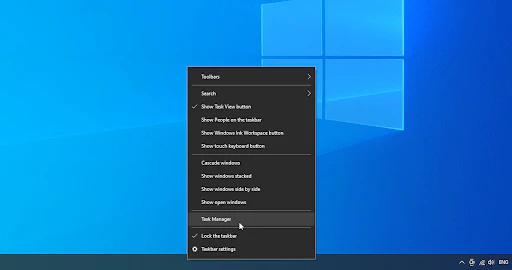
If Task Manager opens in compact mode, click on More details to expand it.
- Disable Antivirus in Startup:
- Switch to the Startup tab in Task Manager.

Find your antivirus application from the list, click on it once to select it.
Click the Disable button in the bottom-right corner to prevent it from starting up automatically when your computer boots.
- Restart Your Computer:
- Restart your computer and check if the Kernel Security Check Failure error still appears.
If you want to re-enable your antivirus, repeat these steps and click Enable instead.
Disabling your antivirus is a temporary solution, so make sure to troubleshoot further to identify the root cause of the issue.
What is the error?
A blue screen error caused by data corruption, outdated drivers, malware, or hardware issues.
What causes it?
Causes include outdated drivers, corrupted files, malware, memory issues, or faulty hardware.
How to fix it?
Update Windows, drivers, run memory diagnostic, check disk, and disable antivirus temporarily.
How to check RAM?
Use Windows Memory Diagnostic by searching and selecting “Restart now and check for problems.”
Can malware cause this?
Yes, malware can corrupt files or cause system issues leading to this error.
How to update drivers?
Go to Device Manager, find outdated drivers, right-click, and select Update Driver.
One more thing
If you’re in search of a software company that embodies integrity and upholds honest business practices, your quest ends here at Ecomkeys.com. As a Microsoft Certified Partner, we prioritize the trust and satisfaction of our customers. Our commitment to delivering reliable software products is unwavering, and our dedication to your experience extends far beyond the point of sale. At Ecomkeys.com, we provide a comprehensive 360-degree support system that accompanies you throughout your software journey. Your trust is our foundation, and we’re here to ensure that every interaction with us is a positive and trustworthy one.