Is your Windows 11 device constantly crashing? This can be incredibly frustrating, especially when you have important tasks to complete. But don’t worry—you don’t have to give up just yet! There are several actionable solutions that you can implement to fix this issue and get your Windows 11 system running smoothly again.
Windows 11 is a cutting-edge operating system that offers new features and enhanced performance for its users. However, like any software, it can experience occasional problems, including system crashes. These crashes can disrupt your workflow and productivity, making it essential to address them promptly.
In this article, we’ll discuss a range of effective methods to help you troubleshoot and resolve Windows 11 crashes—so you can get back to a seamless experience.
What Causes Windows 11 to Crash?
Before diving into the troubleshooting solutions, it’s important to understand the potential causes of Windows 11 crashes. These crashes can stem from a variety of issues, and identifying the root cause is key to finding the right fix. Here are some of the most common causes:
- Outdated drivers or incompatible hardware/software
- Insufficient RAM, hard disk space, or CPU power
- Corrupted system files or registry entries
- System overload due to too many programs running at once
- Malware or virus infections
Understanding the underlying cause of the crash will help you pinpoint the right solution more effectively. Let’s explore some actionable steps to troubleshoot and resolve Windows 11 crashes.
How to Fix Windows 11 Crashes
Now that you’re familiar with the common causes of Windows 11 crashes, it’s time to explore how to resolve them. We recommend trying these methods one by one until the issue is fixed.
1. Check for System Updates
Windows 11 is frequently updated by Microsoft to provide the latest features, security patches, and bug fixes. If your system isn’t running the latest version, it could result in crashes and other errors. System updates are often designed to address and fix potential issues that can cause crashes.
To install the latest system updates on Windows 11, follow these steps:
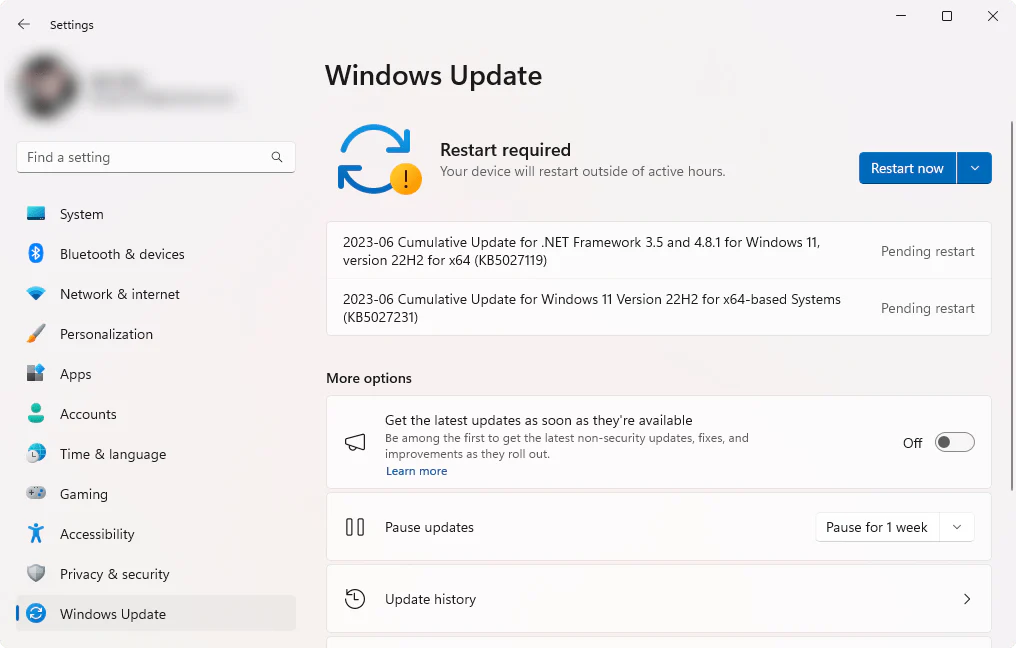
- Click on the Start button at the bottom-left corner of your screen. From the Start menu, select Settings.
- In the Settings window, locate and click on Windows Update. This will open the Windows Update settings panel.
- In the Windows Update panel, find and click the Check for updates button. This will start the search for available updates.
- If any updates are found, they will be displayed on your screen. Click the Download or Install button to begin the update process.
Regularly checking for and installing updates will help keep your Windows 11 system up to date with the latest improvements, features, and patches—ensuring a smoother and more reliable experience.
2. Update Your Device Drivers
Device drivers are essential software that allow hardware components to communicate with your Windows 11 system. Outdated or incompatible drivers can cause system instability and crashes. To ensure your device drivers are up to date in Windows 11, follow these steps:
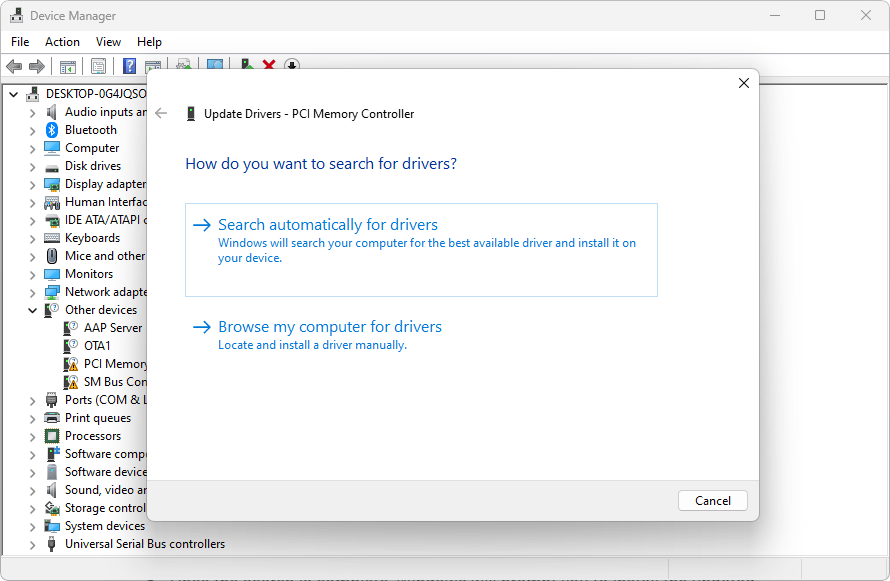
- Press the Windows key + X on your keyboard to open the WinX menu. From the list, select Device Manager.
- Once Device Manager is open, you’ll see a list of device categories. Expand each category by clicking the arrow next to it. Look for any devices marked with an exclamation mark or listed as “Unknown Device.” These indicate that the drivers for those devices are either outdated or incompatible.
- Right-click on the device needing an update and select Update driver from the context menu. This will open the driver update wizard.
- In the wizard, choose the option that says Search automatically for updated driver software. Windows 11 will search your computer and the internet for the latest drivers for that device.
- After the search is complete, Windows will prompt you to install the updated drivers. Follow the on-screen instructions to proceed with the installation.
In some cases, you may need to restart your computer for the changes to take effect. Keeping your device drivers updated ensures your system runs smoothly and avoids driver-related crashes.
3. Remove Recently Installed Software
Sometimes, recently installed software can conflict with system files, leading to crashes. This is especially true if the application isn’t compatible with Windows 11, meaning it hasn’t been updated to work properly with the system. Such software can cause system instability, particularly if it runs at startup.
To remove recently installed software from your Windows 11 system, follow these steps:
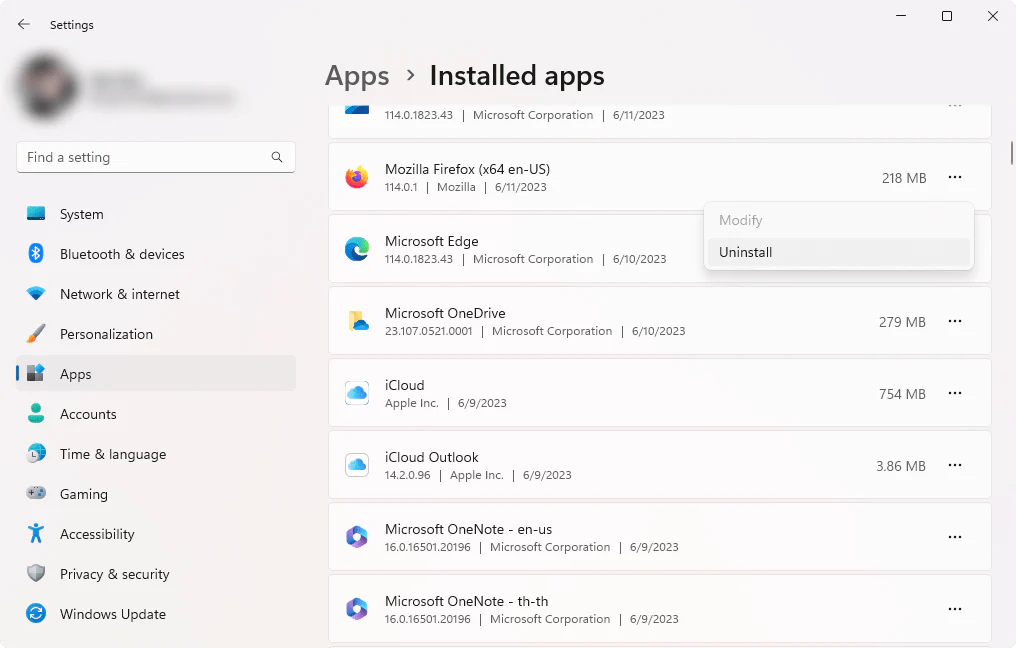
- Press the Windows key + I to open the Settings app.
- Click on the Apps option in the Settings window. From the left sidebar, select Apps & features.
- Scroll down the list of installed apps and software to locate the recently installed programs.
- Click on the software you want to uninstall, then select the Uninstall option.
- Carefully follow the prompts that appear after selecting the Uninstall option. Complete the process by following the on-screen instructions.
By removing conflicting software, you’ll prevent potential crashes and restore your system’s stability—ensuring a smooth and reliable performance.
4. Scan for Malware and Viruses
Malware or viruses can cause severe damage to your system files, leading to crashes and other errors. To ensure your system is free of malware or viruses, it’s essential to run a security scan with your preferred antivirus software.
If you don’t have a third-party antivirus app, we recommend using Windows Defender to scan your Windows 11 system. Here’s how to run a Windows Defender scan:
- Click the Start menu button or press the Windows key on your keyboard.
- Type “Windows Security” in the search bar and select Windows Security from the search results. The Windows Security app will open.
- In the Windows Security window, click on the “Virus & Threat Protection” tab located in the left-hand menu.
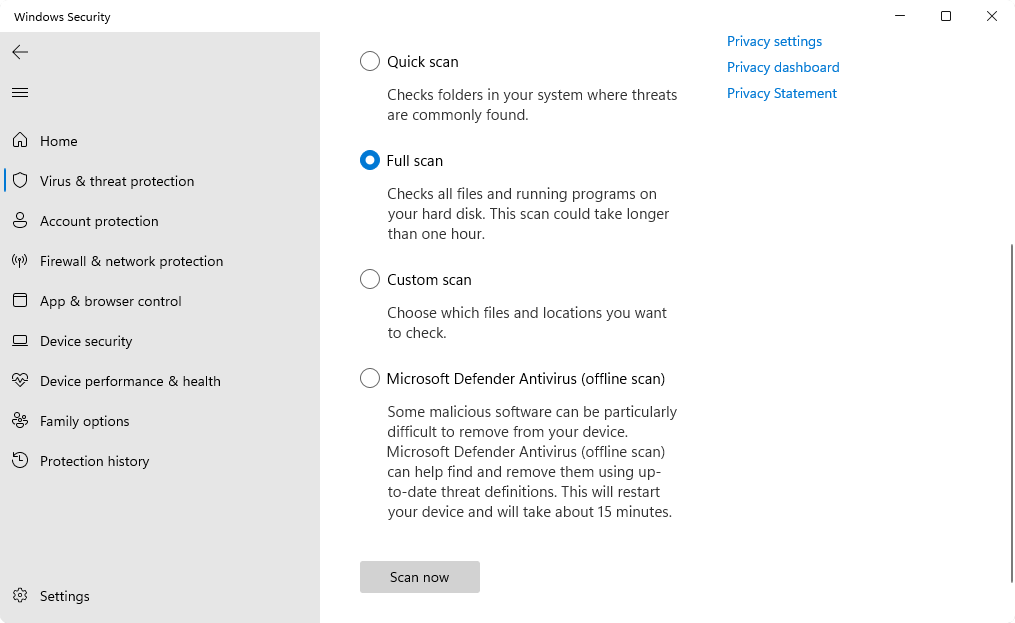
- Under the “Current threats” section, click on the “Quick scan” or “Scan options” link. This will open the Scan options window.
- Choose between a Quick scan or a Full scan:
- Quick scan: Scans the most critical areas of your computer, including running processes and commonly infected locations. It’s faster but may not detect deeply hidden malware.
- Full scan: Scans your entire system, including all files and folders. It may take longer but provides a more comprehensive scan.
- Click the “Scan now” button to begin the selected scan.
If any malware or suspicious files are detected, Windows Security will notify you and offer options for action. Follow the on-screen instructions to remove or quarantine any identified threats, ensuring your system remains safe and stable.
5. Adjust Your Power Settings
Power settings can significantly impact your system stability. For instance, if your device is set to run on a high-performance profile, it may consume more resources, potentially leading to crashes. To optimize your power settings in Windows 11, follow these steps:
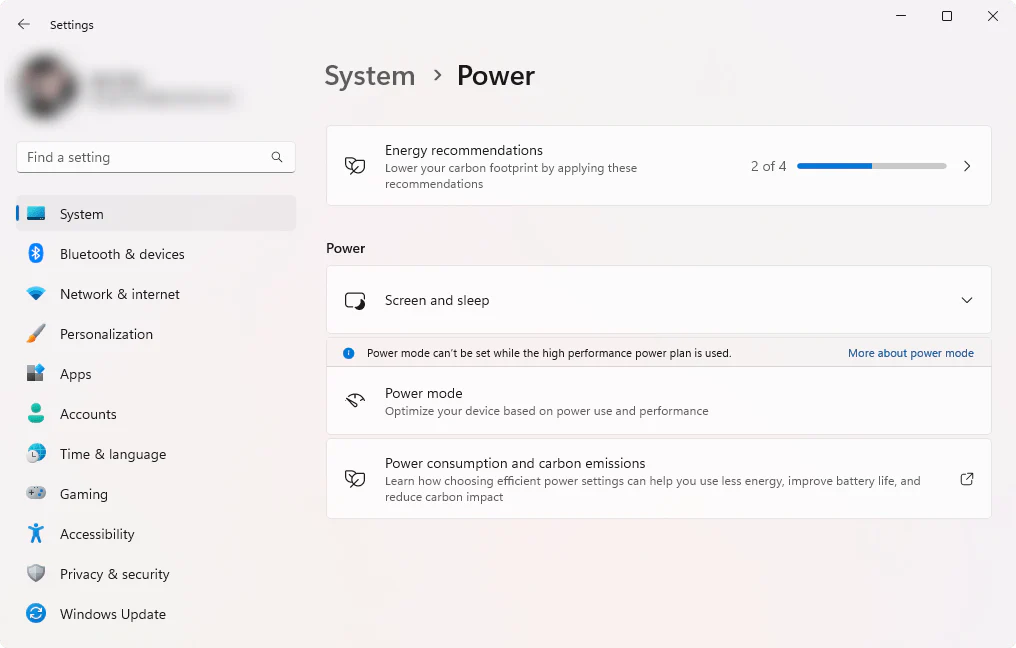
- Right-click the Start menu button or press the Windows key + X on your keyboard. From the context menu, select Power Options. A separate window will open.
- Identify the power plans listed and click on the Additional power settings link.
- In the next window, you’ll see a list of power plans. Select the High Performance plan.
- After selecting the High Performance plan, you may want to further customize certain settings to improve performance. Click on the Change plan settings link.
- The Advanced Power Settings window will open, allowing you to fine-tune specific power-related options. Make any adjustments you need, then click OK to save your settings.
Adjusting your power settings ensures that your system runs optimally without unnecessary strain on its resources, helping to prevent crashes and maintain stability.
6. Optimize Virtual Memory (VRAM)
Virtual RAM (VRAM) is used by your system when physical RAM is insufficient for running tasks. An inadequate amount of VRAM can cause crashes by preventing tasks from completing properly. To optimize VRAM in Windows 11, follow these steps:
- Right-click on the Start menu button or press the Windows key + X on your keyboard. From the context menu, select System.
- Click on the Advanced system settings link on the left-hand side. This will open the System Properties dialog box.
- Navigate to the Advanced tab and click on the Settings button under the Performance section.
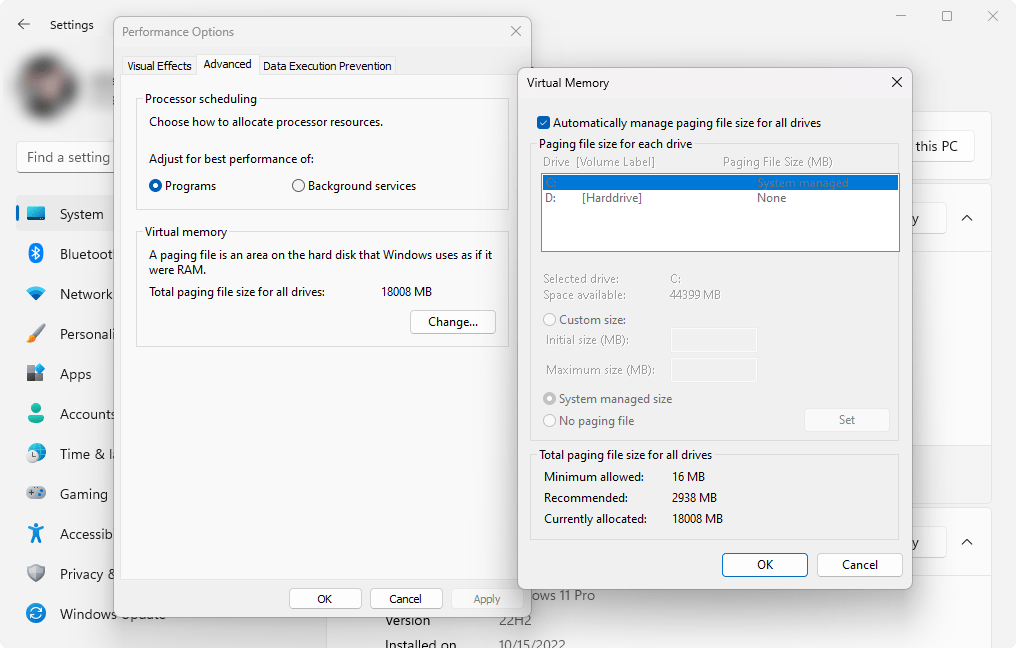
- In the Performance Options window, navigate to the Advanced tab and click on the Change button under the Virtual memory section.
- Uncheck the option that says “Automatically manage paging file size for all drives” if it’s selected.
- Select the drive where you want to modify the virtual memory. Choose either the “Custom size” or “System managed size” option:
- Custom size: Allows you to manually set the initial (MB) and maximum (MB) size for virtual memory. It’s recommended to set both the initial and maximum size to the same value to avoid frequent resizing.
- System managed size: Lets Windows automatically manage the virtual memory size based on system requirements. This option is generally suitable for most users.
- If you choose the Custom size option, enter the desired values for the initial and maximum size. It’s generally recommended to set the size larger than your physical RAM, but not excessively large. The specific values will depend on your system configuration.
- Click on the Set button to apply the changes.
After modifying the virtual memory settings, it’s advisable to restart your computer to ensure the changes take effect. Optimizing VRAM can help prevent system crashes and improve performance.
7. Run the System File Checker (SFC Scan)
The System File Checker (SFC) tool is a powerful utility used to scan and restore corrupted system files. If corrupt system files are causing your system to crash, running an SFC scan can help resolve the issue. To run an SFC scan on Windows 11, follow these steps:
- Open the search bar on your taskbar by clicking the magnifying glass icon, or press Windows + S on your keyboard as a shortcut.
- Type “Command Prompt” in the search box. When it appears in the results, right-click on it and select Run as Administrator. If you’re using a local account without administrator permissions, follow the instructions to grant admin access.
- When prompted by User Account Control (UAC), click Yes to allow the app to launch with administrative permissions.
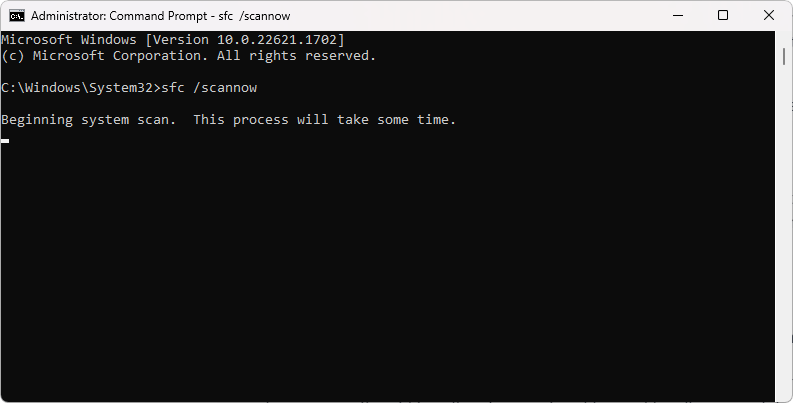
- Type the following command and press Enter to execute it:
sfc /scannow - Wait for the System File Checker to finish scanning your computer. If any discrepancies are found, the utility will restore the corrupted system files and fix any related errors.
Running an SFC scan can help resolve system crashes caused by file corruption, ensuring that your Windows 11 system runs more reliably.
8. Perform a Clean Boot
A Clean Boot is a state where only a minimal set of drivers and programs are running on your computer, which can help identify third-party applications that may be causing crashes. To perform a Clean Boot on Windows 11, follow these steps:
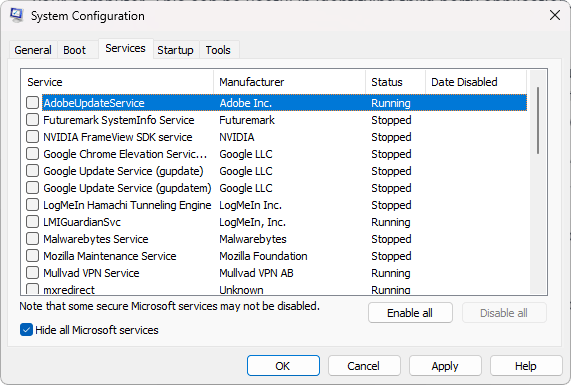
- Press Windows + R on your keyboard to open the Run utility. Type “msconfig” (without quotation marks) and press Enter. This will open the System Configuration window.
- Go to the Services tab. Check the box that says “Hide all Microsoft services.” This will ensure that only third-party services are visible.
- After hiding the Microsoft services, click the Disable all button to disable every third-party service on your device.
- Click the Apply button and restart your computer. When your system reboots, it will only initiate essential Microsoft services.
- Restart your computer again to complete the clean boot process.
After performing these steps, your computer will start with only official Microsoft services running. Check if this resolves the system crashes on Windows 11. If it does, you can gradually enable services to identify the conflicting third-party application.
9. Reset Windows 11
If none of the methods above have resolved your issue, you can consider resetting Windows 11. This will restore your system to its original state, which can help remove any corrupted files or settings causing crashes.
While resetting your system may seem like an extreme step, it can be an effective solution for fixing severe issues. However, keep in mind that this method should be used as a last resort, as it will erase all personal data and settings.
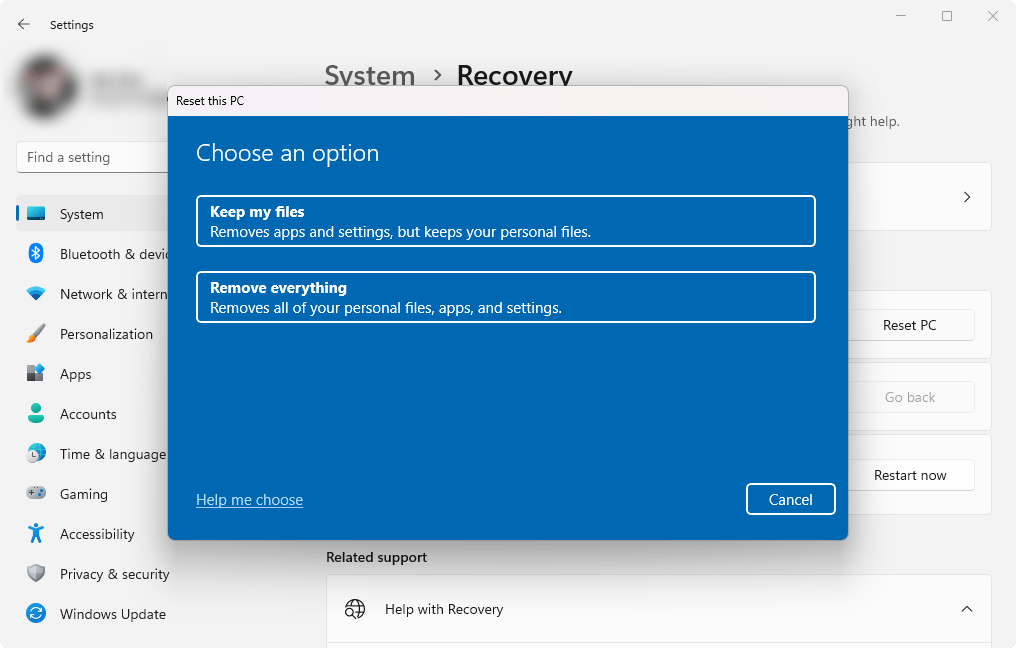
You have two options for resetting Windows 11:
- You can reinstall Windows using a bootable USB.
- Alternatively, you can reset Windows without needing a bootable DVD/USB.
Whichever method you choose, it will help you set up a fresh operating system that should function smoothly without system crashes. Make sure to back up your important files before proceeding with a reset to avoid losing any crucial data.
Why does Windows 11 keep crashing?
Windows 11 may crash due to various reasons, including outdated drivers, insufficient RAM, malware or viruses, corrupted system files, or even conflicts with recently installed software. Identifying the root cause is crucial in applying the right solution.
How do I know if my drivers are outdated?
To check if your drivers are outdated in Windows 11, open Device Manager, locate the device category, and check for any devices with a yellow exclamation mark. You can update these drivers by right-clicking on them and selecting Update driver.
How can I check for system updates in Windows 11?
To check for system updates, open Settings, go to Windows Update, and click on Check for updates. Installing the latest updates ensures that your system is running the most recent bug fixes and security patches.
What should I do if my system is infected with malware?
If you suspect your system is infected, run a malware scan using Windows Defender or another antivirus tool. To use Windows Defender, open Windows Security, go to Virus & Threat Protection, and perform a Quick scan or Full scan.
How do I perform a clean boot in Windows 11?
To perform a clean boot, press Windows + R, type msconfig, and press Enter. Disable all third-party services under the Services tab, and restart your computer. This helps identify whether third-party software is causing system crashes.
One more thing
If you’re in search of a software company that embodies integrity and upholds honest business practices, your quest ends here at Ecomkeys.com. As a Microsoft Certified Partner, we prioritize the trust and satisfaction of our customers. Our commitment to delivering reliable software products is unwavering, and our dedication to your experience extends far beyond the point of sale. At Ecomkeys.com, we provide a comprehensive 360-degree support system that accompanies you throughout your software journey. Your trust is our foundation, and we’re here to ensure that every interaction with us is a positive and trustworthy one.