If you’re facing issues with your Windows 10 Start menu not opening or freezing, you’re not alone! This article will walk you through some helpful solutions to fix it.
The Windows 10 Start menu has been a favorite feature for Windows users since Windows 98. It’s one of the most commonly used features in Windows, providing easy access to all of your apps, settings, and more.
That’s why when the Start Menu doesn’t work in Windows 10 or refuses to open, it can be frustrating to say the least.
In this article, you’ll learn:
- Why Windows 10 Start Menu is not working
- Why can’t I open my Start Menu in Windows 10?
- How do I fix a corrupted Start Menu in Windows 10?
- How do I restore the Start Menu in Windows 10?
Windows 10 Start Menu Not Working
If your Start menu in Windows 10 isn’t working, you may be facing one of several common issues. The Start Menu not working can be a frustrating problem, but don’t worry, this guide will help you troubleshoot and solve it.
Why Isn’t Start Menu Working? Common Causes of Start Menu Not Working in Windows 10
Windows 10 has been around for a while now, and many users are still encountering bugs with the Start menu. There are a few common causes that might explain why your Start Menu is malfunctioning:
- Temporary files: If one or more temporary files used by the Start menu are corrupted, missing, or outdated, the Start menu may freeze or collapse. This can be fixed by restoring these files.
- Cortana: If Cortana is enabled, its files can sometimes become corrupted or damaged, leading to Start Menu crashes.
- Bug or glitch: Certain versions of Windows 10, especially after specific updates, have bugs that can cause the Start menu to freeze. Updating to a newer version should resolve this issue.
- Windows Explorer problem: After a recent update, Windows Explorer may crash, affecting the Start Menu. Restarting Windows Explorer can help fix this error.
- Virus/Malware: Malware can corrupt Windows system files, drivers, and cause other issues that may prevent your Start Menu from functioning properly.
How to Fix Windows 10 Start Menu Not Opening
If you’re having trouble with your Windows 10 Start Menu not opening, don’t worry! There are several troubleshooting steps you can take to fix it. In this guide, we’ll discuss some of the best methods to get your Start Menu working again.
Methods to Fix Windows 10 Start Menu Not Working:
- Sign Out of Your Microsoft Account
- Restart Windows Explorer
- Check for Windows Updates
- Scan for Corrupt System Files
- Clear Cortana Temporary Files
- Uninstall or Fix Dropbox
Let’s explore each of these methods in more detail below.
Method 1. Restart the Windows Explorer Process
One of the quickest fixes for Start Menu issues is to restart the Windows Explorer process. This method is available on Windows 7, 8, and 10, and can often resolve minor glitches affecting the Start Menu.
Here’s how to restart Windows Explorer:
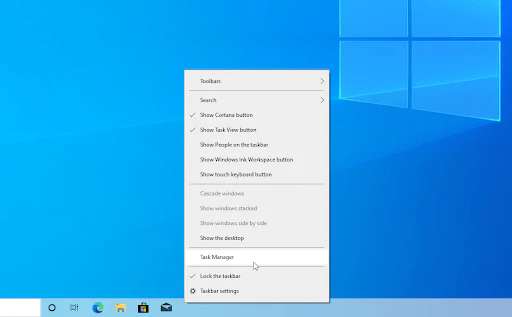
- Right-click on an empty space in your taskbar and select Task Manager from the context menu.
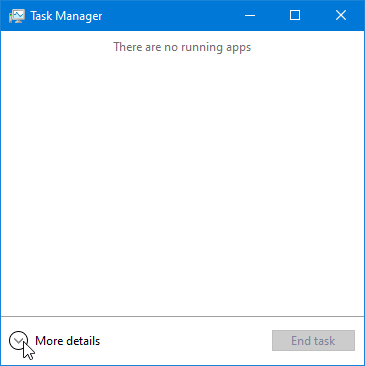
- If Task Manager opens in compact mode, click More details to expand the window.
- In the Processes tab, locate and select the Windows Explorer process.
- Click on the Restart button at the bottom-right of the window.
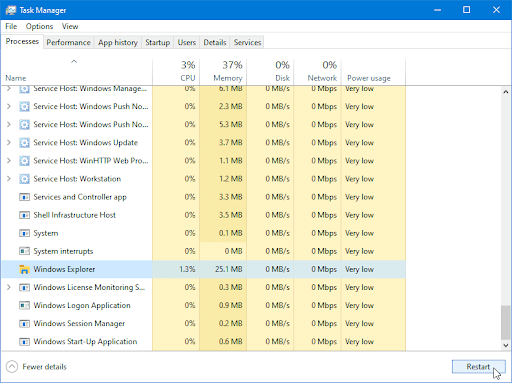
- Wait a few seconds for the Windows Explorer process to restart. You may notice your taskbar and open windows temporarily disappear as the process reboots.
Once Windows Explorer has restarted, check if your Start Menu is now functioning properly. If not, move on to the next troubleshooting method.
Method 2. Sign Out of Your Account
Sometimes, signing out of your user account can resolve issues related to the Windows 10 Start Menu not opening. If the Start Menu is severely unresponsive, there are two ways you can sign out:
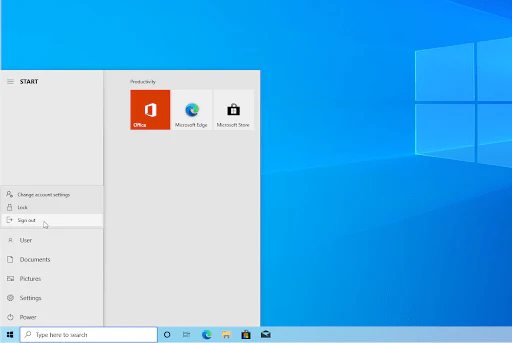
- If you can access the Start Menu:
- Open the Start Menu and click on your username.
- From the context menu, click on Sign out.
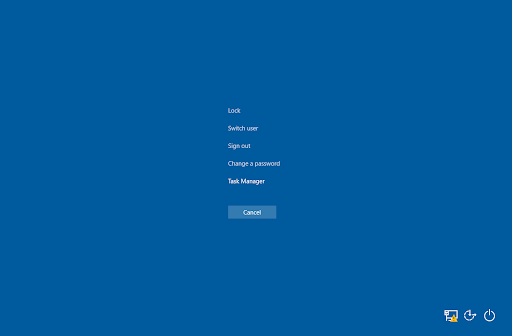
- If you can’t access the Start Menu:
- Press Ctrl + Alt + Del on your keyboard simultaneously.
- Select Sign out from the options that appear.
After signing out, sign back in and check if your Start Menu is working properly. If it still doesn’t open, move on to the next method for further troubleshooting.
Method 3. Restore Corrupt System Files
Corrupted system files can cause significant problems, including the Start Menu not opening or freezing. One of the most common reasons for this issue is file corruption. You can use built-in tools like System File Checker (SFC) and DISM to identify and repair these corrupt files.
- Run the SFC Scan: The System File Checker (SFC) is a built-in Windows tool that automatically detects and repairs corrupt system files. Here’s how you can use it:
- Open the search bar in your taskbar (click the magnifying glass icon or press Windows + S).
- Type “Command Prompt” in the search box. Right-click it and select Run as Administrator.
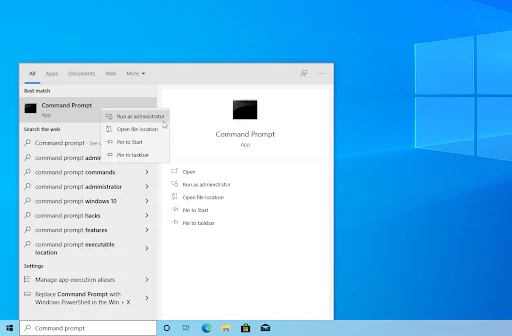
When prompted by User Account Control (UAC), click Yes to grant administrative privileges.
In the Command Prompt, type the following command and press Enter:
sfc /scannow
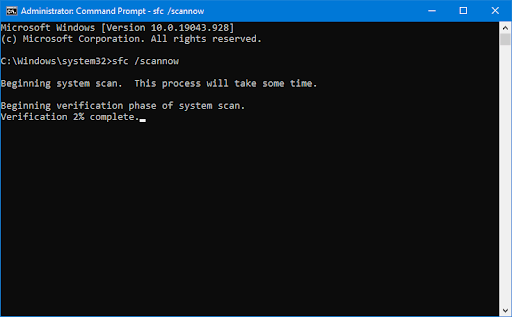
Wait for the scan to complete. If any discrepancies are found, the utility will repair them.
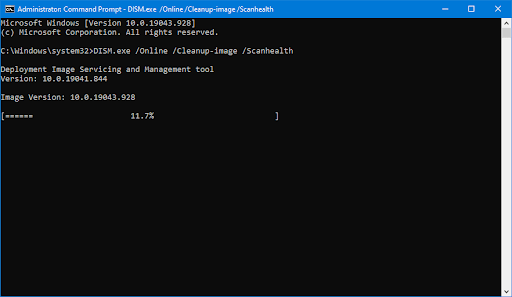
- Run the DISM Scan: After running the SFC scan, it’s a good idea to run DISM (Deployment Image Servicing and Management) for a deeper scan of your system:
- In the Command Prompt, type the following command and press Enter:
DISM.exe /Online /Cleanup-image /Scanhealth
- In the Command Prompt, type the following command and press Enter:
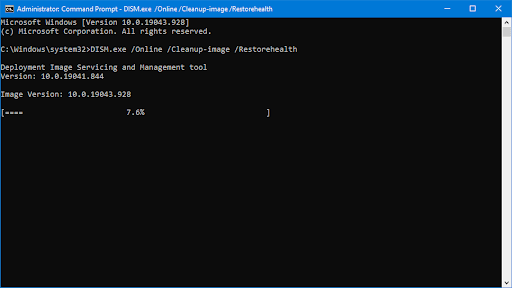
Wait for the scan to complete. If issues are found, execute this command to fix them:
DISM.exe /Online /Cleanup-image /Restorehealth
Wait for the process to finish, then restart your computer.
The SFC and DISM scans may take some time, depending on your system. Even if no errors are found, many users have reported an improvement in PC functionality after running these scans.
Method 4. Clear Temporary Cortana Files
If your Windows Start menu is malfunctioning, it could be related to Cortana. Temporary files created by Cortana can slow down your system, especially when you open the Start menu. Clearing these temporary Cortana files can help fix the issue and speed up your device.
Here’s how to do it:
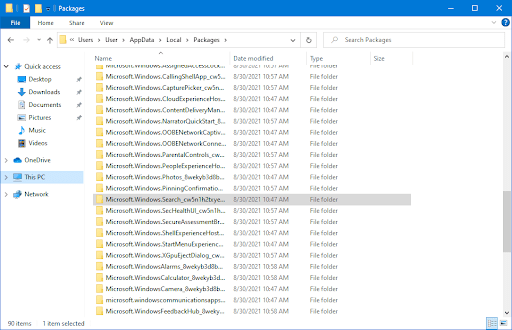
- Navigate to the Cortana Folder:
- Open File Explorer and go to the following directory:
C:\Users\User\Local\Packages\Microsoft.Windows.Search_cw5n1h2txyewy.
If you can’t find this folder, try looking for the Microsoft.Windows.Cortana folder instead.
- Open File Explorer and go to the following directory:
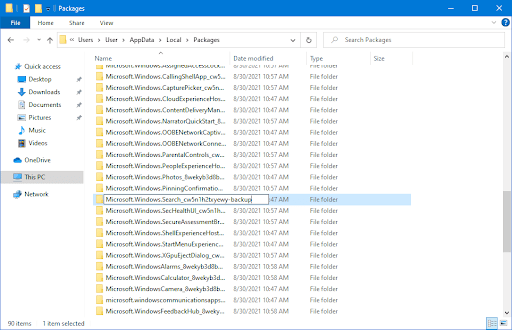
- Rename the Folder:
- Right-click on the folder and choose Rename from the context menu.
- Add
-backupat the end of the folder name to create a backup of your current Cortana files.
- Use PowerShell to Reset Cortana:
- Open the search bar in your taskbar (click the magnifying glass icon or press Windows + S).
- Type PowerShell in the search box. Right-click it and select Run as Administrator.
When prompted by User Account Control (UAC), click Yes to grant administrative permissions.
In the PowerShell window, type the following command and press Enter:
Add-AppxPackage -Path “C:\Windows\SystemApps\Microsoft.Windows.Cortana_cw5n1h2txyewy\Appxmanifest.xml” -DisableDevelopmentMode -Register
After performing these steps, your Cortana files should be cleared and reset. If the Start menu still doesn’t work, continue exploring other solutions to restore this important feature of your Windows 10 system.
Method 5. Use PowerShell
If you’re still facing issues with the Windows 10 Start menu, you can use PowerShell to execute a command that may fix the problem directly.
Here’s how you can use PowerShell to fix your Start menu:
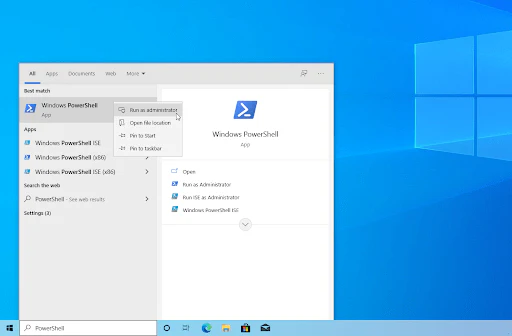
- Open PowerShell:
- Click on the search bar in your taskbar (the magnifying glass icon) or press Windows + S to open it.
- Type PowerShell in the search box. Once it appears in the results, right-click it and select Run as Administrator.
- If prompted by User Account Control (UAC), click Yes to grant administrative privileges.
- Execute the PowerShell Command:
- In the PowerShell window, type or copy and paste the following command, and then press Enter:
Get-AppXPackage -AllUsers | Foreach {Add-AppxPackage -DisableDevelopmentMode -Register "$($_.InstallLocation)\AppXManifest.xml"}
- In the PowerShell window, type or copy and paste the following command, and then press Enter:
- Restart Your Device:
- After executing the command, try using your Start menu again. It may require a restart for the changes to take effect.
This command re-registers all the built-in Windows apps that are associated with the Start menu and could resolve the freezing or failure to open. If the issue persists, try the other methods outlined to restore the Start menu functionality.
Method 6. Make an Edit in the Registry
The Windows Registry is an advanced tool used to tweak system settings. It allows you to fix errors like the Start menu not opening or working. However, modifying the Registry is not for everyone, and small mistakes can cause significant issues with your system. It’s recommended to backup the Registry before making any changes.
If you’re comfortable with editing the Registry, follow these steps to resolve Start menu issues:
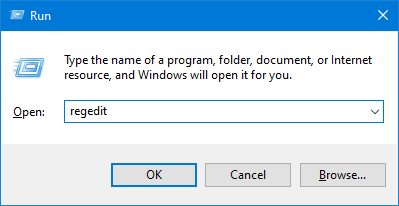
- Open the Run Utility:
- Press Windows + R on your keyboard to bring up the Run dialog box.
- Launch the Registry Editor:
- Type regedit (without quotes) and press Enter to open the Registry Editor.
- Navigate to the Registry Key:
- In the Registry Editor, use the Navigation Pane on the left side to reach the following path:
HKEY_LOCAL_MACHINE\SYSTEM\CurrentControlSet\Services\WpnUserService - Alternatively, you can copy and paste the file’s location into the address bar.
- In the Registry Editor, use the Navigation Pane on the left side to reach the following path:
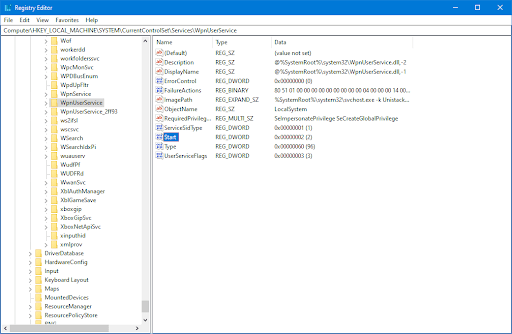
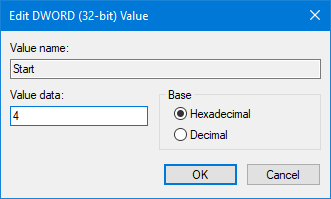
- Modify the Registry Entry:
- Locate the registry entry named Start.
- Double-click on it to open its properties.
- In the Value data field, change the value to 4.
- Click OK to confirm the change.
- Exit the Registry Editor:
- After making the change, click on the X in the top-right corner to close the Registry Editor.
- Restart Your Device:
- Restart your computer and check if the Start menu now works.
This method involves directly editing the Registry, so be sure you’re comfortable with this process. If you’re unsure or uncomfortable, it may be better to avoid this step or consult with an expert.
Method 7. Reset or Reinstall Windows 10
If none of the previous methods worked to fix your Start menu issue, the last resort might be to reset or reinstall Windows 10. This can give your system a fresh start, but it may also involve data loss if you choose to completely reinstall it. Here’s how you can proceed:
Option 1: Reset Windows 10
- Open Settings:
- Click on the Start menu and select Settings (gear icon), or press Windows + I.
- Navigate to Reset:
- Go to Update & Security > Recovery.
- Start the Reset Process:
- Under Reset this PC, click on Get started.
- Choose the Reset Option:
- You’ll be prompted to either:
- Keep my files: This will remove apps and settings but keep personal files.
- Remove everything: This will delete all files, apps, and settings.
- You’ll be prompted to either:
- Complete the Process:
- Follow the on-screen instructions to complete the reset process. The system will restart and attempt to repair the issues.
Option 2: Reinstall Windows 10
- Create a Bootable USB:
- You can follow the official Microsoft guide to create a bootable USB drive with Windows 10.
- Reinstall Windows:
- Insert the bootable USB and restart your computer.
- Boot from the USB drive and follow the on-screen instructions to reinstall Windows 10.
- Choose Install Options:
- You can choose whether to install Windows 10 fresh or repair the existing installation. If you choose to reinstall, you’ll need to select whether you want to keep or delete personal files.
Important Notes:
- Backup your files: Before performing a reset or reinstall, make sure to back up any important data to avoid losing it.
- Reinstall apps: After resetting or reinstalling, you may need to reinstall apps and reconfigure your system settings.
If you’re unsure about the process or want to preserve your data, a reset is generally safer than a full reinstall. You can check out Microsoft’s official support page for more detailed instructions on the reset and reinstall process.
One more thing
If you’re in search of a software company that embodies integrity and upholds honest business practices, your quest ends here at Ecomkeys.com. As a Microsoft Certified Partner, we prioritize the trust and satisfaction of our customers. Our commitment to delivering reliable software products is unwavering, and our dedication to your experience extends far beyond the point of sale. At Ecomkeys.com, we provide a comprehensive 360-degree support system that accompanies you throughout your software journey. Your trust is our foundation, and we’re here to ensure that every interaction with us is a positive and trustworthy one.